Abstract
Ok, you've just downloaded the latest version of Hydrogen and have it installed successfully. Now you want to test it while creating your favourite song, this might help you to learn it, writing down a few difficult parts in order to play them over and over again or to be sure that in future a quick glance at the songfile will bring up immediately to mind the song. Hydrogen can be used also as an advanced “click” machine that can help you practicing (in speed, precision and rudiments), maybe with a custom pattern designed by yourself. This short introduction will guide you creating a a complete song, we will work on "Georgy Porgy" of Toto which has a quite straight structure therefore is appropriate for a guide but this doenst mean the song is _actually_ easy to write down since the drummer (Jeff Porcaro) enriches the groove with his personal touch and fantasy; Hydrogen will not play better than the drummer who is working on the song, most of the task must be accomplished by the programmer's sensibility and experience.
Table of Contents
Table of Contents
Before starting make sure you have a few things:
The song to study on: either an audio-cd or (better) an .ogg or .mp3 for optimal flexibility.
Optionally a rough layout of the song on paper: it may be useful to count bars and different parts of the song that eventually wii get into Hydrogen.
The song we will work on has the following structure:
Intro: 4 bars
Verse: 8 bars
Bridge: 8 bars
Verse: 8 bars
Bridge: 8 bars
Chorus: 8 bars
Riff: 4 bars
Verse (with guitar): 8 bars
Verse (with voice): 8 bars
Bridge: 8 bars
Chorus: 8 bars
Chorus: 8 bars
Chorus: 8 bars
Final Riff: 4 bars
Looking at this scheme we can see that some pattern repeats, so we'll use this symbols in Hydrogen's Song Editor:
Verse -> A
Bridge -> B
Chorus -> C
And to save up words on explainations we'll use two common TLA (Three Letters Acronym ^_^):
LMB: left mouse button
RMB: right mouse button
Well, now unplug your phone and launch Hydrogen from the shell: let's get to work!
The base pattern (Fig. 1 and 2) is 4 bars long (divided in 2 different bars, each repeated 2 times, so it's [2a*2]+[2b*2]) and lasts for the whole song, from the beginning to the end, riff included; most of the time (intro and riff excluded) this base pattern is repeated 2 times to reach the commonly used 8 bars for each part of the song (A,B,C). Before starting let's set the speed to 98bpm (HINT HINT you can find out by yourself the speed of the song while playing it with your favourite media player and following the rhythm by clicking repeatedly the backslash key in Hydrogen) and from the menu “Grid Resolution” let's set '16'. To create a new pattern select the instrument “Closed HH”, click on RMB and choose “Fill Notes”: the first two bars will be filled up. Then insert manually the beats on Snare Jazz and Kick as indicated in the 2 pictures below and there we have the base pattern for our song. Note how the beats on the hi-hat have different 'hardness': beats falling on the beginning of the bar are set at [0.78], the others at [0.50] (you can check that on the lower stat bar of Hydrogen), in order to give groove the song.

Fig. 1 Base pattern, first bar.
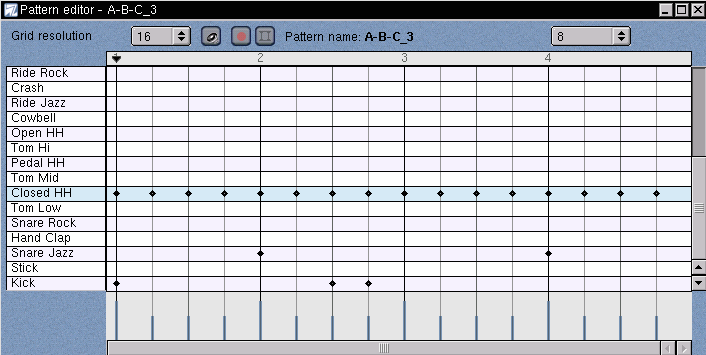
Fig. 2 Base pattern, second bar.
Before we start writing down verses there are 4 intro bars, all equals to each other, except for the last one which at the end has an open hi-hat. We should do then:
Rename the first pattern in the Song Editor with RMB click on the name “Empty Pattern” and change it to “intro_a”, for example.
Add two 'X' near the first one (which represent the second and the third bar)
Create in Pattern Editor the base pattern (Fig. 1)
For the fourth bar we'll instead open the hi-hat (Fig. 3):
RMB in Song Editor on the newly created pattern, choose “copy”, then choose a name (ex. “intro_b”) and automagically you will have a new one right under.
Select the pattern you've just created (IMPORTANT!)
Delete the last 2 beats of “Closed HH” and move them on “Open HH”.
Select '32' from “Grid Resolution” and add another 2 beats right near the previous ones.
Adjust the hardness of these 4 beats so that the first is [0.78] while the other 3 [0.20] to simulate a longer opening.
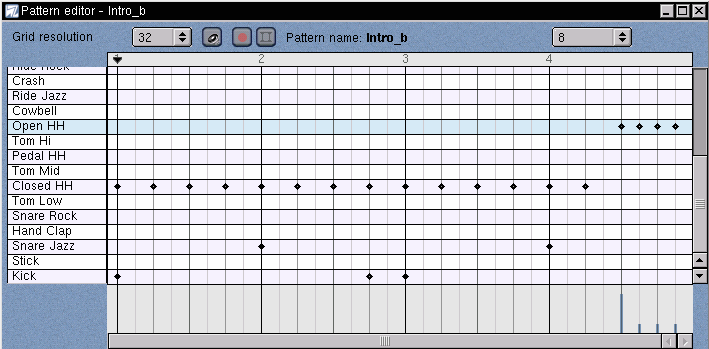
Fig. 3 Intro detail, fourth bar.
Since we have written the base pattern, now we should already know the basis. To create the first verse we just have to copy from the Song Editor the pattern “intro_a” and rename, say, to “A-B-C_1”, because it is the first bar of the verse that eventually will also fit for the bridge (B) and the chorus (C). Pay attention, why can't we just add 2 more 'X' next to this pattern? Because in the first bar there is a “Crash” beat which ends the previous intro, therefore the two bars are not completely equal; you have to copy the pattern “A-B-C_1” and rename it to “A-B-C_2”, cutting the “Crash” beat cited before.
Same thing for the following 2 bars: just copy into the Song Editor the pattern in Fig. 2, rename it according to the previous ones and add two 'X' (because they're identical), you should reach number '8' as shown in Fig. 4.
The 4 remaining bars of the verse are more or less the same of what we've just written, so why redo everything from scratch? Bars number 5,6,7 are virtually identical to the previous ones so we just have to add 2 crosses to pattern “A-B-C_2” and one to “A-B-C_3+4” taking care of renaming the patterns logically (so to understand how the song moves around the Song Editor), while in the eighth bar there is a fill which closes the verse. We have to copy+paste in a new line a pattern already written (ex. “A-B-C_3+4”), rename it to “A-B-C_8” and modify it as in Fig. 4. Note how in this case too the three “Snare Jazz” beats on fourth bar have hardness properly tuned with [0.10], [0.20] and [0.78]; you can't see it in the picture but also the two final beats of “Tom Mid” are both 'touched' to [0.50], after all it's only just a small fill, better not beat hard on the drums :)
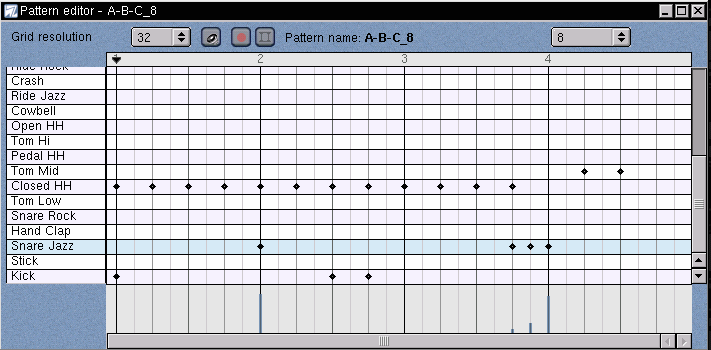
Fig. 4 Eighth bar of the first verse.
The result in the Song Editor should be something like Fig. 5.
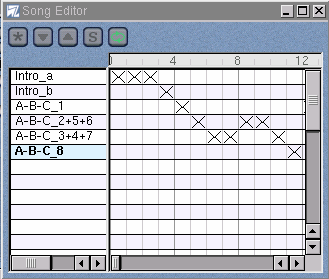
Fig. 5 Intro and first verse in the Song Editor.
WARNING! if you reached this point without saving your work, NOW is the good time to do that. A simple [CTRL+S] followed by the name of the songfile and you'll be ok. If you want to add some more infos, LMB on 'S' button of the Song Editor and change the fields as you like: these infos will be shown upon opening of the file.
Now that we're done with the first verse you should have an idea of how the whole thing works: the first bridge is made of the same 8 bars (4+4) with a slight change at the end of the fourth, which forces us to create a 'custom' fourth bar while the others are easily added with our friendly little cross ('X').
Let's take the latest pattern created as sample (“A-B-C_8”), let's copy and rename it to “Bridge1_4” (i.e. fourth bar of first bridge) and modify it as in Fig. 6. We have quickly completed the bridge! The Song Editor now should appear as follows in Fig. 7. Looking closely one should ask why the fifth bar of the bridge (17th bar of the whole song) isnt assigned to the pattern “A-B-C_1”; the answer is that the pattern has also a “Crash” which is not present in “A-B-C_2+5+6”.

Fig. 6 Fourth bar of the first bridge.
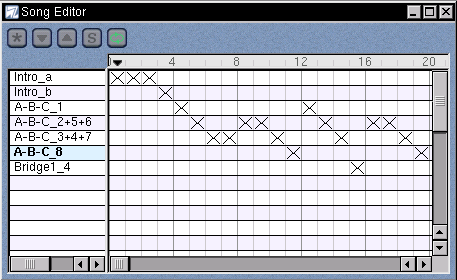
Fig. 7 The Song Editor with the first bridge.
Now we can build up quickly the remaining parts of the song: after this bridge there is another verse, then a bridge and a chorus, which are mostly the same so we just need to create different pattern in a few cases (along with this guide you will find the song file with the whole song). Of course one can write as many lines in the Song Editor as the bars in the song but a whole song would become difficult to follow, plus the songfile would be bigger.
Around half song there are two riffs: each one is 2 bars long but actually the pattern is the same, just the other instruments play something that we will see in the last riff of this song (where drums too play the pattern of the riff).
In this riff the drums play the same pattern we already know for one bar (see Fig. 1) while in the second bar only beats two times (Fig. 8), then the pattern again and then again two beats with a small final fill (Fig. 9); again the open hi-hat is done with beats of different intensity: [0.78] and [0.20].
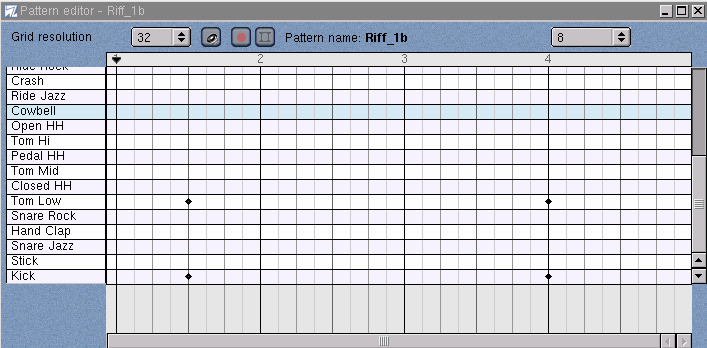
Fig. 8 Second bar of the riff.

Fig. 9 Fourth bar of the riff.
After the riff we have half job done. We just have to write down two verses, one bridge, a chorus repeated 3 times and the same riff at the end.
The second part of the song is slightly different from the previous one because we have a few hi-hat opening during the verses and every 4 bars there's a small fill almost everytime: it's easier to start from scratch a new set of pattern (i.e. “A-B-C-*”) in the Song Editor copying them with a suffix like '_hh' to show the presence of the “Open HH”. As noted in the introduction of this guide, Jeff Porcaro puts much of his skills playing the song and this makes the difference between a song played from a raw and "cold" transcription on paper (or on Hydrogen): therefore the following parts of the song will try to be faithful to the original piece, but another 'ear' could give another written layout of the same part: after all this doesnt matter so much since we are showing how a program works, not to play like Porcaro :)
In Fig. 10 here is how is the section in the Song Editor of the two verses and the bridge following the first riff; as you can see the first bars (48-50 according to the Song Editor's enumeration) are already written before while the others (51-71) are new. Moreover there a few pattern 'ad hoc' identified by “A-B-C-3a_hh” (Fig. 11 to see an example) and “A-B-C-4a_hh” since both have a few changes not present in any pattern written up to now.
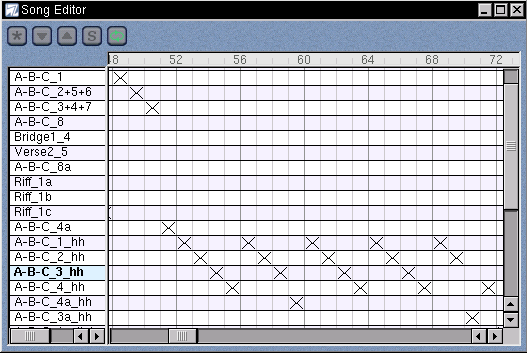
Fig. 10 Third and fourth bars in the Song Editor.

Fig. 11 Seventh bar of the third bridge.
After the third bridge we repeat the chorus: the first time the “Stick” is used instead of the “Snare Jazz” and we don't play the “Kick” (even if it may sound the opposite since the bass guitar does play here, so we have put the same the kick beats softly at [0.50]), while the second and third time the chorus goes on there are a few bars different, as shown from patterns “C3_*”. In Fig. 12 the pattern “C3_6+7 & C4_3” (slightly different ...) which criptycally identify the sixth and seventh bar of the third chorus AND the third bar of the fourth chorus: if you think this is confusing, you may find out your own method :-)

Fig. 12 Pattern “C3_6+7 & C4_3”.
The song ends repeating a slightly different riff we have met before: the first 2 bars are the same (i.e. pattern + 2 beats), while the in third bar the drum plays actually with the other instruments (Fig. 13) to finally end as always.

Fig. 13 The final riff.
And this is the end. The goal of this little tutorial is giving a quick overview of the most common functions of Hydrogen: this piece of software can also run for other purposes, like an advanced 'click' played with the drum, or to loop playing some part of a song difficult to catch; however, as in other things, analyzing the song itself helps the comprehension and here too, Hydrogen can be helpful reducing the time needed to write down a pattern and tune it.
For comments, suggestions, corrections, you can use the Hydrogen mailing lists (hydrogen.sf.net)