2021-03-04
Abstract
Hydrogen is a software synthesizer which can be used alone, emulating a drum machine based on patterns, or via an external MIDI keyboard/sequencer software. Hydrogen runs on Linux, Mac OS X and Windows.
Table of Contents
List of Figures
- 4.1. The Main UI in Single Pane mode
- 4.2. The Main UI in Tabbed mode
- 5.1. The General Tab
- 5.2. The Audio System Tab
- 5.3. The MIDI System Tab
- 5.4. The OSC Tab
- 5.5. The Appearance Tab
- 6.1. The Main Menu
- 6.2. Import Drumkit
- 6.3. The Audio Engine View
- 7.1. The Main Toolbar
- 8.1. The Song Editor
- 8.2. The Pattern Options menu
- 8.3. The Dialog to Change the Pattern Properties
- 8.4. Dialog Window for Adding Tags
- 8.5. The Automation Path Widget
- 9.1. Pattern Editor in Drum Mode
- 9.2. Pattern Editor Controls
- 9.3. The Sidebar of the Pattern Editor
- 9.4. Pattern Editor in Drum Mode
- 9.5. The Note Properties Ruler set to Velocity
- 9.6. The Note Properties Ruler showing the NoteKey Property
- 9.7. Pattern Editor in Piano Mode
- 10.1. The Soundlibrary
- 11.1. The Instrument editor General view
- 11.2. The Instrument Editor Layers View
- 11.3. The Layer Section of the Instrument Editor
- 12.1. The Sample Editor
- 12.2. The Wave Display Section of the Sample Editor
- 12.3. The Pitch Shifting Section of the Playlist Editor
- 12.4. The Envelope Section of the Sample Editor
- 13.1. The Mixer
- 13.2. The Instrument Channel Strip in the Mixer
- 13.3. The Component Channel Strip in the Mixer
- 13.4. The FX Rack in the Mixer
- 13.5. Select an Effect
- 13.6. The Master Fader Strip in the Mixer
- 14.1. The Director
- 15.1. The Playlist Editor with Demo Songs loaded
- 16.1. MIDI Actions are set in MIDI System tab of the Preferences Dialog
- 18.1. The Pattern Editor
- 18.2. Inserting Patterns in the Song Sequence
- 18.3. The Mixer
- 44. Visualization of the Interaction of the Different Pan Parameters
List of Tables
- 4.1. MIDI Mapping
- 17.1. All OSC Messages
- 21.1. Shortcut Table
Table of Contents
You can download Hydrogen from http://www.hydrogen-music.org. On the Downloads page you can find several binaries (installers) for MacOS and Windows.
Due to the variety of distributions we do not provide packages for Linux. If you do not find Hydrogen in the repository of your distribution, please ask the people behind it to include Hydrogen.
![[Warning]](img/admonitions/warning.svg) | Warning |
|---|---|
From MacOS Big Sur onwards you may require some extra steps to run Hydrogen on you computer. This page of the Hydrogen Wiki will guide you through this process step by step. |
![[Tip]](img/admonitions/tip.svg) | Tip |
|---|---|
The instructions provided in this section are for Linux only. If you intend to build Hydrogen on macOS, check out the corresponding wiki page for tips or guides. |
If you want to compile Hydrogen yourself, you can download the latest source files directly from our git repository with
$ git clone git://github.com/hydrogen-music/hydrogen.git
A certain release can be fetched with
$ git checkout tags/1.0.0
Compiling Hydrogen depends on the following libraries (among others):
Qt 5: at http://www.qt.io
libsndfile: at http://www.mega-nerd.com/libsndfile/
ALSA: (>= 1.x) at http://www.alsa-project.org (only if you wish to use ALSA as audio driver)
Jack Audio Connection Kit (>= 0.80): at http://jackaudio.org/ (only if you wish to use JACK as audio driver)
PortAudio: at http://www.portaudio.com (only if you wish to use PortAudio as audio driver)
PulseAudio: at http://www.pulseaudio.org (only if you wish to use PulseAudio as audio driver)
Flac: at http://flac.sf.net (only if you wish to use Flac samples)
LADSPA: at http://www.ladspa.org (only if you wish to use LADSPA effects)
liblrdf: at http://sf.net/projects/lrdf (only if you wish to use lrdf to categorise effects)
LASH: at http://lash.nongnu.org (only if you wish to use LASH)
liblo: at http://liblo.sourceforge.net/ for OSC and NSM support
Please install them with your distribution's package manager. If you're running a Debian-based system, you can install the libraries with:
$ apt-get install qtbase5-dev qtbase5-dev-tools           \
    qttools5-dev qttools5-dev-tools libqt5xmlpatterns5-dev  \
    libarchive-dev libsndfile1-dev libasound2-dev liblo-dev \
    libpulse-dev libcppunit-dev liblrdf-dev                 \
    liblash-compat-dev librubberband-dev libjack-jackd2-dev
Compiling with cmake can be done easily by using the build.sh script. Go to the directory where the git repository
was cloned and run the build.sh script without any arguments to display the help :
$ ./build.sh
The help is now displayed (and is self-explanatory) :
   r[m]     => all built, temp and cache files
   c[lean]  => remove cache files
   m[ake]   => launch the build process
   mm       => launch the build process using ccache
   mt       => launch the build process with clang tidy checks enabled
   d[oc]    => build html documentation
   g[raph]  => draw a dependencies graph
   h[elp]   => show the build options
   x|exec   => execute hydrogen
   t[ests]  => execute tests
   p[kg]    => build source package
   z        => build using ccache and run from tree
To build Hydrogen and execute the result, run the build script with the m option
$ ./build.sh m x
and to install it permanently on your computer, change into the build folder and use the make command.
$cd build$sudo make install
![[Note]](img/admonitions/note.svg) | Note |
|---|---|
For further details about the installation process please have a look the |
The Hydrogen user interface is designed so that it can be used entirely with the mouse, with the exception of text entry.
Most actions are performed with the left mouse button, and implement what should be the most obvious behaviour for any control. The right mouse button may sometimes perform an alternate action, or bring up a context menu. Some common controls also have alternate actions accessed by clicking while holding a modifier key:
Ctrl + left click : restore default value of knob or fader
Shift + left click : bind MIDI event to MIDI-learnable widget (see Section 16.2)
Some controls will also respond to scroll wheel events for convenience.
The keyboard can also be used for navigating and editing in the Pattern and Song Editors, using a combination of
↑|↓|←|→ : move the keyboard input cursor's position, or adjust values under the cursor.
Shift + ↑|↓|←|→ : can be used to make selections of notes or pattern groups as if the mouse had been dragged over them.
Enter and Return : generally performs the same action as a mouse click, but can also start or end a move (or copy) of items in the same way a mouse drag would.
Tab and Shift + Tab : move between the Pattern, Song and Note Property Editor.
Delete : delete notes or patterns.
Esc : cancels an ongoing selection, move or copy.
| Note |
|---|---|
The keyboard input cursor is hidden from view until one of the above keys is pressed. This keeps the display clear and uncluttered when using the mouse. You can alter this default behavior in the General tab of the Preferences. |
Most other keys on the keyboard can be used to play samples and enter notes in the same way a MIDI keyboard can be.
Table of Contents
Table of Contents
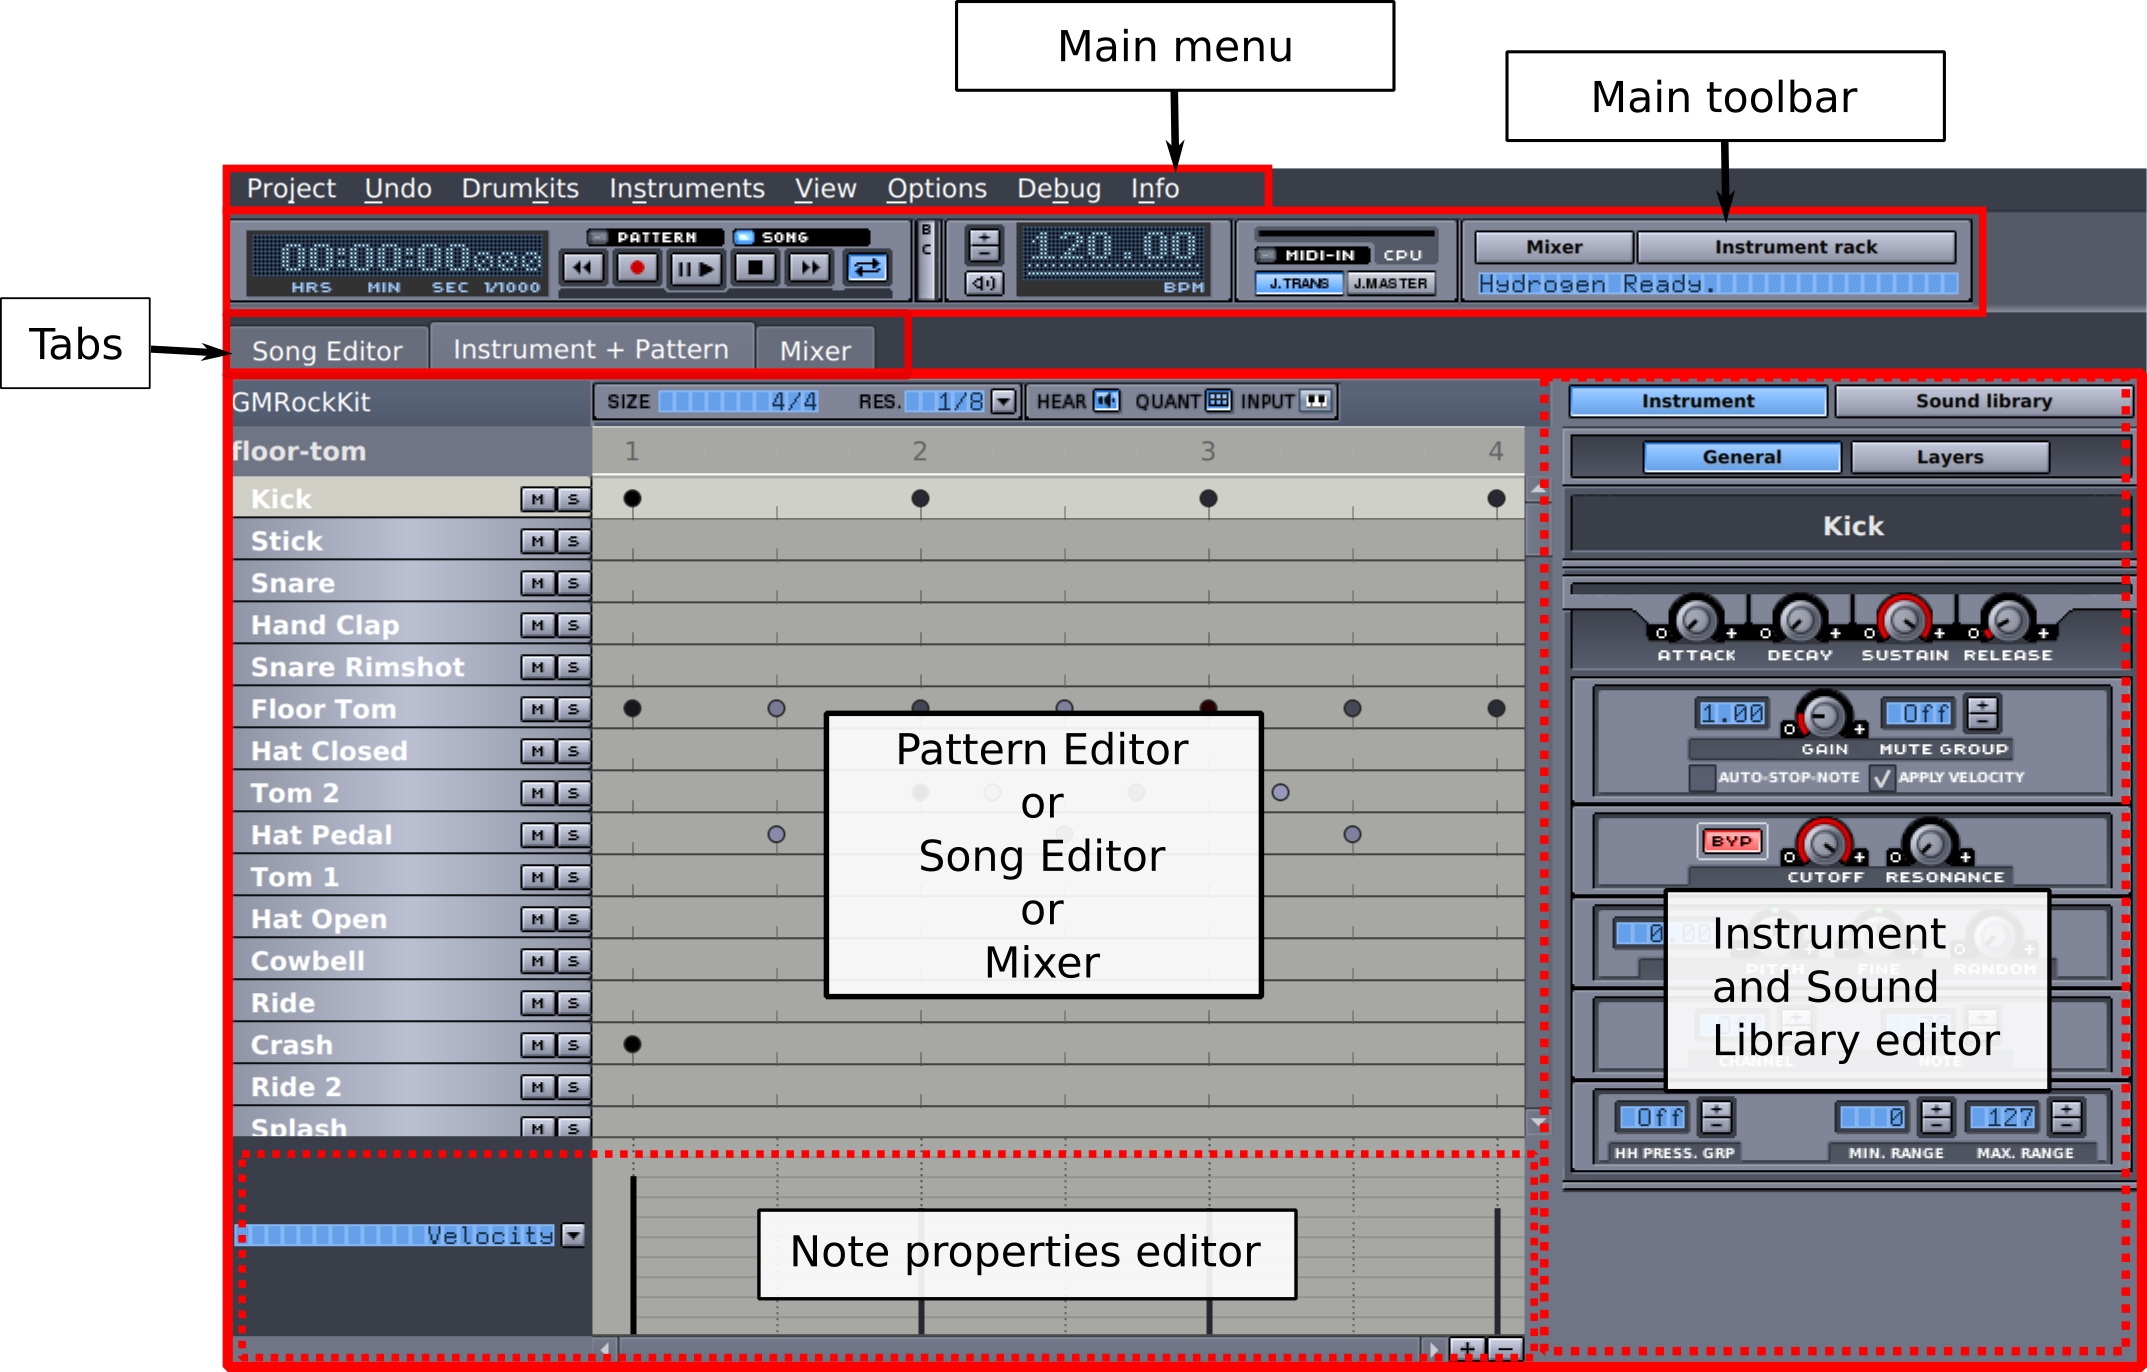
The Main UI comes in 2 flavors : the (classic) Single Pane mode (ideal for large- and medium size screens), and the Tabbed mode (optimized for netbook screen sizes).
| Tip |
|---|---|
You can switch between these two modes in the Appearance tab of the Preferences. |
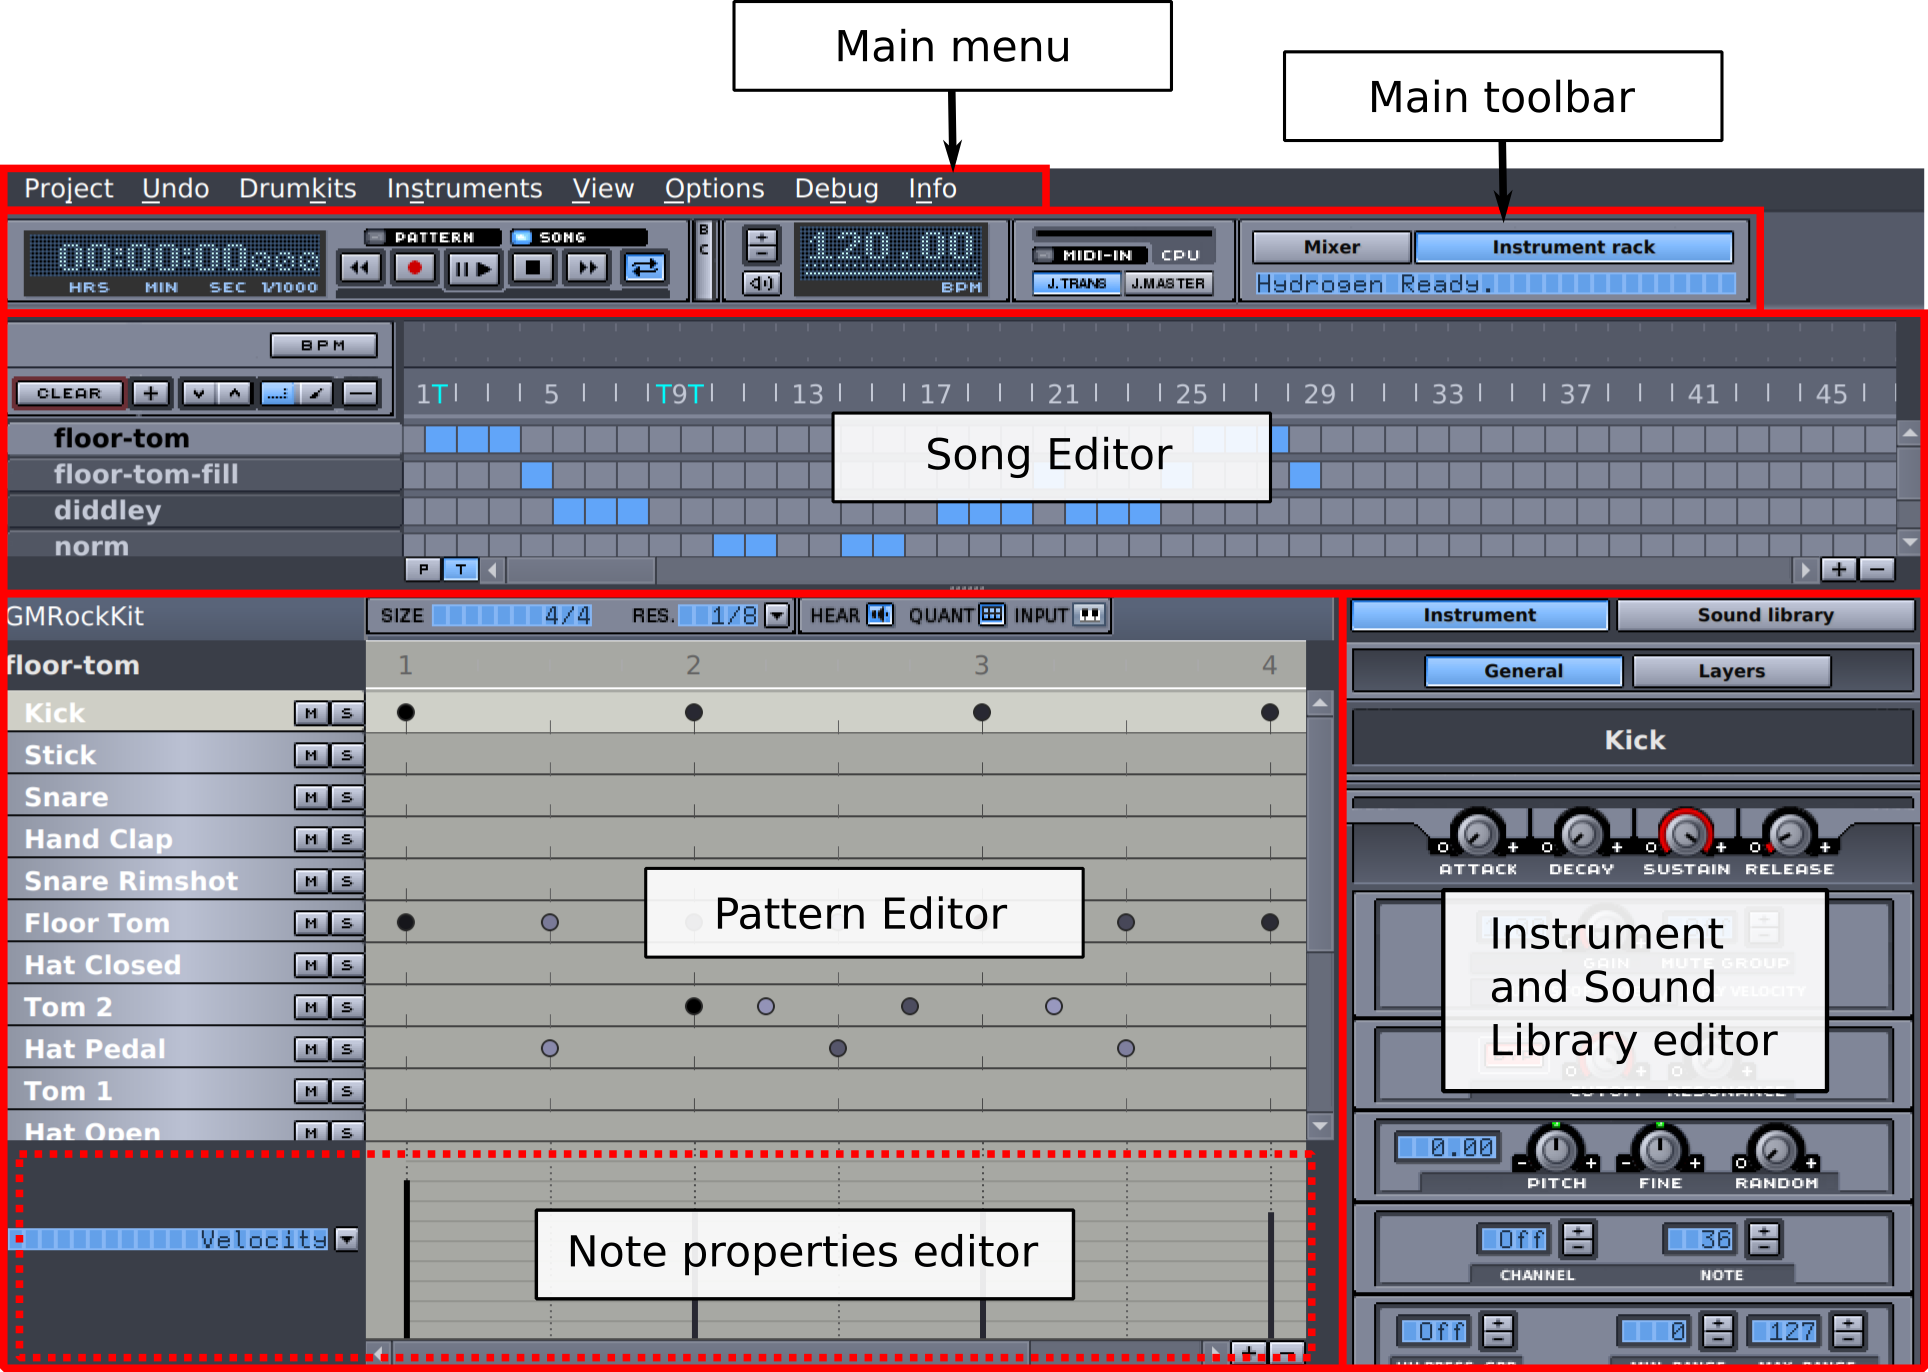
Below you can see the main UI split up in 5 parts: the Main Menu, Main Toolbar, Song Editor, Pattern Editor and the Instrument and Sound Library Editor. These sections will be explained in detail further down in this manual.
Let's start with a little history on the concept of Drumkits within in Hydrogen. It began as a dedicated drum machine but has evolved into a versatile sample-based sound synthesizer/sequencer that is capable of generating and manipulating all sorts of sounds. Hence the original "Drumkit" terminology is slightly misleading. You can load any kind of sound into a "Drumkit" and manipulate that sound just like playing a regular synthesizer. This is also the main reason why the Piano Roll Editor was introduced.
To sum it up, nowadays a Drumkit is a collection of a number of instruments (snare, kick, sampled voice, bass sound ...), using one or more components which each can consist of multiple layered samples.
| Tip |
|---|---|
In case you are not familiar with the world of sound synthesis, you can check out the Glossary for a number of useful definitions. |
Instead of playing back programmed patterns Hydrogen can also be used synthesize drum sounds for incoming MIDI or keyboard events.
Using the Input mode in the Options tab of the Main Menu you can choose between two different ways to emulate sound. Drumkit maps different MIDI notes or virtual keyboard strokes to different instruments of the current drumkit. Instrument, on the other hand, maps them to pitch-shifted samples of the instrument currently selected in the Pattern Editor. You can think of these modes as input versions of both Drumkit Editor and Piano Roll Editor.
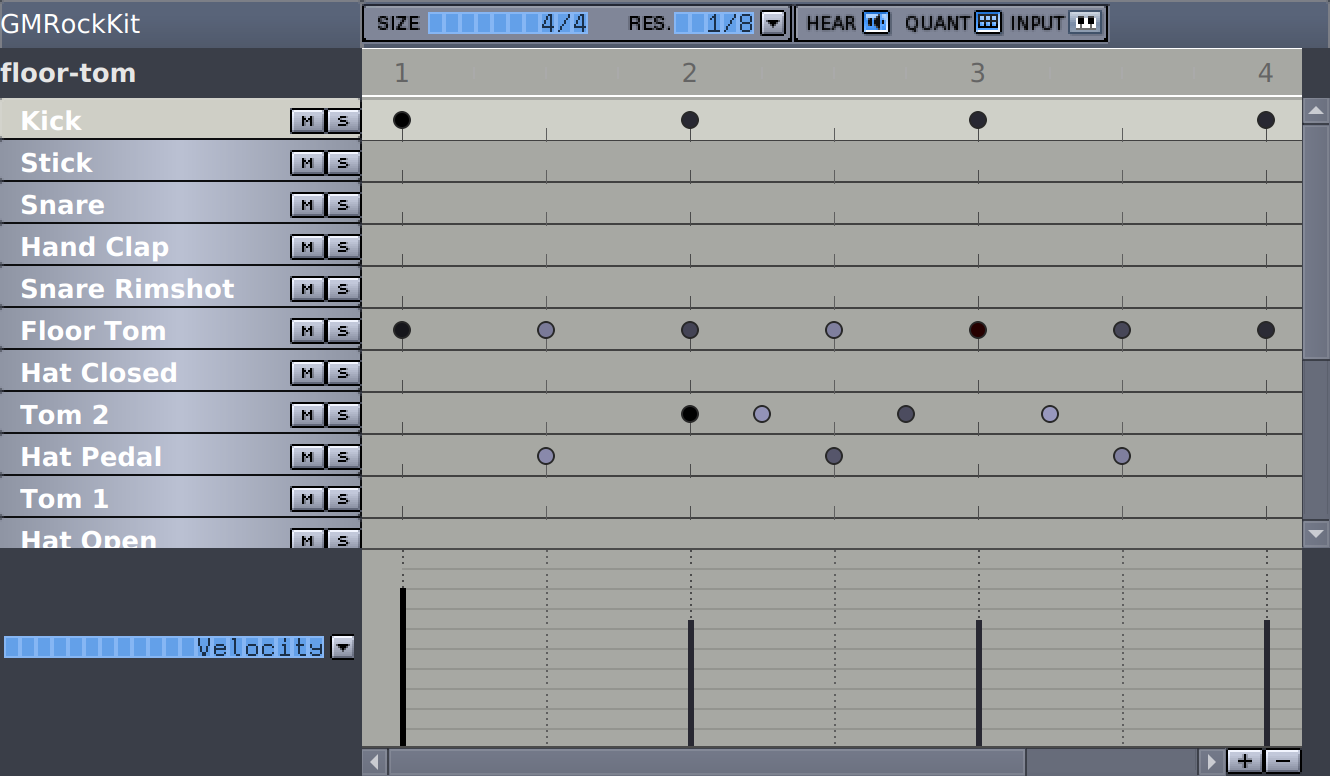
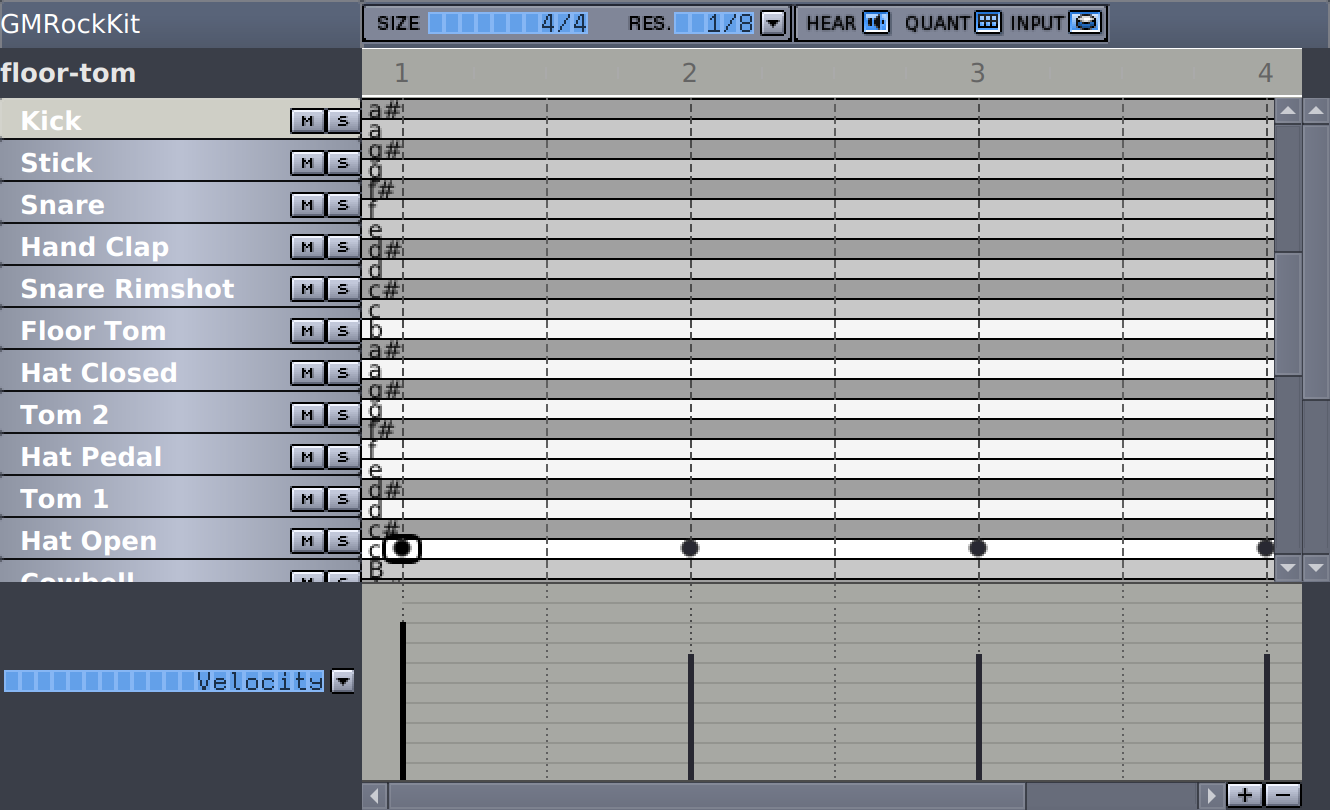
Which MIDI note maps to which instrument (with Input mode set to Drumkit) is depending on the Note parameter in the Instrument Editor set for in each particular drumkit. An example for the GMRockKit is shown in the table below.
| Note |
|---|---|
In order to process incoming MIDI messages, you have to set up the overall MIDI support in the MIDI system tab of the Preferences dialog first. |
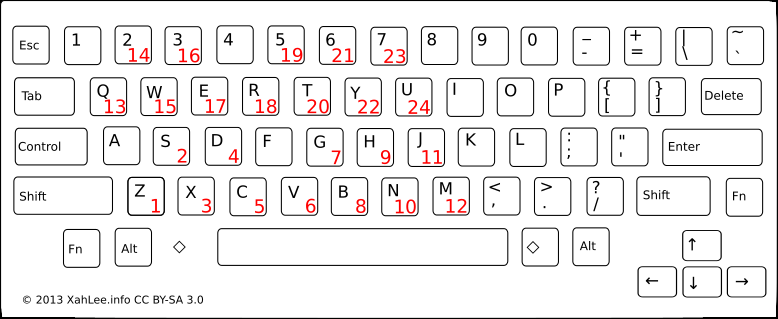
Alternatively you can use the Virtual keyboard provided in Hydrogen. In Drumkit mode it maps a number of keys of your computer keyboard to different instruments in the drumkit depending on their position shown in the Pattern Editor. In Instrument mode the corresponding instrument number + 36 is used as note key for the currently selected instrument. The mapping is shown for the GMRockKit in table as well as in general in the figure below.
Table 4.1. MIDI Mapping
| Hydrogen GMRockKit | Virtual Key | MIDI Note | GM Standard |
|---|---|---|---|
| 35 | Bass Drum 2 | ||
| Kick | Z | 36 | Bass Drum 1 |
| Stick | S | 37 | Side Stick/Rimshot |
| Snare | X | 38 | Snare Drum 1 |
| Hand Clap | D | 39 | Hand Clap |
| Snare Rimshot | C | 40 | Snare Drum 2 |
| Floor Tom | V | 41 | Low Tom 2 |
| Hat Closed | G | 42 | Closed Hi-hat |
| Tom 2 | B | 43 | Low Tom 1 |
| Hat Pedal | H | 44 | Pedal Hi-hat |
| Tom 1 | N | 45 | Mid Tom 2 |
| Hat Open | J | 46 | Open Hi-hat |
| 47 | Mid Tom 1 | ||
| 48 | High Tom 2 | ||
| Crash | 2 | 49 | Crash Cymbal 1 |
| 50 | High Tom 1 | ||
| Ride | Q | 51 | Ride Cymbal 1 |
| Hat Semi-Open | E | 52 | Chinese Cymbal |
| Bell | R | 53 | Ride Bell |
| 54 | Tambourine | ||
| Splash | 3 | 55 | Splash Cymbal |
| Cowbell | M | 56 | Cowbell |
| 57 | Crash Cymbal 2 | ||
| 58 | Vibra Slap | ||
| Ride 2 | W | 59 | Ride Cymbal 2 |
| 60 | High Bongo | ||
| 61 | Low Bongo | ||
| 62 | Mute High Conga | ||
| 63 | Open High Conga | ||
| 64 | Low Conga | ||
| 65 | High Timbale | ||
| 66 | Low Timbale | ||
| 67 | High Agogô | ||
| 68 | Low Agogô | ||
| 69 | Cabasa | ||
| 70 | Maracas | ||
| 71 | Short Whistle | ||
| 72 | Long Whistle | ||
| 73 | Short Güiro | ||
| 74 | Long Güiro | ||
| 75 | Claves | ||
| 76 | High Wood Block | ||
| 77 | Low Wood Block | ||
| 78 | Mute Cuíca | ||
| 79 | Open Cuíca | ||
| 80 | Mute Triangle | ||
| 81 | Open Triangle | ||
| Hat Semi-Open | E | 82 |
| Note |
|---|---|
This table refers to the GMRockKit that is shipped with Hydrogen and loaded by default. For all other drumkits the order of instruments and thus their mapping to virtual keys as well as the assigned MIDI notes might differ. |
When adjusting the mapping or creating your own custom drumkit try to follow the General MIDI (GM) standard as accurately as possible. This will ensure that switching between drumkits goes smoothly. You are of course free to place your instruments anywhere in your drumkit, and sometimes it isn't even possible to follow the GM standard, but it makes life a lot easier if you do.
For a better visualization you can also find the mapping of instrument positions (red numbers) to your PC's keyboard keys in the figure below.
| Note |
|---|---|
When using German or French keyboard layout/local the overall mapping is still the same. |
In addition to manually program pattern using mouse and keyboard you can also record one or multiple pattern. You can do so using an external MIDI device, like an e-drum, or use the virtual keyboard provided by Hydrogen.
In order to start recording, first activate the record button
 in the Main Toolbar and afterwards press the
 button located right next to it (like in a classical tape recorder).
Using the playback mode of the Song Editor you can choose between the following two scenarios. When in Pattern mode all inserted notes will be added to pattern currently selected in the Sidebar of the Song Editor. When, on the other hand, in Song mode the input notes will be added to the active pattern (the one the playhead is located in and is currently used for playback). If several patterns are selected in a single row, the input notes will only be added to the pattern at the bottom.
| Note |
|---|---|
The incoming notes will be added in a non-destructive way. This means when adding two notes at the same position, you will have two notes being played back at once (with double the volume of a single one). |
With Session Management you can easily restore complex sessions involving numerous applications including their particular state. Hydrogen does support some Session Management systems too.
| Warning |
|---|---|
All the supported Session Management protocols are Linux only. There is no (tested) support for MacOS and Windows yet. |
NSM: Non Session Manager (NSM) is of 2021 the de facto standard in Session Management tools within the Linux audio community and Hydrogen does over full support and compliance to its API.
Tip We highly recommend using this protocol for Session Management.
LASH: Hydrogen provides a basic support for LASH Audio Session Handler (LASH). This covers recalling the song used within the session but, unlike the NSM support, no recalling of the JACK connections and no per-session preferences.
Note You have to activate LASH support in the General tab of the Preference dialog in order to use it.
JACK Session: JACK Session has been marked deprecated by the JACK project.
Warning Hydrogen versions <= 1.1 still feature this Session Management protocol. But it will be removed in future releases.
Hydrogen will be under session management if you start it via a NSM server application, like RaySession. You can easily check whether Hydrogen is aware of the session by checking out the Project option of the Main Menu as some action will have changed in order to comply to the NSM API.
Replace With New Song: instead of New. Replaces the song associated with the session by an empty one.
Import Into Session: instead of Open. Replaces the song associated with the session by a song of your choice.
Import Recent Info Session: instead of Open Recent. Replaces the song associated with the session by one of the recently used songs.
Warning In Hydrogen version 1.1 the import into a session is not yet fully supported. While the selected file will be loaded and you can work with it, Hydrogen won't recall it after closing and opening the session. You need to copy the corresponding .h2song file manually into the session folder to make your choice permanent.
Export From Session As: instead of Save As. Stores the song associated with the session at a location of your choice as .h2song file.
Note In contrast to the Save As command the underlying path of the current song will not be changed. All subsequent Save actions will store the current state of the song to the file in the session folder and not to the path of the exported file.
| Note |
|---|---|
The Open Demo option will be missing. |
Both the song and the preferences associated with the session will be stored in a session folder called Hydrogen.*. In addition, the drumkit (and its samples) used with the song will linked into the session folder as well. If the link is replaced by a folder containing a valid drumkit, this one will be used over the system and user drumkits.
| Tip |
|---|---|
This allows you to create fully self sufficient backup of your Hydrogen session using tar -chf. These can be even ported and used to systems which do not have the required drumkits installed. |
After installing Hydrogen on your system you can invoke it from the command-line with a number of different options.
-h, --help                  Displays this help.
-v, --version               Displays version information.
-d, --driver <Audiodriver>  Use the selected audio driver (jack, alsa, oss)
-i, --install <File>        Install a drumkit (*.h2drumkit)
-n, --nosplash              Hide splash screen
-p, --playlist <File>       Load a playlist (*.h2playlist) at startup
-P, --data <Path>           Use an alternate system data path
-s, --song <File>           Load a song (*.h2song) at startup
-k, --kit <DrumkitName>     Load a drumkit at startup
-V, --verbose <Level>       Level, if present, may be None, Error, Warning, Info, Debug or 0xHHHH
Table of Contents
Via this window most of the configurations and customization can be altered. The Preferences Dialog can be accessed via the Options element in the Main Menu.
| Note |
|---|---|
All changes done in the Preferences Dialog - if not noted otherwise via a popup - will take effect when clicking the Ok button at the bottom of the window. |
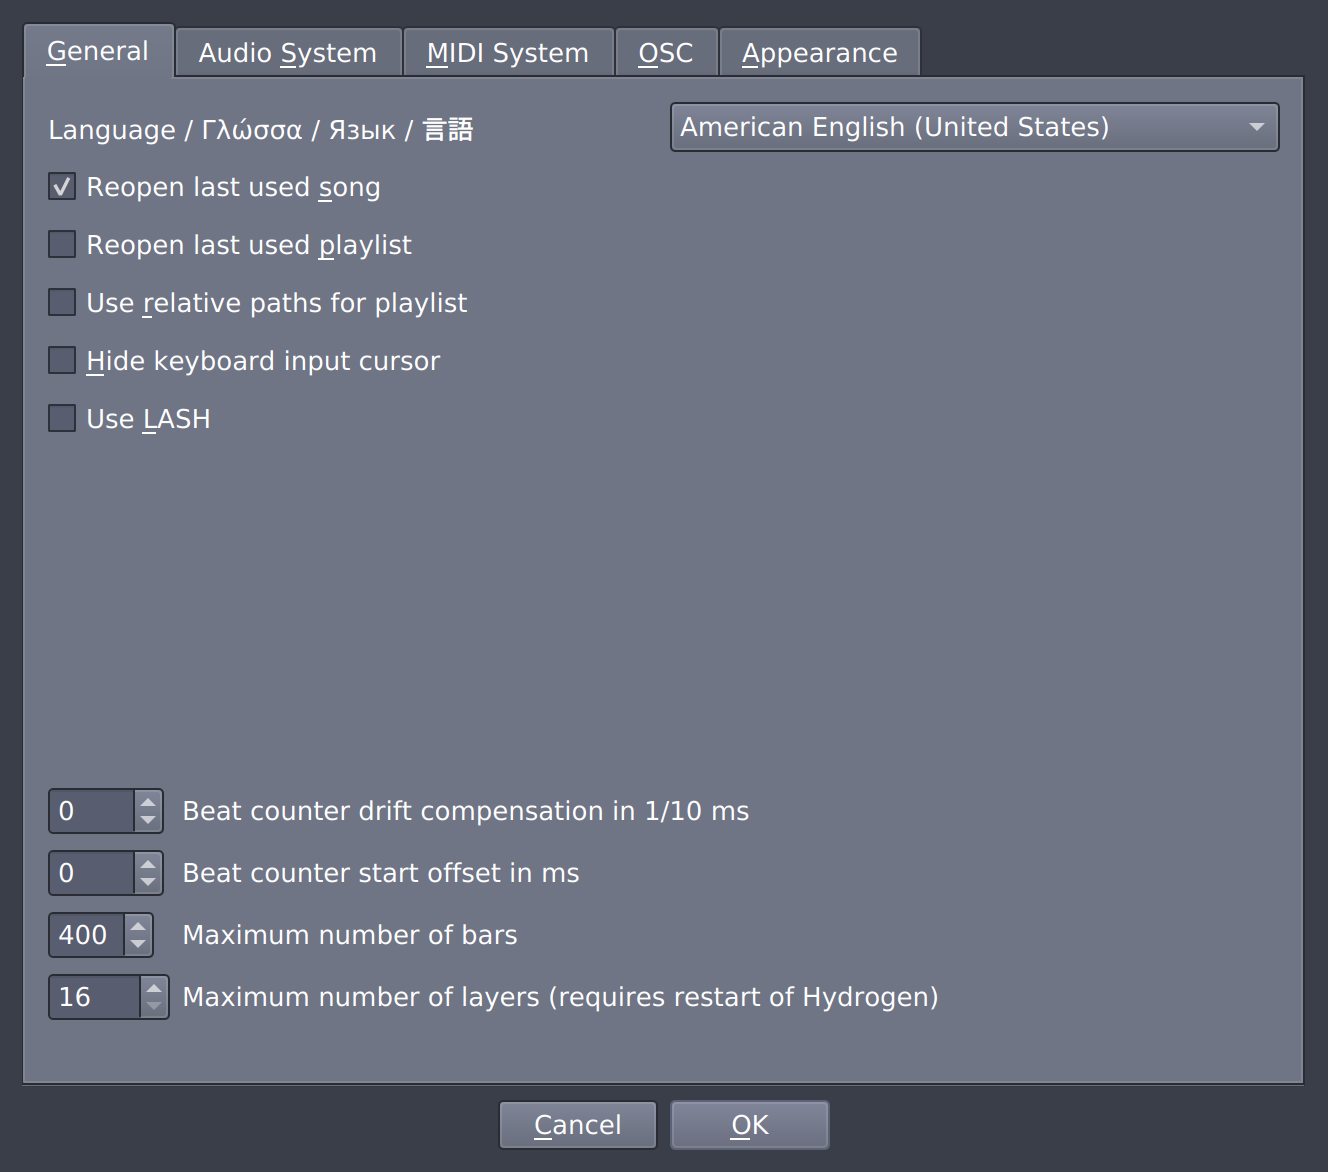
Language: chooses one of the translations Hydrogen is available in.
Note For this setting to take effect you have to restart Hydrogen.
Tip If your mother tongue is not available or the corresponding translation is flawed or incomplete, you would have an accessible way to contribute to Hydrogen at hand. Please see the About dialog in the Info option of the Main menu for information of how to contact the Hydrogen dev team.
Reopen last used song: determines whether Hydrogen will open the last used song during startup or an empty song instead.
Reopen last used playlist: determines whether the last used Playlist will be loaded during startup or none at all.
Tip This can come in handy when you are using Hydrogen live.
Use relative paths for playlist: specifies whether the path names in the stored .h2playlist file will contain absolute paths or a path relative to the
playlistfolder in the Hydrogen data directory (usually$HOME/.hydrogen/data/).Tip Using relative paths might be handy when using your playlist on different computers or user profiles.
Hide keyboard input cursor: hides the keyboard cursor until you press a key on you keyboard (see Chapter 3). By enabling this feature you can switch to the look and feel of the interaction with the Pattern Editor and Song Editor prior to Hydrogen v1.1.
Use LASH: enables LASH (LASH Audio Session Handler) support within Hydrogen. This allows you to recover a particular song associated with a session.
Tip You may consider using the more advanced NSM support of Hydrogen which gives you many additional features, like restoring all JACK connections or creating a per-session configuration.
Beat counter drift compensation in 1/10 ms: allows you to compensate for system latency. The provided number will be added to each consecutive triggering of the Beat Counter. The allowed range is from
-200to200.Tip This is quite handy if you are using different sound cards or external MIDI devices, like a keyboard or an e-drum, with mismatching clocks.
In order to find useful values for these, you will need to take some time to play with it. Also, you may want different values depending on the speed of your hardware, audio devices, drivers, etc. Using the Beat Counter effectively requires practice.
Beat counter start offset in ms: sets the time between the Beat Counter's last input stroke and when the song starts playing. Its allowed range is from
-500to500.Note The Beat Counter has to be set to Set BPM and play -
 should be displayed in the bottom right corner - for this setting to take effect.
Maximum number of bars: sets the maximum number of supported bars/patterns for a single song. Its allowed range is from
1to800.Maximum number of layers: sets the maximum number of layers for a single instrument. Its allowed range is from
16to8192.Note For this setting to take effect you have to restart Hydrogen.
Path to the Rubberband command-line utility: sets the absolute path to the rubberband command line interface (CLI) Hydrogen will use for stretching samples in the Sample Editor.
Note This option is only available if your version of Hydrogen does not already has Rubber Band support compiled into it. If it does and the option is hot shown, everything is already configured and you don't have to worry about Rubber Band at all.
Tip If you are using Ubuntu, you can install Rubber Band from the Software Center via the package
rubberband-cli. For other Linux distros please check your package manager and for other platforms please check the Rubber Band site .Tip If Rubber Band is installed and configured correctly, you will see an extra button
 button in the Main Toolbar. You can use this behavior to verify your configuration.
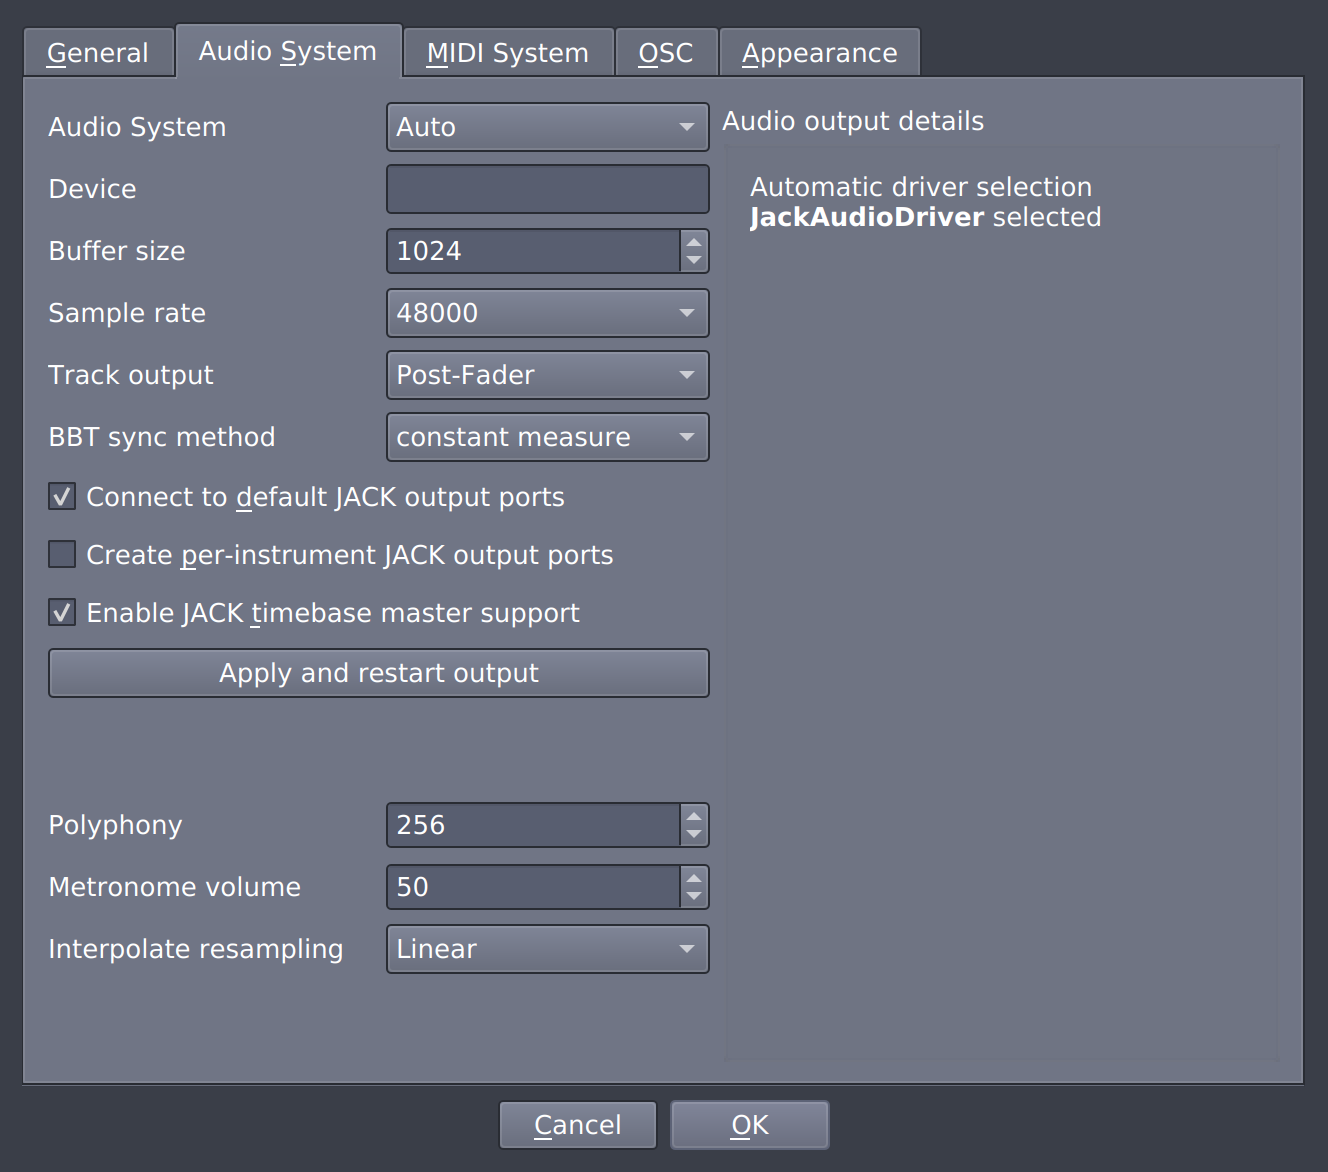
Audio System: let's you choose the audio driver used by Hydrogen to connect to your computer's sound card.
Available options:
Auto: Hydrogen will try a number of different drivers in a predetermined order, choose the first working one, and display the result.Tip This option is recommended for beginners.
JACK: The JACK driver is a professional audio server which permits very low lag and exchanges with other audio software. The JACK server will start automatically if not already running.Tip We strongly recommend using this driver to have the best out of Hydrogen.
ALSA: The widely adopted Linux standard audio driver.OSS: The OSS audio driver uses/dev/dspand it's based on the OSS interface which is supported by the vast majority of sound cards available for Linux; this said, the use of this audio driver blocks/dev/dspuntil Hydrogen is closed i.e. unusable by any other software. Use it as last resort.PortAudio: An open-source multi platform audio driver interface layer.CoreAudio: A driver for MacOS.PulseAudio: A driver for the cross platform PulseAudio sound server.
Host API (PortAudio only): some systems (notably Windows) have more than one native way for applications to interact with audio hardware (APIs), and not all audio devices are supported by all APIs. If you don't find your sound device in the device list, try changing the Host API setting.
Device: specifies the particular sound card the audio driver will use.
Buffer size: specifies the size of the batch of time Hydrogen will process in one run. Supported values are from
100to5000, although this can vary depending on audio system and sound device.In general, selecting a smaller buffer size will allow the audio system to reduce latency (the lag between hitting a key and the sound being played), but can lead to increased likelihood of audio glitches.
Sample rate: specifies the number of data points the audio signal will contain within one second.
Note If you are using the JACK audio driver, the sample rate can not be altered from within Hydrogen and the audio driver configuration should happen before starting the JACK server.
Track output: determines which audio settings will be applied to the outgoing audio of the per-instrument JACK output ports.
Post-Fader:Pre-Fader:note velocity
Note This option is only available if the JACK audio driver was selected and it will only take effect if the Connect to default JACK output ports option is checked.
BBT sync method: if Hydrogen uses JACK transport in the presence of an external JACK Timebase master (TBM), it will use the provided measure and tempo information instead of the local one of either the song's tempo or the Tempo Markers added to the Timeline. But due to limitations in the current implementation, Hydrogen can not set both measure and speed provided by JACK for arbitrary pattern combinations. You have two options here. Either drop all measure changes in the TBM and work with tempo changes only to support arbitrary patterns (using option
constant
            measure
) or to keep the length of each pattern consistent with the corresponding measure in the TBM and to use both tempo and measure provided by JACK (optionmatching bars).Note This option is only available if the JACK audio driver was selected.
For this option to take effect the
 button has to be activated and the
 button deactivated in the Main Toolbar (next to
having a JACK TBM application).
button deactivated in the Main Toolbar (next to
having a JACK TBM application).Tip Hydrogen can be registered as JACK Timebase Master via the Main Toolbar.
Connect to default JACK output ports: connects the main stereo JACK output ports of the Master Fader Strip to the default JACK input ports of your system (system:playback_1 and system:playback_2). This will be done every time Hydrogen starts up or the JACK audio driver is restarted.
Note This option is only available if the JACK audio driver was selected.
Create per-instrument JACK output ports: in addition to the main stereo output Hydrogen will register JACK output ports for every single instrument.
Tip This can be useful if you want to add effects to a single instrument with jack-rack for example.
Note This option is only available if the JACK audio driver was selected.
Warning There are no JACK output ports for the Metronome and the Playback Track. Their audio is only available via the main stereo output ports of Hydrogen.
Enable JACK timebase master support: whether Hydrogen will respond to or ignore the incoming BBT (tempo and measure) information sent by the JACK server.
Tip Some JACK clients are not well written or have fallen into despair. As a result Hydrogen could receive nuisance signals messing up its playback. If you encounter weird jumps in the transport position and/or Hydrogen is out of sync after relocating the transport position, you might try to uncheck this option.
Note This option is only available if the JACK audio driver was selected.
Apply and restart output: restarts the audio driver and makes all settings specified above take effect without closing and reopening the entire Preferences dialog.
Polyphony: specifies the maximum number of notes played simultaneously. Supported values are from
1to512.Tip Depending on your CPU Hydrogen might be overrunning your audio driver due to this parameter.
Metronome volume: sets the volume of the Metronome. Supported values are from
1to100.Interpolate resampling: specifies the type of resampling applied if a sample does not use the same Sample Rate as Hydrogen.
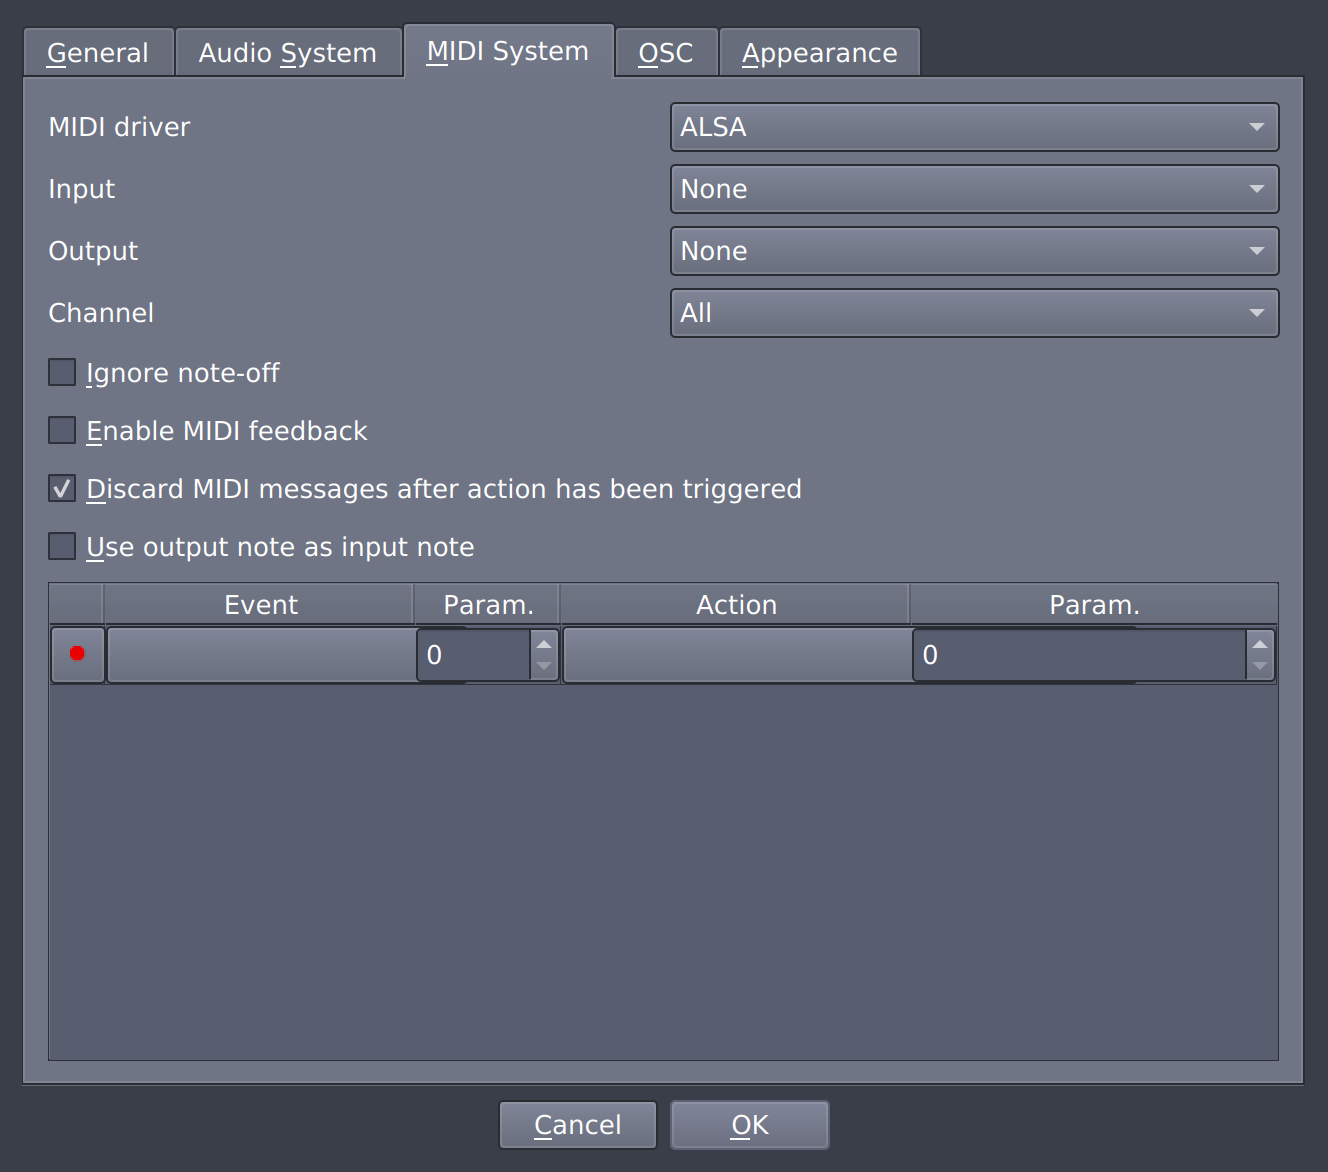
MIDI driver: selects the MIDI driver Hydrogen will use to send MIDI messages.
Input: selects the device Hydrogen will expect MIDI messages to receive from.
Output: selects the device Hydrogen will send MIDI messages to.
Channel: specifies whether Hydrogen should listen to MIDI messages on one particular of the 16 available channels or on all of them.
Ignore note-off: specifies whether Hydrogen will respond to the note-off MIDI message.
Note This makes better use of the drumkit samples used in Hydrogen when working with certain external MIDI devices. But it may also discard Cymbal choke messages in some e-drums.
Enable MIDI feedback: specifies whether Hydrogen will send a message about updated values every time a certain parameter is changed. These parameters are
Discard MIDI messages after action has been triggered: specifies whether a MIDI note - after performing the MIDI action associated with it - should be played back or be discard.
Use output note as input note: specifies whether the output MIDI note of an instrument specified in the MIDI Out Settings of the Instrument Editor should be used to map the input as well.
Note If this option is unchecked, only the currently selected instrument will used to play back the received MIDI notes.
Using the table in the lower part of the tab you can associate MIDI actions provided by Hydrogen with incoming MIDI messages. How this is done will be explained in the Section 16.1.

The OSC tab (Figure 5.4) let's you modify all options associated with OSC (Open Sound Control) (see chapter OSC API for details).
| Note |
|---|---|
In order to see and access the Enable OSC feedback and Import port option, Enable OSC support has to be checked first. |
Enable OSC support: Allows Hydrogen to receive OSC commands send by external programs.
Enable OSC feedback: Hydrogen will broadcast OSC messages to all registered clients each time does change. A client can register to receive OSC messages by sending a message to Hydrogen previously. The state broadcast as feedback is composed of the following OSC paths:
Incoming port: Specifies the OSC port Hydrogen will be register to. Values up to
20000are supported.
| Note |
|---|---|
If the chosen OSC port is already occupied, Hydrogen will pick an alternative one on startup and displays it via a popup as well as in the OSC tab of the Preferences. |
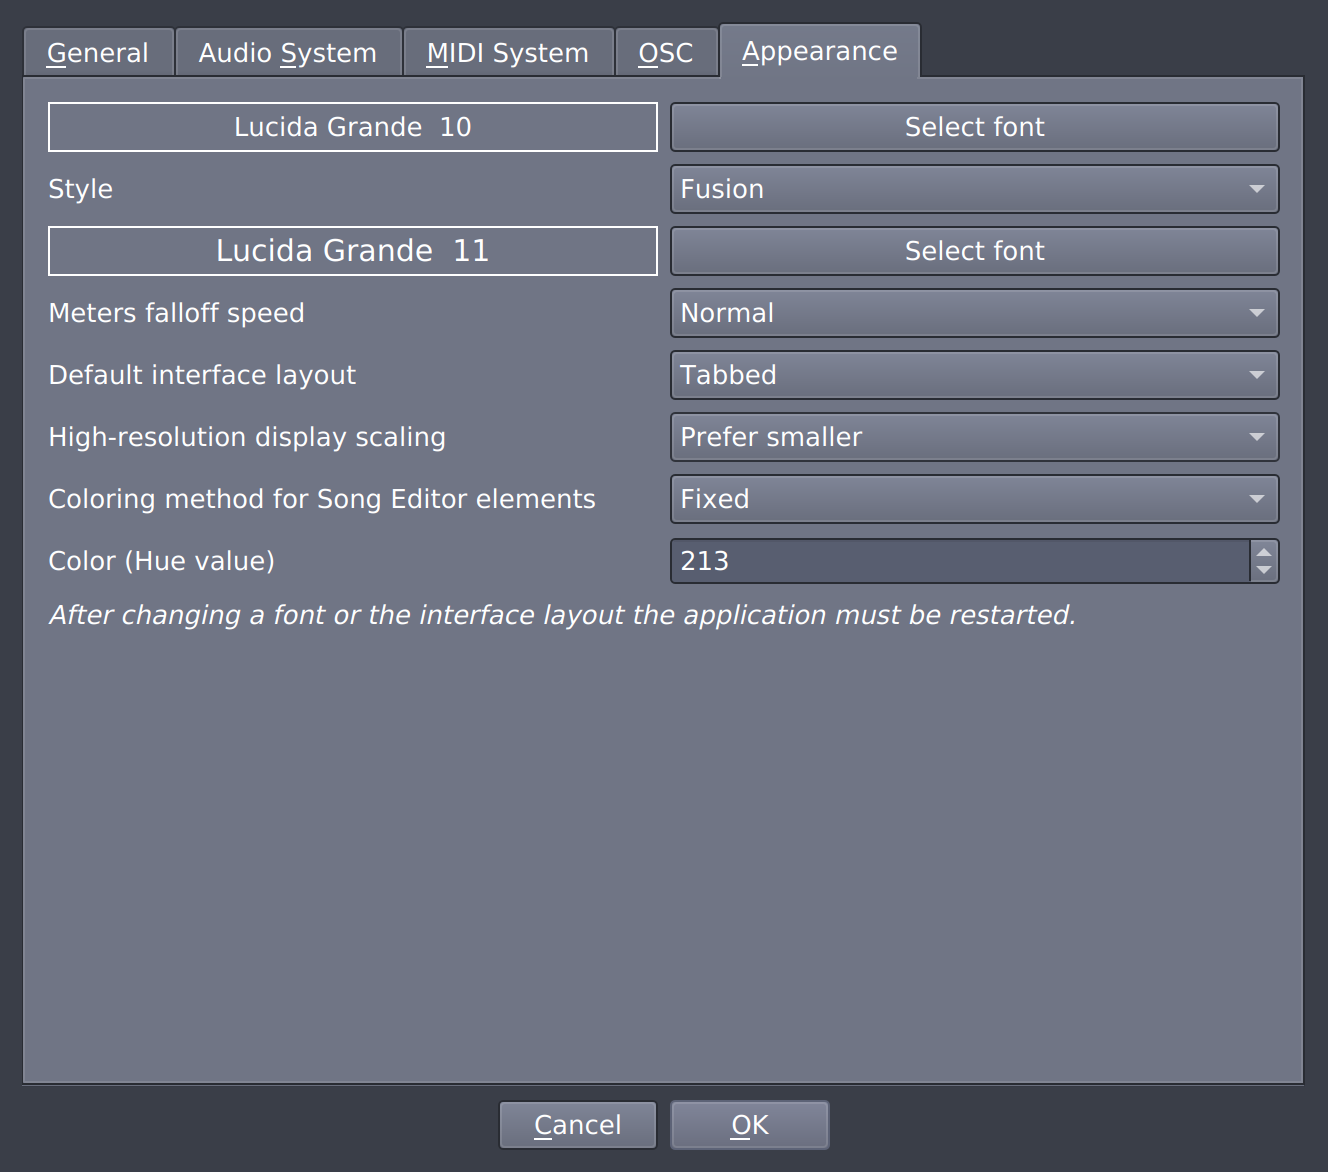
The Appearance tab let's you modify Hydrogen's look and feel.
Application font: specifies both the font family and point size of the application font used for the grid in Pattern Editor and Song Editor as well as for the pattern names in the Sidebar of the Song Editor.
Note In order for this setting to take effect, Hydrogen has to be restarted.
Style: specifies a certain look of GUI elements like menus, scrollbars, and dialog windows.
Tip Using this option you might can make Hydrogen integrate with you operating system better.
Mixer font: specifies both the font family and point size of the mixer font used for the instrument names in the Instrument Channel Strips and the component names in the Component Channel Strips.
Note In order for this setting to take effect, Hydrogen has to be restarted.
Meters falloff speed: specifies for how fast the update of the maximum value of the audio signal will be shown in the LCD displays of the Instrument Channel Strips, Component Channel Strips, and the Master Fader Strip before its replacement with a more recent value will take place.
Default interface layout: specifies whether the GUI of Hydrogen will be arranged in Single Pane mode or Tabbed mode (see Main User Interface for details).
Note In order for this setting to take effect, Hydrogen has to be restarted.
High-resolution display scaling: specifies whether the underlying bitmap graphics of the GUI should be scaled to larger sizes by Qt in order for Hydrogen to look nice with your system's resolution settings.
Coloring method for Song Editor elements: determines the coloring of the boxes indicating the presence of a pattern in the Song editor. The available options are:
Automatic: Uses as much colors as there are patterns in the song.Steps: Uses a certain numbernof colors you have to enter via a second input widget. After coloring the firstnpatterns with different colors the same set of colors will be used for the nextnpatterns and so on.Fixed: Colors all patterns using a single color determined via its hue in a separate input widget.
Table of Contents

This menu offers file related functions.
| Note |
|---|---|
If you are using Hydrogen within a NSM session, some of the options below will be called and behave differently (see Section 4.5.1 for details). |
Show Info: sets general properties of the song such as name, author, license, and generic notes.
Open: opens an existing song (a .h2song file).
Open Demo: opens one of the demo song shipped with Hydrogen.
Note The demo songs are stored in
$INSTALL_PATH/share/hydrogen/data/demo_songs).Open recent: opens a menu showing the last used songs (ordered from most recent to least recent).
Save: saves changes to current song.
Save as: saves current song as .h2song file to a path of your choice.
Tip In order for Hydrogen to automatically list it in the Songs section of the Sound Library, you have to store it in
$HOME/.hydrogen/data/songs/.Open pattern: opens a pattern (a .h2pattern file) belonging to the current drumkit.
Export Pattern As: saves a pattern as a .h2pattern file.
Tip In order for Hydrogen to automatically list it in the Patterns section of the Sound Library, you have to store it in
$HOME/.hydrogen/data/patterns/drumkit_name/.Export MIDI file: exports the current song in MIDI format.
Export song: exports the current song into an audio file.
The Export mode option
Export to a single trackwill export one stereo downmix of your song - the master output.Export to separate trackswill create files for each instrument/track.Bothwill create a stereo downmix + audio files for all individual instruments.Export Lilypond file: exports the current song to LilyPond.
Warning It has the following limitations: Only the GMRockKit and no triplets are supported.
Quit: exits Hydrogen.
Undo: lets you undo your last action.
Redo: lets you redo the last undone action.
Undo History: gives you an overview of your previous actions.
New: creates a new and empty drumkit by clearing all the instruments of the current one.
Open: opens one of the registered drumkits and replaces the currently loaded one.
Note Via this option you can only load drumkits that have been already imported into Hydrogen. If you just received a new one from an external source, be sure to use the Import option described below.
Properties: sets general properties of the drumkit such as its name, author, license, general information, image, and image license.
Save: saves all settings of the current drumkit (including those of their instruments and sound samples).
Save As: saves all settings of the current drumkit (including those of their instruments and sound samples) as new drumkit.
Note The new drumkit will be a physical copy of the old one and is stored into the
$HOME/.hydrogen/data/drumkits/folder.Export: compress and stores all instruments samples and settings of any drumkit (not just the current one) into a folder of your choice as .h2drumkit file.
Note For compatibility reasons you can also export your drumkit in a format used in older versions ( <= 0.9.6 ) of Hydrogen. By doing so you need to select a single component to export since this functionality was not supported back than.
Import: imports a drumkit (a .h2drumkit file) from the local filesystem.
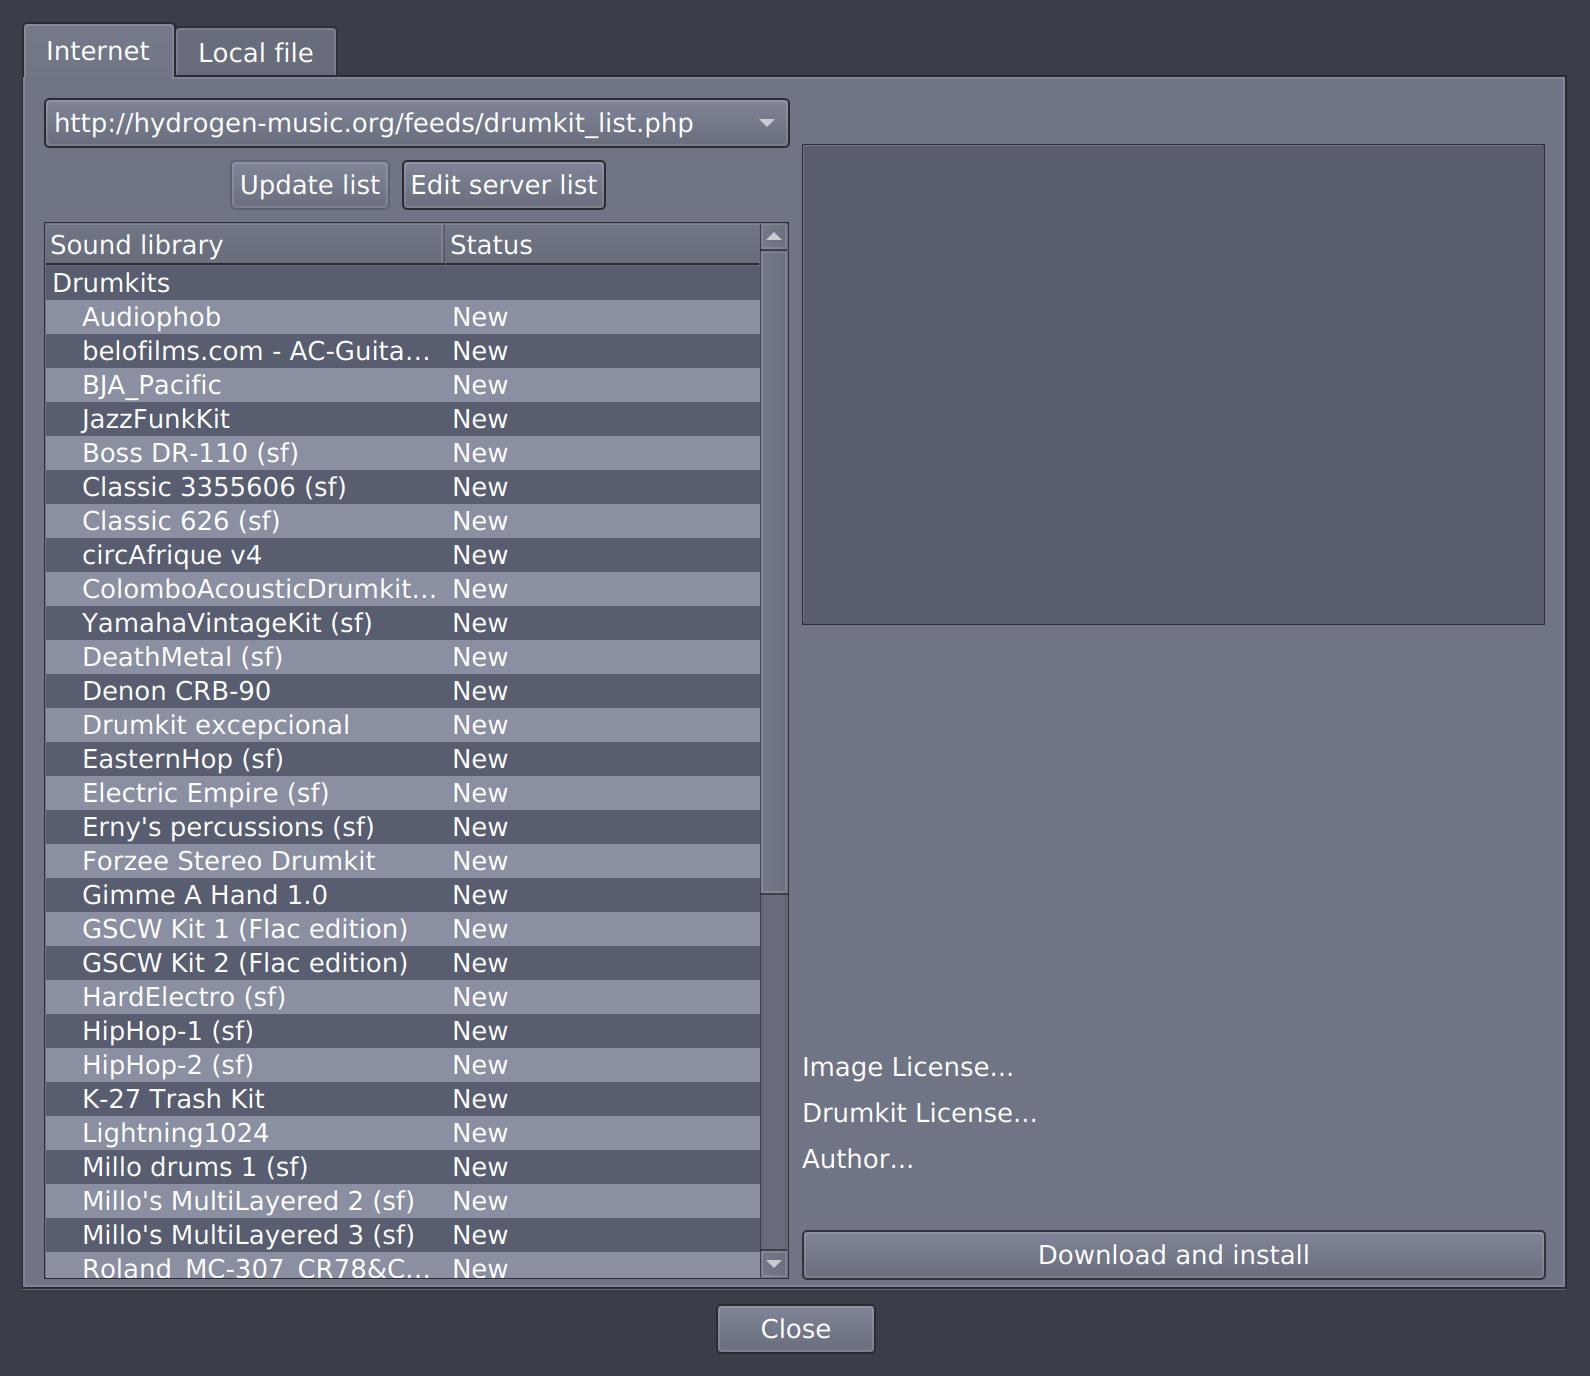
Online Import: imports another drumkit from a remote location through a XML feed. The XML file that should be provided is NOT RSS compliant (see Hydrogen website for an example).
The Import window will pop up with the Internet tab selected. By default the link to the drumkit list (on hydrogen-music.org) will be filled in, and after pressing the Update list button you will get a complete list of all drumkits that are available for download. In the status column you can see if a kit is installed or not.If you select one of the drumkits you will see info about this kit in the right pane of the Import window: name, description, author and also the license type.
You can install a drumkit by selecting it and clicking Download and Install.
Once the kit has been downloaded it will be available in the Sound Library under User drumkits.
This menu offers instruments functions.
Add Instrument: adds a new instrument to the current drumkit.
Clear All: deletes all instruments from the current drumkit.
Add Component: adds a component to the current drumkit.
Playlist Editor: opens the Playlist Editor window.
Director: opens the Director window.
Mixer: opens the Mixer window.
Instrument Rack: shows or hides the widget of the main window containing both the Instrument Editor and the Sound Library.
Automation Path: shows or hides the Automation Path panel.
Timeline: shows or hides the Timeline panel.
Playback Track: shows or hides the Playback Track panel.
Full screen: maximises the window size to the whole screen area.
Input mode: when set to
Drumkitthe keys on your MIDI keyboard will map to the instruments in your drumkit. If you set it toInstrumentthe keys of your MIDI keyboard will trigger the instrument that is currently selected. The pitch of the instrument will follow the key you press on your keyboard. This feature is mainly used for non-drum instruments (see Section 4.3 for details). An example: if you use a sample of a piano for one of your instruments, you will be able to 'play' that piano instrument using your keyboard just like you are playing a piano synth.Preferences: opens the main preferences window (see Preferences for details).
Tools mainly for debugging and monitoring Hydrogen.
| Note |
|---|---|
The Debug option is only available if Hydrogen was compiled with debug support. |
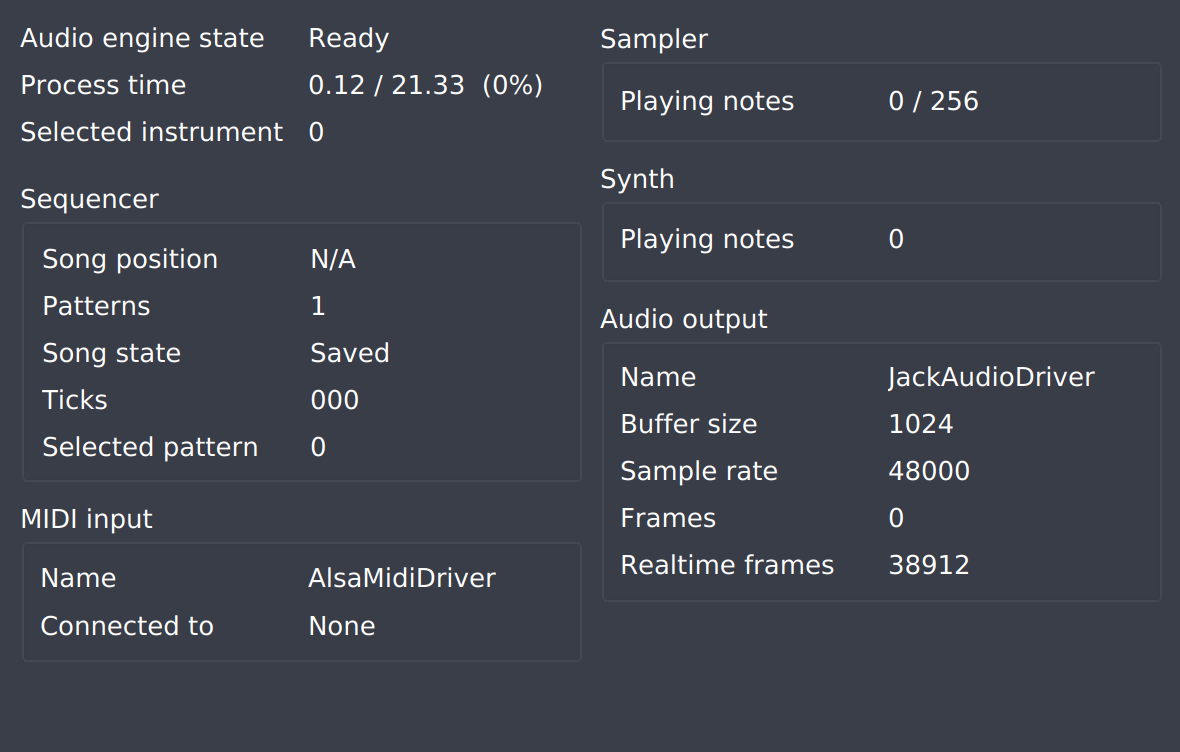
Show Audio Engine Info: opens a window that shows various stats about Hydrogen and the audio driver.
Note In case JACK is used, buffer and sampling rate should be set in the configuration of the JACK server before starting Hydrogen (JACK automatically starts when an application tries to connect).
Show Filesystem Info: opens a window that shows you the paths to the user and system data directory as well as to the folder used to create temporary files.
Log Level: specifies which log messages will be written into the log file.
None: No messages will be written at all.Error: Only messages concerning critical errors will be written out.Warning: LikeErrorbut in addition also general warnings about potential bugs or inconsistencies will be written out.Info: LikeWarningbut also all info messages indicating the correct behavior of Hydrogen will be written out.Debug: LikeInfobut also internal help messages used for developing will be written out.
Open Log File: opens Hydrogen's log in either the terminal the application was started in or in a new terminal instance.
User Manual: opens a window with a version of this manual installed on your local computer.
About: the usual window with license information, acknowledgments, etc.
Report Bug: opens the Hydrogen issue page at github.com in your default Internet browser. You can open a new issue to communicate a bug here (first search if there exists already an issue about it).
Donate: make a donation to developers/maintainers.
Table of Contents

Before analyzing the two main frames of Hydrogen, let's take a quick look at the main toolbar and its components.

Using these buttons you can start (also bound to Space, see Chapter 21 for further related shortcuts) and stop the playback, record new patterns (see Section 4.4 for details), fast forward and rewind the transport position, and loop playback.
In addition, you can switch between Song mode and Pattern mode.
| Tip |
|---|---|
When using the Keyboard to navigate in the Song Editor and Pattern Editor the shortcut Ctrl + Space (or Alt + Space on MacOS) will change the mode to the one corresponding to the editor. In addition, it will move the current transport position to either the note (Pattern Editor) or the pattern (Song Editor) focused by the cursor and starts the playback. |

This section covers how to interactively change tempo using the Beat Counter. Due to conceptional similarities the Tap Tempo will be covered as well which itself is not related to the widget displayed above.
The Tap Tempo allows you to change the tempo at any time - with playback rolling or stopped - within Hydrogen. To change the tempo, hit the \ key in the tempo you want.
After two keystrokes the tempo will be first changed according to the time difference between the two taps. With each addition keystroke the tempo will be changed again to the rolling average value of the last up top eight hits of the \ button. If you tap accidentally, or if you wait too long between taps, the Tap Tempo counter will start over.
| Note |
|---|---|
The widget shown above is the one of the Beat Counter. The Tap Tempo itself does neither have a dedicated widget nor any option to be set by the user. |
The Beat Counter is essentially a Tap Tempo on steroids. By default the Beat Counter widget is not
visible. To see the Beat Counter widget click the
 button or simply press ,.
The tempo that you tap will be considered to correspond to even beats of the song's
beat type. The beat type can be set to 1/8 (for eight-note beats), 1/4 (for
quarter-note beats), 1/2 (for half-note beats), and 1/1 (for whole-note
beats). To change the beat type use the left + / - buttons. To change
the Countdown Counter value, use the right + / - buttons. The Countdown
Counter value can be set between 2 and 16 beats. (I.e. if you set the beat to 6, you will
have to tap 6 times before the new tempo is computed and set.) When the
display shows an R, it means that the Beat Counter
is ready to start from 0. When you tap ,, the R will change to
1, and will increment with every keystroke until it reaches the Countdown
Counter value (shown just below the R).
The button in the bottom right-hand controls the auto-start
feature, and it toggles between
 and
. When it shows the latter (for Play), the song will set the new tempo and
automatically start to play after you tap the right number of beats (if
it's not already playing, of course). This way, if you have the
Beat Counter set up for 4/4, you can tap 1-2-3-4, and start playing on
the next beat. When it shows
(for Set BPM), the auto-start is disabled.
and
. When it shows the latter (for Play), the song will set the new tempo and
automatically start to play after you tap the right number of beats (if
it's not already playing, of course). This way, if you have the
Beat Counter set up for 4/4, you can tap 1-2-3-4, and start playing on
the next beat. When it shows
(for Set BPM), the auto-start is disabled.
For example: Suppose you have a live band, Hydrogen, and a
softsynth that is controlled by Seq24)... and you want them all to start
at the same time. Set the beat type to 1/4 and the number of beats to
4. Enable auto-start (button shows
). Count off
the band 1-2-3-4 (while tapping the , key) and everyone
starts on 1.
Another example: Same situation, but the song doesn't require Hydrogen or synths until some point later. During that time, a human (e.g. guitar player) will be setting the tempo. On the measure before Hydrogen is supposed to play, tap the comma key 1-2-3-4 with the beat... and you're in on the next beat (at the right tempo).
| Tip |
|---|---|
An temporal offset when starting the playback after setting the tempo and a latency compensation for the Beat Counter can be configured in the General tab of the Preferences Dialog. |
| Note |
|---|---|
If you are using JACK transport in the presence of an external JACK Timebase Master, Hydrogen is supposed to be a slave and both Tap Tempo and Beat Counter will be disabled. If Hydrogen itself is the JACK Transport Master, tempo changes from Hydrogen will be broadcasted to other JACK clients. |
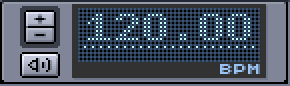
Set the speed of the song in the range from 10 to 400 bpm (beats per minute).
| Tip |
|---|---|
You can use the mouse wheel to decrease and increase the value of this widget. |
In addition you can use
 to toggle the metronome.
| Tip |
|---|---|
The volume of the metronome can be adjusted in the Audio tab of the Preferences. |
If either Rubber Band support is compiled into your current version of Hydrogen or correctly configured in the General tab of the Preferences, you will also find the
button next to the BPM widget. Activating it will enable recalculation of all sample pitches using Rubber Band whenever the tempo of the song will be changed (see Section 12.2 for details.

The CPU bargraph gives you an indication of the CPU load. The MIDI led lights up every time Hydrogen receives a MIDI message.
| Tip |
|---|---|
The MIDI settings can be adjusted in the MIDI tab of the Preferences. |

Clicking
will enable JACK transport. If disabled, Hydrogen will still use the JACK driver and registered audio ports. But it decouples its own transport state from the one of the JACK server and will not be in sync with other clients anymore.
Using
Hydrogen can be registered as JACK Timebase Master and will send additional information, like the current speed, to other JACK
clients. Else it will either act as slave in the presence of another
Timebase Master, like Ardour, or as a stand-alone client in the
absence of a Master.
| Tip |
|---|---|
You can check whether Hydrogen is in slave mode by hovering over the disabled Beat Counter or Timeline. |
| Note |
|---|---|
The support of JACK Timebase can disabled in the Audio tab of the Preferences. This can be useful in the presence of a fault Master broadcasting nuisance information. |

Toggles the Mixer window and the Instrument Rack (containing both the Instrument Editor and the Sound Library).
The LCD screen below displays what Hydrogen is up to and gives an optical feedback of the parameters set in the Mixer.
Table of Contents
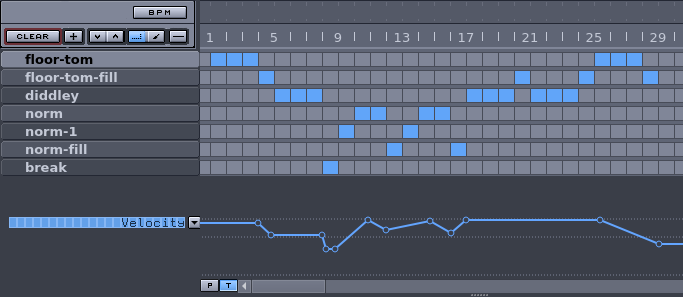
The Song Editor gives an overview of the whole song (e.g. intro, verse, bridge, chorus and so on). Each blue colored square on this panel represents a playing pattern. It gives you complete freedom to add/remove patterns to the song and to move or copy any part of your song.
Columns represent time periods within the song. While they're shown as the same width in the Song Editor, the length of time taken to play through a column is set by the length of the pattern or patterns which are active and playing during that time slot.
Multiple patterns can be active at the same time in a column, and they will play simultaneously. This allows instrument parts to be separated out into different patterns, or to add ornamentation or fills on top of basic patterns without duplicating the basics into both patterns.
In the case of multiple patterns of different lengths in one column only the largest one(s) will be represented by a square. The shorter patterns are indicated by rectangles whose width indicate their length relative to the longest one.
| Tip |
|---|---|
Instead of having the same color for all patterns you can set different colors schemes in the Appearance tab in the Preferences. |

In addition to the transport control provided in the Main Toolbar you can use the song ruler for navigation. This the area above the grid and right of the Main Controls. The position clicked will be rounded to the nearest pattern beginning and transport will be relocated there.
| Note |
|---|---|
Navigation in Hydrogen is always quantized. It is only possible to move forward / backwards or locate to whole patterns. |
| Tip |
|---|---|
You can also locate the keyboard cursor (see Chapter 3) to a desired pattern and press Ctrl + Space to relocate to this position. |

 : deletes all patterns
(asks for confirmation!).
: deletes all patterns
(asks for confirmation!).
 : creates a new pattern (and asks for a name).
 : moves currently selected pattern
up or down.
: moves currently selected pattern
up or down.
Tip You can also drag-and-drop a pattern up/down in the pattern list.
 : enables Select mode (Section 8.2.1).
 : enables Draw mode (Section 8.2.1).
 : sets Hydrogen to Single Pattern mode
 or to Stacked mode (Section 8.2.5).
The Song Editor has two different interaction modes. The default Select mode allows pattern blocks to be set, cleared, selected, moved and copied. The Draw mode instead allows pattern sequences to be drawn freehand.
In both modes, you can perform basic editing: clicking an empty square activates the pattern in that time slot, and clicking again will deactivate it.
They keyboard can also be used for editing. The arrow keys ↑|↓|←|→ will move the keyboard input cursor, and pressing Return will activate or deactivate the pattern in the current column.
In addition, there are two major playback modes, Song mode and Pattern mode, with two minor submodes, Single Pattern mode (covered in the Pattern mode section), and Stacked mode. These will determine which parts of the song you will listen too during playback.
| Note |
|---|---|
While Select mode, Draw mode, Single Pattern mode, and Stacked mode are activated via the Main Controls of the Song Editor, Song mode and Pattern mode are activated via the Transport Control section of the Main Toolbar. |
This mode allows you to select multiple patterns in the Song Editor and delete/move/copy them.
Once you have selected a part of your song you can delete it by pressing Delete. You can move it by simply dragging your selection to another location with your mouse, or by cutting (Ctrl + x) and pasting (Ctrl + v) using your keyboard. You can also copy your selection by either holding Ctrl while dragging it to a new location, or by copying (Ctrl + c) and pasting (Ctrl + v) using your keyboard.
Selections can be modified by holding Ctrl while clicking to select additional blocks, or to remove selected blocks from the selection.
The arrow keys on the keyboard can also be used, along with Return, to select, move and copy parts of the song:
Shift + ↑|↓|←|→ can be used to make selections using the keyboard
Return over a selected block will begin a move or copy
↑|↓|←|→ to move the selected cells into position
Return to move the selected blocks into place
Ctrl + Return to copy the selected blocks into place
Pressing Esc will cancel an editing operation that's in progress, or clear any selection.
This mode allows you to insert patterns by drawing - holding the left button while moving the mouse - blocks on the song canvas.
Clicking a square on the song canvas will add a pattern (the square will turn blue) and clicking it again will remove it. Holding the mouse button down will continue either adding or removing patterns from under the mouse cursor.
Using the arrow keys on the keyboard, and the Return, will also add and remove patterns from the song.
| Note |
|---|---|
The keyboard input cursor is usually hidden unless you press one of the keys listed in Chapter 3. You can alter this default behavior in the General tab of the Preferences. |
When Song mode is selected Hydrogen will play the sequence of patterns you have created in the Song Editor from left to right until it reaches the end of the song.
| Tip |
|---|---|
By enabling Loop mode in the transport control, the playback will move seamlessly to the beginning again after reaching the end of the song. |
When Pattern mode is selected Hydrogen will play the pattern that is currently selected in the Song Editor and displayed in the Pattern Editor. This usual behavior is also called Single Pattern mode.
| Tip |
|---|---|
By enabling Loop mode in the transport control, the playback will move seamlessly to the beginning again after reaching the end of the pattern. |
Normally when composing a pattern and editing it, you'll listen to that single pattern looping over and over again while working on it. Sometimes, however, it's useful to hear that pattern in the context of other patterns (for example, other instrument parts) while working on it.
Stacked mode will play multiple patterns simultaneously, on a loop. You can select which patterns play using Ctrl + left click on the pattern's name. Selected patterns are all marked with a triangle.
| Note |
|---|---|
Hydrogen's playback mode must be set to Pattern rather than Song for Stacked mode to take effect. |
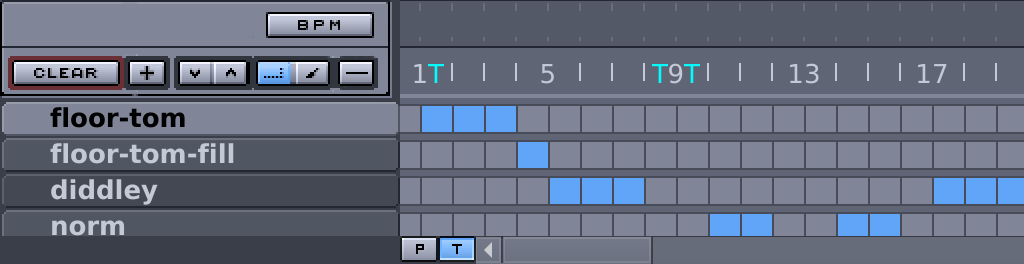
The Sidebar of the Song Editor allows you to interact with and arrange the patterns of your song.
Left-clicking selects a pattern, double-clicking allows you to rename a pattern, drag-and-dropping allows you to rearrange the patterns, and right-clicking will show you a menu where you can change a number of things:
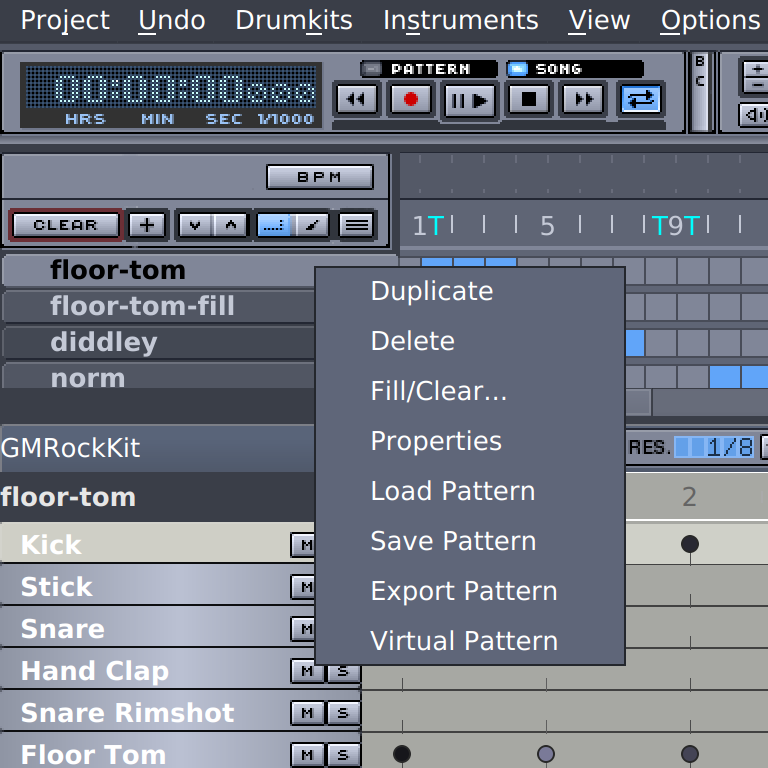
Duplicate: will copy the selected pattern to a new pattern in your song.
Note Note that patterns with the same name are not allowed.
Delete: will completely remove the selected pattern from the song.
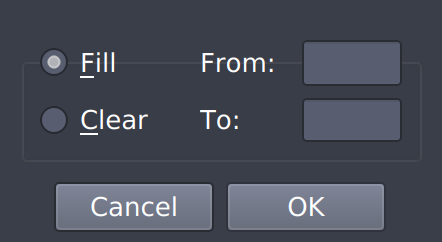
Fill/Clear: will open a window that allows you to fill/clear a part of the song with the selected pattern by entering the start- and end bar.
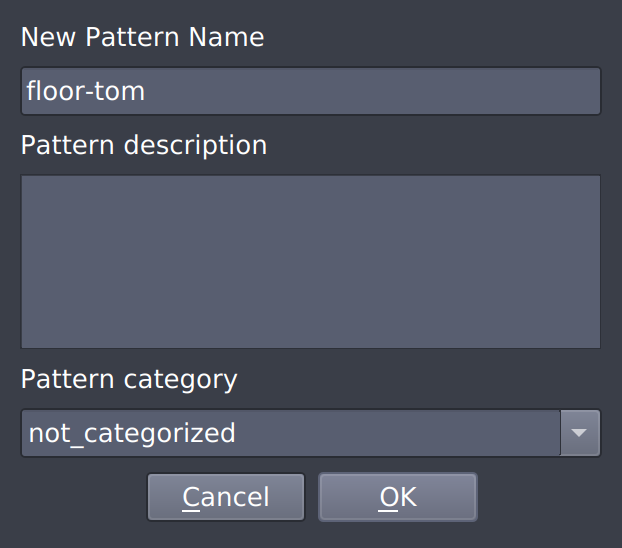
Properties: will open a window where you can change the name of the pattern and also assign it to a certain category. Using the latter you can group pattern in in the Sound Library.
Note Note that you can choose one of the existing categories from the dropdown list, but you can also enter a new category name in the Pattern Category box.
Load Pattern: will load a pattern from a saved pattern file.
Save Pattern: stores the pattern in the
patternsfolder within the Hydrogen data directory (usually$HOME/.hydrogen/data/).Export Pattern: stores the pattern at a location determined via a file browser.
Virtual Pattern: will open the virtual pattern editor.
Virtual patterns are a convenient way of grouping patterns together. For example, say you have a song in which three patterns are always played together at the start of each bar. Previously, the way to do this in the pattern matrix was to explicitly enable the three patterns at each bar.
With virtual patterns we can assign a pattern to be a sort of meta-pattern that implicitly invokes these three patterns together when the new virtual pattern is enabled in the pattern matrix. This way, we only need to set one pattern every bar, instead of three.
Virtual patterns provide a function that's similar to the regular pattern editor, and one could argue that since a virtual pattern is also a regular pattern, we could have just merged the three patterns into this new one. However, the advantage that virtual patterns provide is that if one of the original three patterns changes, the virtual pattern automatically inherits the change. A virtual pattern can also invoke other virtual patterns.

The majority of songs consist of several parts (intro, verse, chorus ...) and often these parts will have a different tempo. Hydrogen provides an easy way to let you change the tempo of a song at any given moment in the song. This is done by adding Tempo Markers to your song.
To add a Tempo Marker you first need to show the Timeline by clicking the
 button at the bottom of the Song Editor or via the View element of the Main Menu and enable it using the
 button. Once this is done
the horizontal bar next to the button changes to a ruler with marks at every bar.
Now simply left-click this ruler at the bar you want the tempo to change and a
window will pop up where you can enter the new tempo.
button. Once this is done
the horizontal bar next to the button changes to a ruler with marks at every bar.
Now simply left-click this ruler at the bar you want the tempo to change and a
window will pop up where you can enter the new tempo.
| Note |
|---|---|
Please note that the ruler will not be available while using the JACK transport in slave mode (see Section 7.5 for details. |

Once you have entered the new tempo and clicked OK, the tempo change will show up on the Timeline. If you click the Tempo Marker again you can edit the tempo, change the bar or delete it.

In addition to altering the tempo when the song switches from e.g. the intro into a verse, it is also very handy to have a clear indication of more general changes or special events in the song. For this purpose you can also add Tags to the song. These Tags are short text messages you can add at any given moment that will be displayed whenever the song playhead passes by that Tag.
To add a Tag middle-click on the song ruler (just below the Timeline) and a window will pop up that allows you to add text for any bar.
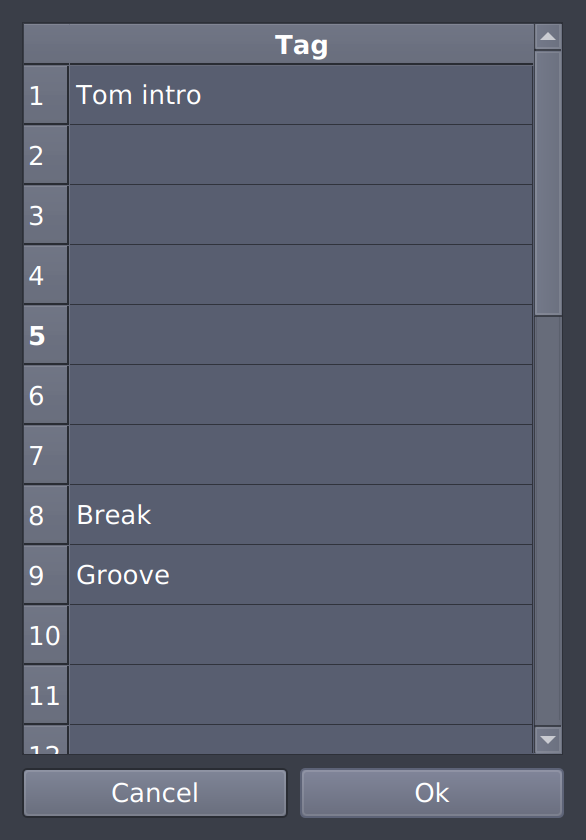
Once you are done you will see a small blue T in the song ruler for every Tag
you have entered. Middle-click anywhere on the song ruler to edit the tags.
Using the Playback Track you can program your song alongside an existing audio file, for example a guitar track.
| Note |
|---|---|
When a Playback Track is loaded, it will be played back every time audio transport in Hydrogen is rolling and Song mode is activated. |
To add a playback track to your song, you need to enable the playback track view. This can be done by either pressing the
 button left to the scroll bar at the bottom of the Song Editor or via the View element of the Main Menu.
Left to the wave display, the controls of the Playback Track are displayed.
Edit: loads an audio file.
Tip As an alternative, you can load an audio file by dragging it into Hydrogen and dropping over the wave display.
Mute: mutes the Playback Track.
Fader: adjusts the volume. You can think of this fader as the mixer strip of the Playback Track. The resulting audio will be pass the Master section of the Mixer like any other strip too.
| Note |
|---|---|
In its current implementation the Playback Track does hide the song ruler used for navigation. It is therefore advised to hide the Playback Track again once you are done setting the sound file and adjusting its volume. |
The Automation Path allows you to control the overall velocity of all notes throughout the song. It can be viewed using the shortcut Alt + A or via the View option of the Main Menu.
Clicking the graph area introduces a new point determining when and to which value the velocity will be changed. Currently only linear interpolations of the velocity between the individual points are supported. You can drag a point to move it and you can delete one by dragging another point over it and "absorbing" it.
| Note |
|---|---|
Whether the Automation Path is hidden or shown does not affect its activation state. It is always active and can't be disabled. But in its default setting it won't alter anything. In its current implementation you have to reset the Automation Path to its original state manually in order to disable it. |
Table of Contents
This is where it all happens, this is where you can make music :-)
The Pattern Editor
allows you to create and modify the pattern selected in the Sidebar of the Song Editor by adding/removing notes and tuning
a number of per-note properties, like velocity and pan.
The Pattern Editor
can be used in two modes: as Drumkit Editor or as Piano Roll Editor. You can switch between these
two by clicking the
 button (located on the top-right of the Pattern Editor).
| Note |
|---|---|
If you are editing a pattern in Single Pattern mode you will always hear the pattern you are editing when you playback is rolling. If you are working in Stacked Pattern mode you will hear the active pattern(s), not necessarily the pattern you are currently editing. The active patterns have a small triangle next to the pattern name in the Song Editor. (see Single Pattern and Stacked mode for details). |

The top part of the Pattern Editor contains a number of controls applying to both the Drumkit Editor and the Piano Roll Editor:
 : lets you choose the length of the pattern (in note values).
It will open a dialog to enter the new size as text, in the standard music fractional notation:
Type / to separate numerator and denominator.
If you enter just the numerator (e.g.
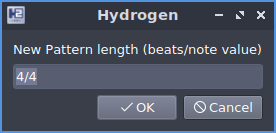
4), the current denominator will be assumed. You can enter a decimal numerator (e.g.4.5/4) but since Hydrogen resolution is limited, some values are not supported and will be approximated.Note Hydrogen supports (only) the following denominators:
1,2,3,4,6,8,12,16,24,32,48,64,96, and192because these are the factors of the maximum resolution (192 ticks per whole note). You can use unsupported denominators, but the size will be approximated almost all the times, hence a warning icon will appear: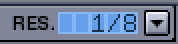 : this is the current grid resolution (
1/4through1/64with triplet-based resolutions marked as1/8T).Note If you are working with a resolution of
1/16you can't go back to8and remove an upbeat 16th note. On the other hand if you are working with a resolution of8and you try to insert a note in the middle of two bars (looking for a16bars precision), notes will be placed in the previous or in the following 8th bar. This constraint can be removed if you disable the whole grid resolution (chooseofffrom the grid resolution LCD control). Now you'll be able to place notes wherever you prefer. : when enabled Hydrogen
will play back samples as they are being added to the pattern (even if transport is not rolling).
: when enabled Hydrogen
will play back samples as they are being added to the pattern (even if transport is not rolling).
Note When disabled you will still hear the preview sound when clicking on the instrument name in the Sidebar. Be sure to click at the left-most position - where the preview is silent - in case you don't want to get disturbed.
 : enables/disables quantization.
When enabled, beats recorded from MIDI or from the
virtual keyboard will automatically respect the grid
resolution currently applied, just like notes inserted by
clicking.
: enables/disables quantization.
When enabled, beats recorded from MIDI or from the
virtual keyboard will automatically respect the grid
resolution currently applied, just like notes inserted by
clicking. - /
 : switches between Drumkit Editor and Piano Roll Editor.

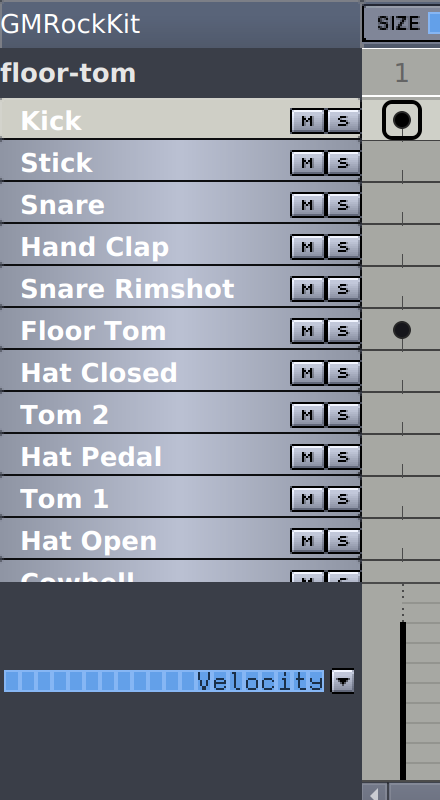
The section on the left shows you what drumkit is currently selected (GMRockKit by default) and below that you can see the instruments that are part of this kit.
Left-clicking the box containing the instrument name will play back a sample of the instrument. Which layer will be select depends on the horizontal position of the mouse click representing zero velocity to the left and maximum velocity to the right. In addition, each instrument has its own set of features that are accessible by right-clicking the instrument. From the context menu that pops up you can select.
Delete notes: removes all notes for this instrument in this pattern.
Fill notes: this allows you to fill up the pattern with notes for the selected instrument.
Note Depending on the choice you make (
fill all,fill 1/2,fill 1/4...) notes will be placed at all, 1/2, 1/4, etc of the note positions that are allowed by the grid setting. So be careful not to mix up the 'musical' 1/2-note and the 'fill 1/2' note.Randomize velocity: automatically apply a pseudo-random velocity to each note of that instrument in the pattern.
Note The more velocity you set on the instrument, the more Hydrogen will hit “hard” on that instrument when played.
Select notes: will select all the notes played on this instrument in the current pattern. They can then be copied, moved etc. in the Pattern Editor main area.
Edit all patterns: this section of the menu has actions which operate on notes played by the instrument in all the patterns of the song.
Cut notes: remove all notes played on this instrument, in all patterns, and keep them in the clipboard.
Copy notes: copy all notes played on this instrument, in all patterns, to the clipboard.
Paste notes : paste a multi-pattern selection from the clipboard to this instrument.
Delete notes: delete all the notes associated with this instrument, without affecting the clipboard.
Tip These can be used together to change the instrumentation of a song, entirely replacing one instrument with another by just copy and pasting the notes to a new instrument.
Instrument: this section of the menu has actions which operate on the instrument as a whole:
Rename instrument: change the name of the instrument.
Delete Instrument: well, deletes the instrument ;-)
The
 button mutes the instrument and
 solos it.
The order of the instruments can be rearranged by simply dragging an instrument up/down in the list and dropping it on a new position within the drumkit. Doing so will not change the sequence of notes you have created for that instrument, nor will it change anything about the song or pattern you are working on.
| Warning |
|---|---|
It will however, have an impact on the MIDI note mapping. |
| Warning |
|---|---|
Rearranging the instruments will also mess up the per-instrument JACK output ports. Be sure to have your drumkit set up before starting wiring. |
Right of the Sidebar area you can see your selected pattern and add notes for any instrument. The simplest way to create a pattern is by adding notes using Fill notes. Where you can add notes depends on the used pattern size and resolution.
If you are using Hydrogen as a pure 'drum' you just want Hydrogen to 'hit' the instrument wherever there's a 'dot' in the pattern. If you are using Hydrogen as an 'instrument', the length of the note becomes very important. There are 2 ways to define the length of a note :
you can add a note by left-clicking, and then can 'stretch' that note by right-click-dragging it. This will change the dot into a rectangle that represents the duration of that note.
alternatively, you can add a stop-note by Shift + left-clicking. This adds a blue dot which represents the end of the note.

(Figure above, from left>right : a 'normal' note, a note in 'note length' mode, a note in 'note off' mode)
As in the Song Editor, the arrow keys can also be used to move around the pattern, and notes can be placed or removed with Return (see Chapter 3).
Notes can be selected by dragging over them with the mouse (or Shift + ↑|↓|←|→), and can be deleted with Delete, or moved by dragging (or Return followed by ↑|↓|←|→ movements) the notes to a new location. This allows notes to be moved between different instruments, or to adjust their timing. Movement in the horizontal direction is constrained by the currently selected grid resolution, however this can be overridden by holding down Alt while moving notes.
Moving a selection of notes with Ctrl held down will copy them to the new location rather than moving, as in the Song Editor.
Selected notes can also be copied to the clipboard with Ctrl + C, and pasted with Ctrl + V. When pasting, the relative positions of the input cursor at the time of the Copy and Paste operation will set the new position of pasted notes.
So far we have only used the mouse or keyboard editing to create a pattern, but you can also record your beats. This is probably a more musical way of creating a pattern, but it's up to you to decide what works best for you.
| Tip |
|---|---|
Also see Chapter 18 for a basic walk-through of how the Pattern Editor works. |

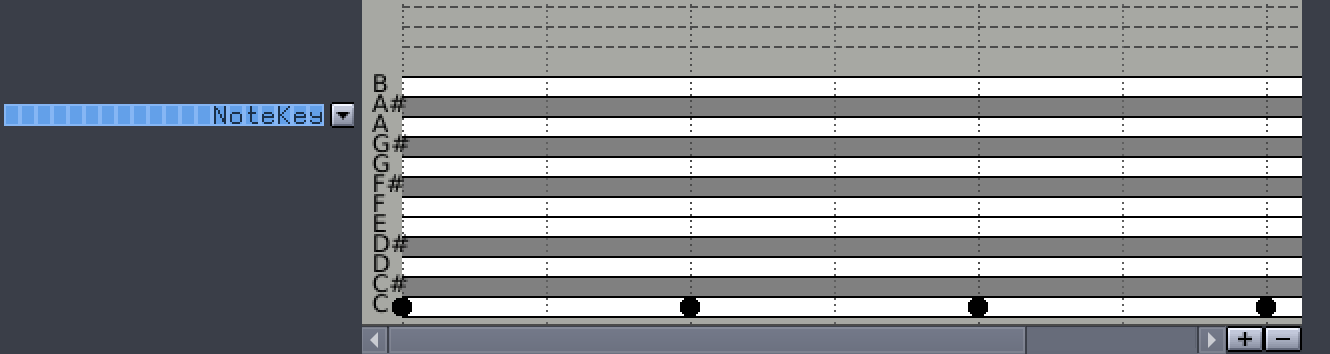
Clicking on an instrument or adding/removing a note associated will select this instrument. Once an instrument is selected all note properties of its notes will be shown in the form of vertical lines in the bottom window. The lines represent the values for the selected property of each note of the selected instrument. You can select a different note-property from the note property drop-down list (located bottom-left).
The following note properties are available:
Velocity: how hard the note is played (the volume of the note). This property also determines which sample of the instrument will be selected.
Note The color of the vertical bar will change according to the velocity value you have defined. A light shade of gray means a low velocity (low volume) and the higher you set the velocity the darker the color will be, turning red when you reach the point of clipping.
Pan: with this property you can move the stereo image position of the note (how loud it will be in the left/right output).
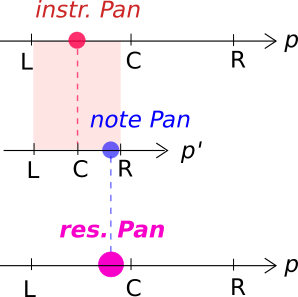
Tip For a detailed description of how this Pan value does interact with the instrument Pan and the Pan Laws in the Mixer please see Pan.
Lead/Lag: Lead and Lag allows a slight note lead or lag in respect of the actual beat. The range is ca. 5 ticks (ca. 1/10 of quarter notes) which equals around ca. 10 ms at a tempo of 120bpm. Changing the lead/lag can make a huge difference to the way your pattern sounds and feels. It's a groove thing ;-)
NoteKey: if you select this note parameter the area where you can modify the parameter will change into a 'piano keyboard'
The striped black and white area represents a piano keyboard and in the gray area you can choose the octave. By moving the dots on the octave scale and the 'keyboard', you can choose any note value.
Note Note that the Piano Roll Editor can also be used to change the note value of existing notes.
Probability: changing the Probability property of a note provides a way for Hydrogen to automatically create some variation in patterns. By setting the probability to less than
1.0, a note may be randomly skipped: a note with probability1.0will always be played, a note with probability of0.0will never be played.
Clicking or dragging the value lines in the Note Properties Editor will set the property value. But often you'll want to set the properties of several notes at once, so there are a few ways to do this.
Drawing with the mouse:
Pressing the mouse button over the first note's property, you can hold down the mouse button and drag over multiple notes. This is great for quickly creating a crescendo from a filled set of notes.
Selecting multiple notes:
The mouse or keyboard can be used to select multiple notes, which can then be modified all together by dragging them together. This can be useful for creating really consistent quiet grace notes. Alternatively, you can use the mouse wheel for a coarse adjustment or combine it with a pressed Ctrl key for fine adjustments.
The Pattern Editor can be used as Piano Roll Editor pressing the Input button.
While the Drumkit Editor focuses on using Hydrogen as a drum machine, you can also use it an instrument via the Piano Roll Editor. It gives you a complete 'piano keyboard' so you can easily put down your tunes.
You can compare the Piano mode to the NoteKey property in the Note Properties Editor. Only here you have a complete piano keyboard, so you don't have to select the octave first.
| Note |
|---|---|
When entering multiple notes in one column - as a chord - the corresponding symbol in the Drumkit Editor will be prepended with e.g. a |
Table of Contents
The Sound Library helps you manage your drumkits, favourite patterns, and favourite songs. When making new songs or drum kits, it allows you to reuse and mix instruments and patterns from other kits and songs.
It is located in the Instrument Rack in the lower right corner of Hydrogen, which can be shown or hidden via the View option in the Main Menu or via the corresponding button in the Main Toolbar. The Instrument Rack does either show the Instrument Editor or the Sound Library depending on what is chosen in the View option in the Main Menu or the corresponding buttons at the top of the Instrument Rack.
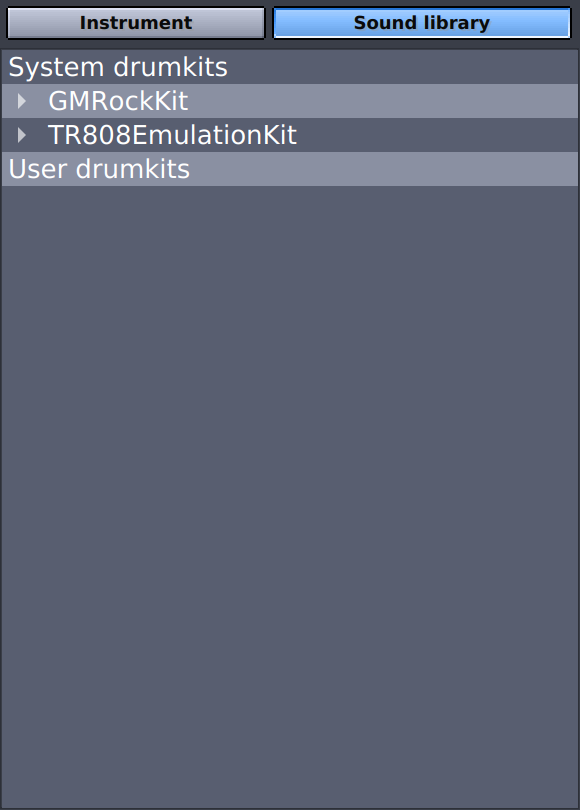
The list of drumkits comprises both the kits present at system level and the ones at user level.
The System drumkits are those installed with your package manager or when compiling Hydrogen manually. Their location is determined by the compile-time prefix. On
Unix-like operating systems, this is usually /usr/share/hydrogen/data/drumkits, or
possibly /usr/local/share/hydrogen/data/drumkits.
These kits are available to all users on the system, and you usually have no write access to them.
| Tip |
|---|---|
You can still modify those kids by saving a tweaked version as a user level kit. |
The User drumkits are those which you can manage yourself. They
are stored in the Hydrogen data
directory (usually $HOME/.hydrogen/data/) within the drumkits
folder. When you have
created a new drumkit via New in the Drumkit option of the Main Menu, you can save it using Save As from the same menu. In addition, you can also Online Import a number of drumkits provided by the dev team of Hydrogen.
| Warning |
|---|---|
If you are using Hydrogen for commercial purposes, (creating songs and selling these online or in any other way) you need to pay special attention to the license type of the drumkit(s) you are using. If the exact license is not available for a drumkit, do not assume that it is a Creative Commons (CC) or other open and free license. Even if the kit is CC licensed you should always check with the author before using the kit in your songs. DISCLAIMER : Hydrogen is not responsible for the drumkits that are made available for download by our users, either via the hydrogen-music.org or via any other channel. |
To load a drumkit via the Sound Library, right-click the drumkit and select
Load. This will replace your current drumkit
with the one that you selected. To load a single instrument from that
kit, left-click the ▶ to the left of the
drumkit's name to show all the instruments. With your left mouse
button, click and drag the instrument into your current kit. The
instrument will be added to the drumkit that you currently have
loaded.
To access songs via the Sound Library, you have to put them within the Hydrogen data
directory (usually $HOME/.hydrogen/data/) into the songs
folder.
To remove them, remove the file from that folder.
To access patterns via the Sound Library, you have to put them within the Hydrogen data
directory (usually $HOME/.hydrogen/data/) into the patterns
folder.
| Note |
|---|---|
This is done automatically when using the Save Pattern option in the Sidebar of the Song Editor but not when using Export Pattern via the same Sidebar or Export Pattern As in the Project option of the Main Menu. |
Before you save a pattern, be sure to give it a title and a category. This can be done by right-clicking on the pattern in the Sidebar of the Song Editor, selecting Properties and entering the details. You can use one of the categories already provided, or create your own categories by simply typing in a category name. The category name is important, because the patterns will be filed by category in the Sound Library.
Table of Contents
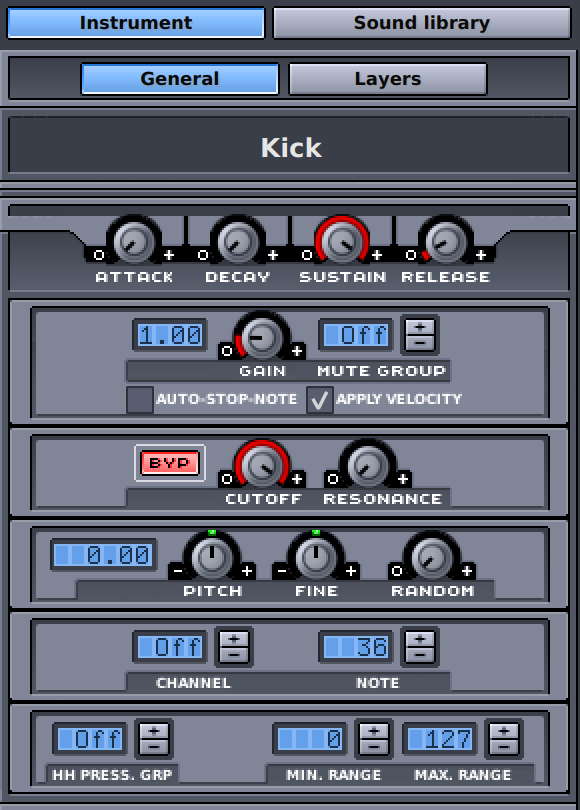
The Instrument Editor is located in the Instrument Rack in the lower right corner of Hydrogen, which can be shown or hidden via the View option in the Main Menu or via the corresponding button in the Main Toolbar. The Instrument Rack does either show the Instrument Editor or the Sound Library depending on what is chosen in the View option in the Main Menu or the corresponding buttons at the top of the Instrument Rack.
When clicking the General button in the Instrument Editor you can adjust several
parameters that apply to the particular instrument (and all its layers) selected in the Sidebar of the Pattern Editor.
| Note |
|---|---|
It's important that you understand Drumkit Concepts and a couple of basic concepts of sound synthesis described in the Glossary in order to continue on. To ease reading, several of the latter concepts are linked in the text. |

When a note associated with this instrument is triggered, its volume is run through an ADSR Envelope. Its particular settings can be adjusted using the envelope parameters located right below the instrument name.
Attack: the amount of time that the volume of the sample goes from 0 to the full velocity of the note. If the value is 0, the sample will play back immediately at full velocity. If the value is 1.0, the sample volume will use the maximum time available for the attack phase.
Decay: the amount of time for the volume of the sample to go from full velocity down to the sustain volume. If the value is 0, the sample will immediately skip from the full velocity to the sustain volume. If the value is 1.0, the sample volume will use the maximum time available for the decay parameter.
Sustain: the volume to play the note after the decay phase is over, and until the note is released. If set to 0, the note will be silent. If set to 1.0, the note will play at full velocity.
Release: the time to fade out the note from the sustain volume back down to 0 (silent). If set to 0, the note will fade out in the minimum amount of time (about 5 ms). If set to 1, it will fade out for the maximum time available.
| Note |
|---|---|
The Attack, Decay, and Release parameters are all set by the number of audio samples. This means that the time changes depending on the sample rate of your sound card. The max time for each of them is 100,000 audio samples (type. 2.27 sec at 44.1 kHz). |
If the sample is shorter than the times that you specify, the sample will end, regardless of which phase of the ADSR it is in. If the note is sustained, it does not draw out the note while you are holding it. It only holds the gain (volume) parameter during that time.

The Gain adjusts the overall volume of all samples associated with this Instrument. This Gain is
applied in addition to the one you set for each layer and before the one
that is set in the Instrument Channel Strips. If the
set to 0, the instrument will be
silent. If the Gain is 1.0, the volume of the samples will not be
adjusted. If the Gain is set higher, the samples will be
amplified.
| Warning |
|---|---|
It is very easy to set the too high, causing your sample to clip. Remember to test the Gain with full-velocity notes. If you clip your signal here, it will only get worse as Hydrogen processes it. |
Hydrogen provides more Mute Groups than you know what to do with (over 256). A Mute Group is a grouping of instruments which's playback is mutually exclusive - only one instrument of the group may be playing at a time. If one is playing and another instrument in the group is triggered, the former will immediately be silence (muted) and the latter starts playing. This is useful, especially, for instruments like hi-hats where the opened and closed sound are incorporated into the drumkit as different instruments.
If the Mute Group is set to Off, then the
instrument is not part of any mute grouping. If the Mute Group is set
to any number, then that is the group that the instrument is a part
of. To set other instruments into the same grouping, set their Mute
Group parameter to the same number. (For example, to group all the
high-hat instruments, you can set all their Mute Group parameters to
1. To have a snare drum Mute Group, set their Mute Group parameters
to 2.)
If the Auto-Stop-Note box is checked, Hydrogen will immediately stop any playing samples belonging to this instrument whenever the instrument is re-triggered, e.g. by another note.
This option is particularly useful when you are using long samples like a crash or some existing audio that you have sampled (like a looped voice in a dance/electro song). For the crash you will need to use the Auto Stop-Note when you are sequencing multiple notes in fast succession and want to make it sound realistic. If you do not check this option the cymbal will start to sound like multiple cymbals instead of only one (since the sample of each individual hit will be played completely). For the voice sample this option is useful if you are trying to get that 'stuttering' effect.
The Apply Velocity box lets the user decide whether Hydrogen should apply the note velocity to the sample being played.
| Tip |
|---|---|
The note velocity can set it the Note Properties Editor. |
When activated, Hydrogen will apply the note velocity to the sample gain in addition to the layer gain, the instrument gain, the component gain, or the instrument volume. If all the layer samples are normalized, this option should be used.
| Note |
|---|---|
By default this option will be selected as this is the way older versions of Hydrogen used to work. |
When not activated, the note velocity will only be used to select the sample to be played, but the sample gain itself will not be changed. This is useful for set of samples that already have their gain "hard-coded".

The filter used in here is a low-pass resonance filter. If you don't wish to
use is, click the BYP button (bypass) so that it's
red. If it's not red, then the filter is active. The cutoff
parameter adjusts the cutoff frequency for the filter. The resonance
parameter adjusts how much to boost to provide at the cutoff frequency. If the
resonance is set to 0, then the filter is just a simple low-pass
filter.
| Note |
|---|---|
The cutoff frequency of the filter varies with the sample rate
of your audio card. The range of the knob |

The first two knobs control the pitch shift offset.
You can use it to change the tuning of the instrument.
Pitch is the Coarse control and has quantized steps of half-tones from -24 to +24.
Fine is the Fine control and has quantized steps of cents of half-tones from -0.50 to +0.50.
The Random parameter allows you to randomly vary the pitch
of the sample every time it is triggered. The value is set between 0
and 1.0.
| Note |
|---|---|
The pitch change is fairly small, almost always between ±1 half-steps ⨉ value. Using this sparingly can help your sequences to sound more like a real drummer. |

Hydrogen is capable of generating MIDI messages that you can use to trigger any external MIDI device or application. To do this, you simply need to configure the MIDI output Channel and Note for every instrument. You need to have a sample loaded (an empty WAV file is fine) and make sure the proper MIDI routing/wiring is in place and you're set. As you can see this is a very flexible approach that enables you to trigger samples or sounds from multiple devices and/or apps.
From now on every time a note is played for that instrument (in the Hydrogen sequencer) a MIDI message will be sent to your external app/device and trigger a sound. This way you can use Hydrogen as a pure sequencer for other apps, or combine the internal Hydrogen sampler with multiple external apps/devices.
| Note |
|---|---|
By enabling Use output note as input in the MIDI system tab of the Preferences dialog the number specified in the Note field will also be used to associate the current instrument with the corresponding incoming MIDI messages. |

The hi-hat is a particular instrument of the drumkit as its sound can be changed by pressing the foot pedal.
For e-drum owners, the hi-hat pressure group enables to group different hi-hat instruments together, for example closed, half closed, fully open.
Pressure Group: you can assign more instruments to the same group. You can create many groups. For example one group for the different opening levels of a hi-hat when playing the top of it, another group when playing the edge. Another example: timpanis - create a group for each timpani and the pressure will change the note.
Range: set the minimum and maximum pressure for each instrument.
Each instrument of a given group should seat in its own separate pressure range.
The range will decide at what pressure level the instrument will be played.
For example, if your closed hi-hat has range from 0 to 20,
when the hi-hat pedal is pressed between 0 and 20 the closed hi-hat is played.
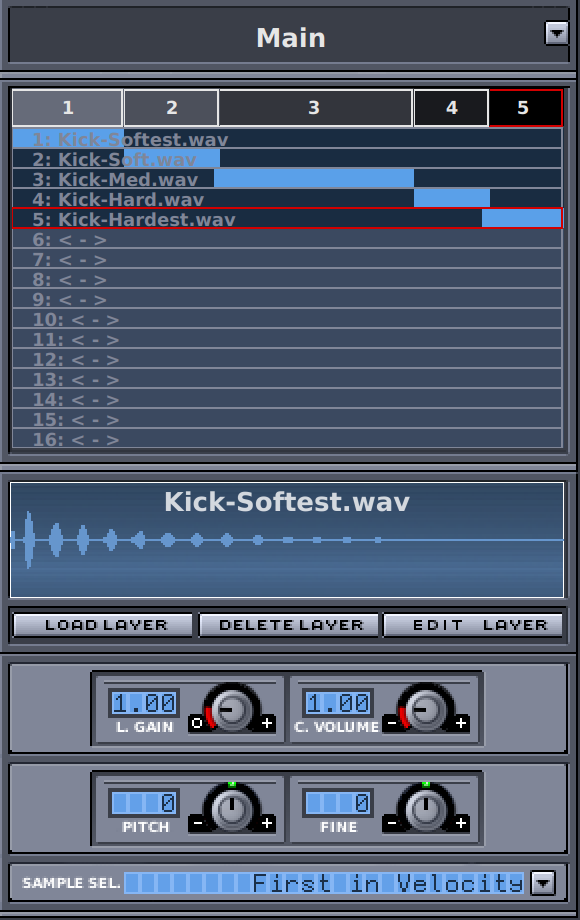
When clicking the Layers button in the Instrument Editor you can adjust the samples and synthesizer parameters of the particular layers of the instrument selected in the Sidebar of the Pattern Editor.

Right below the General and Layers button you find the name of the currently selected component. In the drop down menu accessible by pressing
 you find a list of all components available in the current drumkit and can select them via a left click. Below a separator you can also find three options to
 add a new component, delete the current one, or rename the current one.
| Warning |
|---|---|
The components are shared by all instruments. This means deleting it will delete it including all associated layers from a all instruments and not just the currently selected one. |
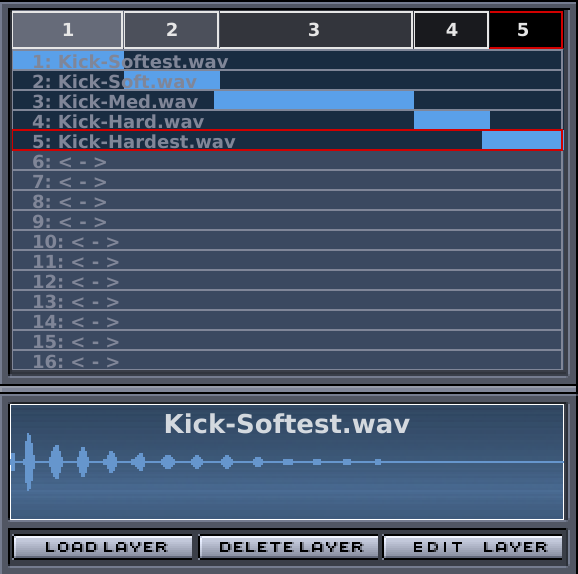
Next you find a listing of all layers of the current component in the selected instrument. The wave form of the sample loaded to the currently selected layer (the one enclosed by a red rectangle) is displayed below.
| Note |
|---|---|
Empty layers will be displayed as |
Using
 you can load a sample into the currently selected layer, using
 you can delete the current layer, and using
 you can open the Sample Editor to customize the sample loaded to the currently selected layer.
| Tip |
|---|---|
Alternatively you can also double-click the wave display to open the Sample Editor. |
| Note |
|---|---|
When loading a sample it will per-default have its active area set to the whole velocity range. By checking the Set auto velocity option all layers will be assigned an equally sized velocity range corresponding to their layer number (the top-most layer will have a range starting a zero velocity and the bottom-most one that ends at maximum velocity). Note however that this option will overwrite all existing velocity ranges. |
Above the layer listing you find boxes in different shades of grey indicating which range of note velocity will trigger which sample (left: 0 velocity, right: maximum velocity). Left-clicking on any of these boxes will play back the sound of associated sample modulated by the velocity corresponding to the horizontal position of the mouse cursor.
| Tip |
|---|---|
This will be quite handy when adjusting the velocity ranges of the layers. |
You might have already noticed in the picture above or for shipped drumkits in the Hydrogen GUI that a layer row contains a light blue rectangle that those not quite fill the whole row. This rectangle indicates the range in velocity the associated sample should be triggered. This way you can separate samples for soft hits, regular hits, and so on for each instrument (component). Whenever two rectangles do overlap a triggered note with a velocity within this shared range will consult the Sample Selection to determine which sample will be played back. You can adjust the velocity ranges of each layer by left-clicking the left or right end of the light blue rectangles and dragging it to the desired position.
| Note |
|---|---|
If there is a(n accidental) hole between two adjacent velocity ranges, the layer closest to the triggered velocity will be used. |

Having a set of samples containing different sample versions of similar sound for the same note velocity is a good way to make your drumkit sound more natural. After all, drummers for example never hit the drum set twice the exact same way.
Hydrogen tries to emulate this behavior by providing multiple layers with overlapping velocity ranges. How the selection of the resulting sample will take place is for you to decide using the Sample Sel. dropdown menu at the bottom of the Instrument Editor.
First in Velocity: will select the first sample available in the velocity set - the one of the layer most further down in the layer listing.Note This is the way previous versions of Hydrogen were working.
Round Robin: will cycle through the different samples one after another as note a in the same velocity range are played.Random: will select a random sample inside the velocity range for each note played.
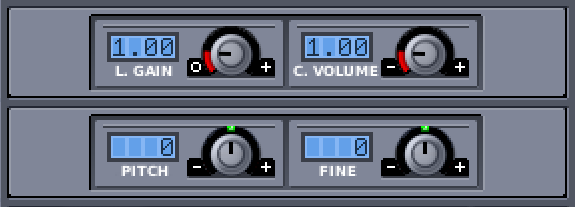
Layer Gain: adds Gain for the currently selected layer and the associated sample.
Component Volume: adjusts the volume of all layers within the current component with respect to the ones of the other instruments.
Tip The resulting audio from all layers of each instrument associated with a certain component can be controlled via its Component Channel Strip in the Mixer.
Pitch: adjusts the pitch of the currently selected layer and the associated sample in quantized steps of half-tones from
-24to+24.Fine: adjusts the pitch of the currently selected layer and the associated sample in quantized steps of cents of half-tones from
-0.50to+0.50.
Table of Contents
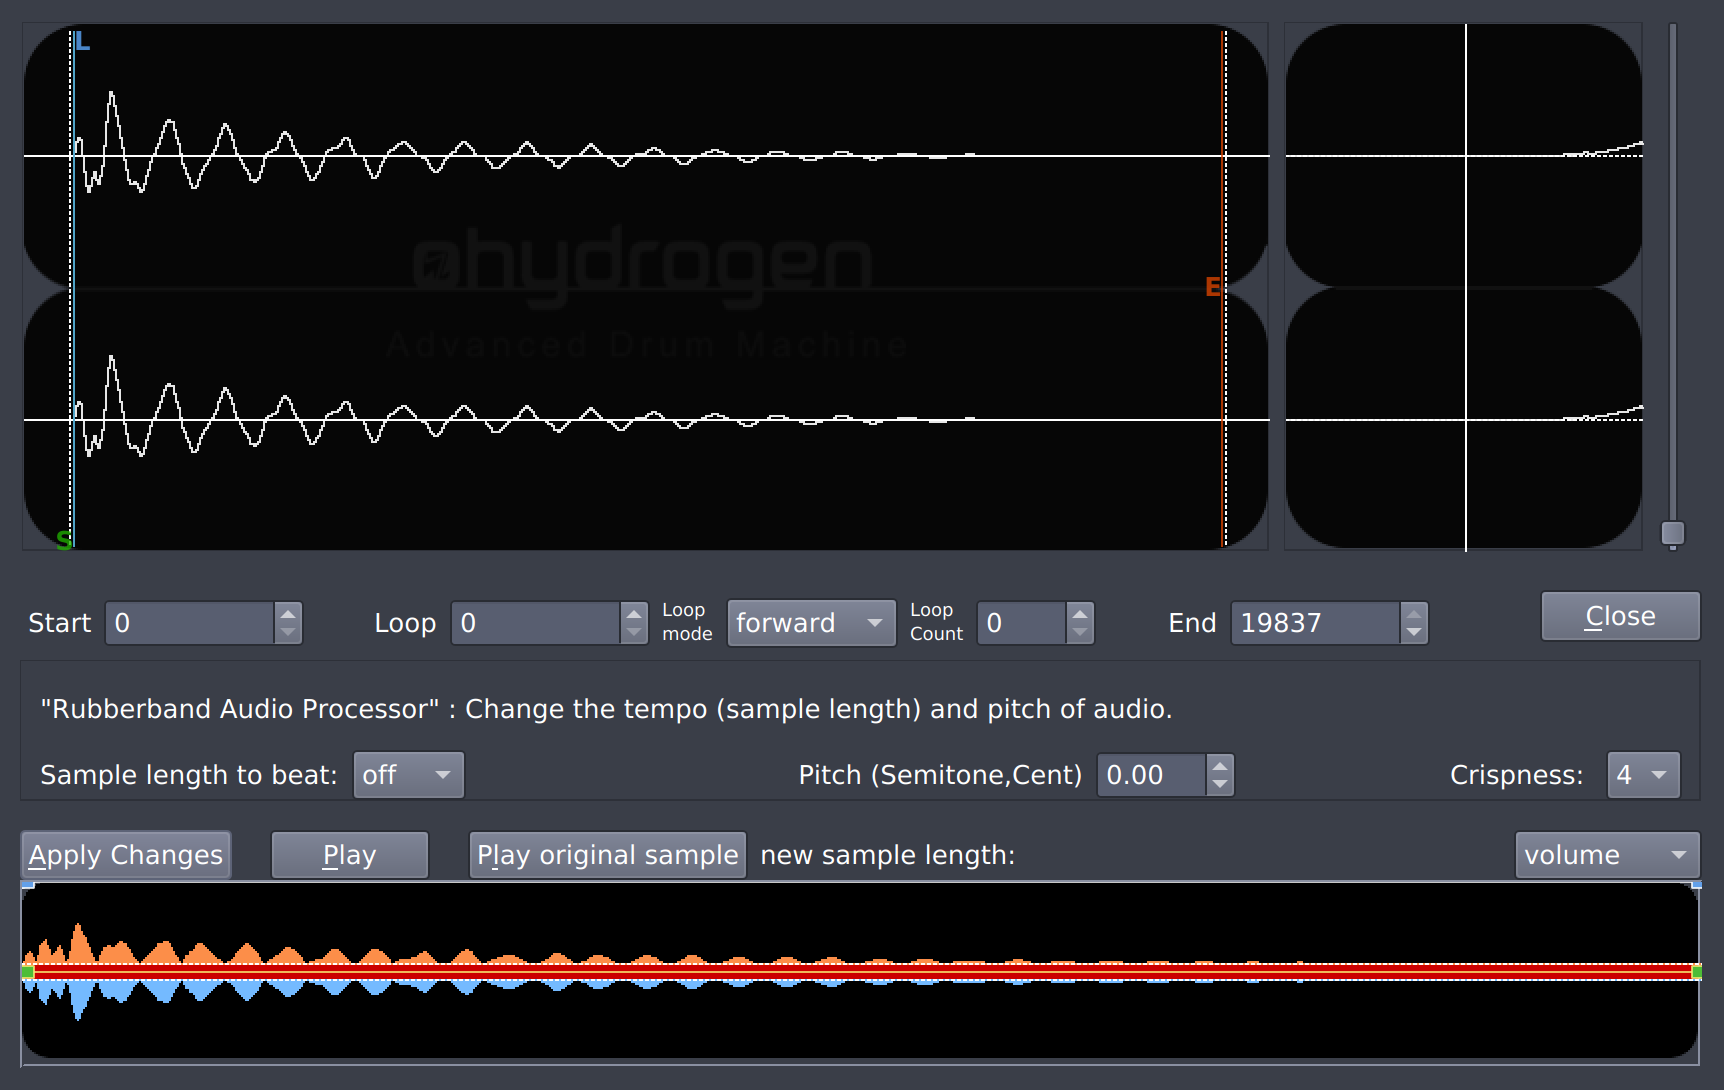
The Sample Editor allows you to tweak and manipulate your
samples. It can be accessed by selecting a layer in the Instrument Editor and clicking the
button. It will really speed up the creation of a drumkit since
you can do the fine-tuning of the samples within Hydrogen and avoid a lengthy import-test-tweak workflow using an external application. This mean less switching between Hydrogen and your audio editor
and more time to make music!
| Note |
|---|---|
The changes you make to your samples in the Sample Editor are non-destructive and are saved per song. So, the original sample will not be changed, and you can reuse the same sample in multiple songs with different Sample Editor settings. |
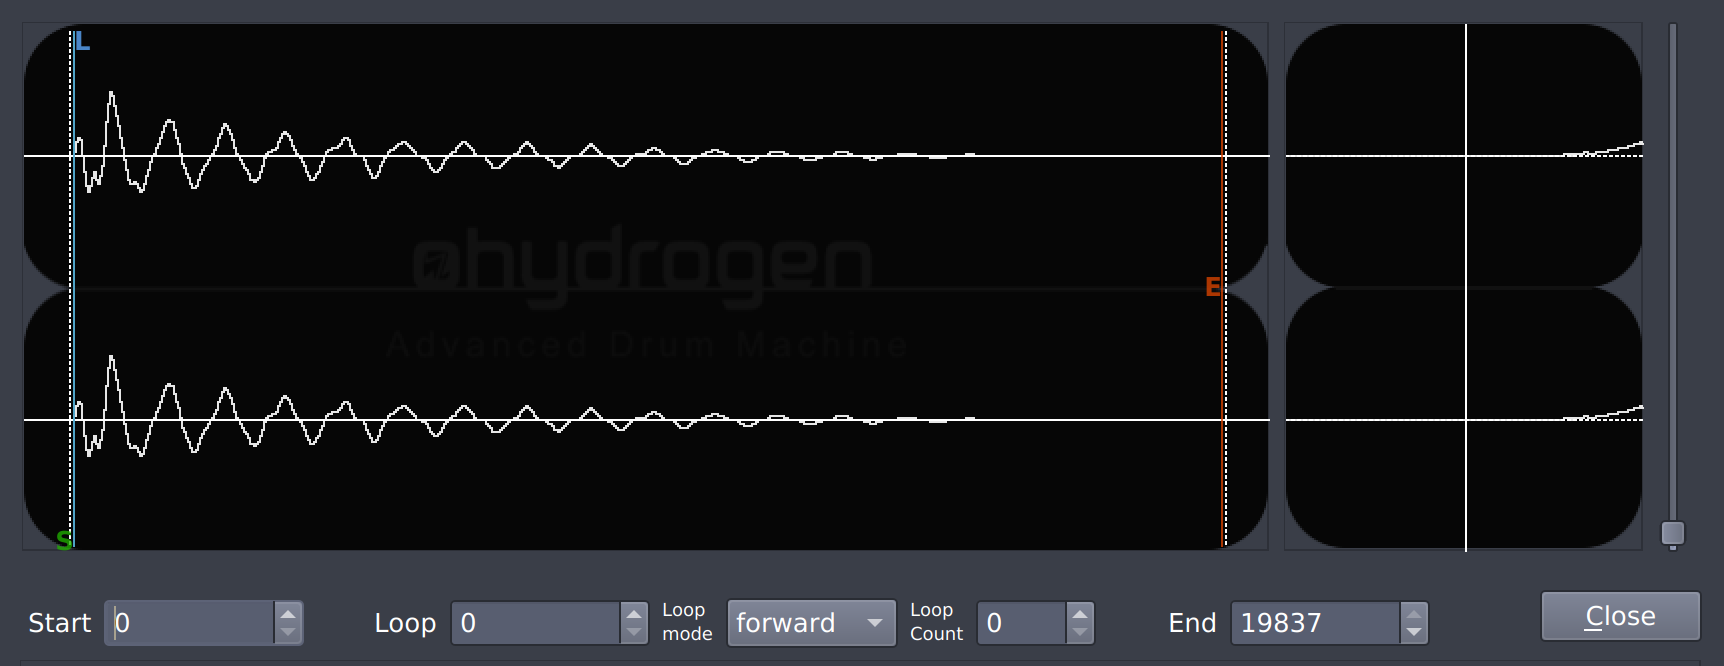
In the larger (left) wave display you can see the wave form of the sample you are about to edit. In there you can set the start, stop, and loop point for the sample by dragging the the 3 markers:
| Tip |
|---|---|
You can easily move one of the markers by grabbing them close to the letter that marks them. |
Underneath you can find a numerical display of the position set for the individual markers as well as some further options. The position of the markers is expressed in number of frames from the very beginning of the sample.
Start: position of the Start Marker.
Loop: position of the Loop Marker.
Loop Mode: specifies the way the individual loops will be played back.
forward: plays the Loop Count loop passages the usual way from left to right.reverse: plays the Loop Count loop passages the backwards (from right to left).ping-pong: plays the Loop Count loop passages alternatively backwards and forwards (starting with backwards).
Loop Count: indicates the number of times the sample will be repeated between Loop and the End Marker. This section will therefore be played back Loop Count + 1 times.
End: position of the End Marker.
Close: exits the Sample Editor.
| Note |
|---|---|
These values will change if you drag the markers, but you can also fine-tune the marker position by using the up/down arrows of the spinboxes, the up/down keys on your keyboard, or by using your mouse scroll wheel while hovering above the spinboxes. |
Whenever you move one of the markers you will see a detail view of the position of that marker on the smaller (right) wave display on the right, making it easy to find the zero-crossings in the sample. This detail window also has a slider next to it that allows you to zoom in and out on the vertical axis. Think of it as a sort of volume 'zoom'.
| Tip |
|---|---|
If you want to hear a preview of the tweaking you have done so far, you first need to press the Apply Changes and then the Play button (both at the bottom of the window) to hear the result. |

This section of the Sample Editor allows you to use Rubber Band - a tool that can change the tempo of a sample without changing the sample's pitch (and vice versa) - to tweak your sample.
| Note |
|---|---|
These options are only available if Rubber Band support was either compiled into Hydrogen or was properly configures in the General tab of the Preferences. After installing Rubber Band you should check if the path to the rubberband cli is configured correctly (see Section 5.1). If neither is the case, all associated widgets will be disabled.
When Sample length to beat is set to |
Sample length to beat: specifies the length of the resulting sample (after Rubber Band was applied to it). After choosing a value other than
offthe length ratio between the original and the resulting sample will be displayed to the right of the combo box under new sample length. To ease the process of finding a proper value, the checkbox will be highlighted green if the length is more or less the same, yellow if there are larger changes, and red if there are significant changes.Tip This should be set to the length of the part of the sample between the Start and End marker, expressed in number of beats.
Note The beat length does dependent on the current tempo of the song. If it is changed, the samples need to be recalculated using Rubber Band again. When exporting a song all required recalculations will be done automatically. But while using standard playback the
button in the Main Toolbar has to be activated to enable the recalculation of all samples on the fly.
Pitch: specifies the resulting pitch of the sample, expressed in
semitones,cent.Note This pitch will affect all instances of the sample in addition to the Pitch Shift Parameters in the Instrument Editor and the NoteKey property of each individual note.
Crispness: fine-tunes the processing algorithm used by Rubber Band. It does not affect tempo or pitch, but changes the way the sample sounds.

The bottom part of the Sample Editor features some basic controls and the Envelope Editor.
Apply Changes: applies all settings of the Sample Editor to the selected sample in a non-destructive way.
Play: plays back the underlying sample with the latest changes applied to it.
Play original sample: plays back the underlying sample (without applying any changes).
panorama/volume: dropdown specifying whether the
pan(orama)orvolumeof the sample will be tweaked in the Envelope Editor.
Using the Envelope Editor you can fine-tune both the volume and panorama (pan) of your sample. This is done by creating envelopes by
| Note |
|---|---|
The volume envelope is blue and the pan envelope is yellow. |
First select
volumeorpanoramain the dropdown to the right.Left-clicking in the Envelope Editor will add a point to the selected envelope or allows you to drag an existing one.
Right-clicking will delete a point.
Hit Apply Changes to make your changes take effect.
Table of Contents
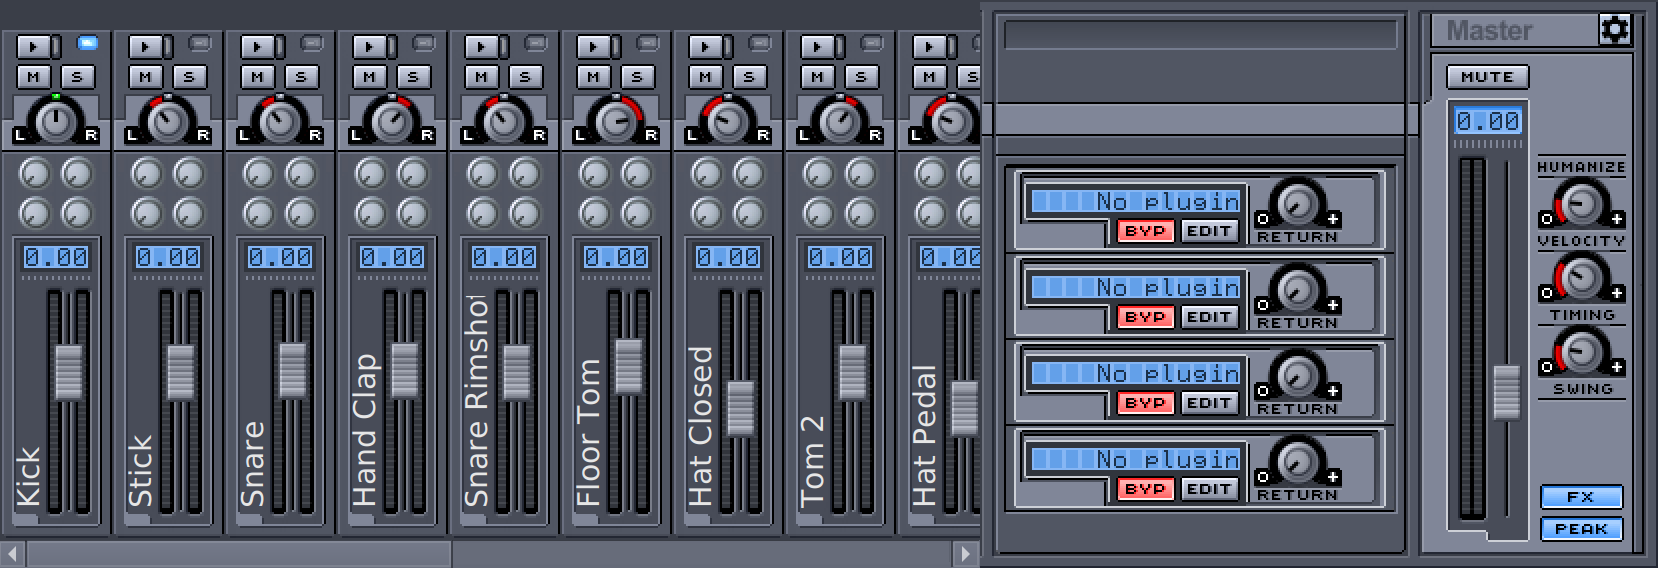
The Mixer window can be opened by pressing Alt + M, by selecting Mixer in the View option of the Main Menu, or by clicking the Mixer button on the Main Toolbar.
The Mixer consists of 3 sections (from left to right): the one containing the Instrument Channel Strips and Component Channel Strips, the FX Plugin Rack, and the Master Fader Strip. The Hydrogen Mixer works very much like a hardware mixer does: it lets you set the volume, pan, FX and several other things for every instrument as well as the volume of all of these sources mixed together.
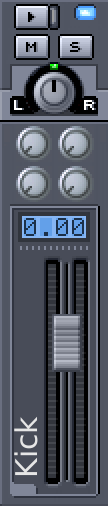
 : lets you trigger the instrument at maximum velocity.
Tip This is quite handy for checking clipping.
 :
lights up whenever this instrument is triggered, e.g. by a note in a pattern or an external MIDI controller).
:
lights up whenever this instrument is triggered, e.g. by a note in a pattern or an external MIDI controller).
 :
shows whether the instrument is currently selected (in both the Mixer and the Pattern Editor).
:
shows whether the instrument is currently selected (in both the Mixer and the Pattern Editor).
Note If the Input mode is set to
Instrument, incoming MIDI events and virtual keyboard keys will trigger only (pitch shifted) sounds of the currently selected instrument.Tip An instrument can be selected by interacting with its Instrument Channel Strip in the Mixer, by interacting with its associated row in the Pattern Editor, or by the corresponding MIDI or OSC command.
- : mutes all sounds related to the instrument (including the preview sound you hear when clicking on the instrument name in the Sidebar of the Pattern Editor).
Note This button is sharing its state with the mute button of corresponding instrument in the Sidebar of the Pattern Editor.
Note This button is sharing its state with the solo button of corresponding instrument in the Sidebar of the Pattern Editor.
 : sets a pan value affecting all note played using this instrument.
 :
the four pre-fader FX send knobs that determine how much of this instrument will be sent to
the effect plugins in the FX Rack.
:
the four pre-fader FX send knobs that determine how much of this instrument will be sent to
the effect plugins in the FX Rack.
Fader and LCD: the fader next to the instrument's name allows you to adjust the volume of the instrument which will be applied on top of all the individual note velocities, layer gains etc. In the background of the fader a volume unit (VU) meter is included representing the instrument's signal level. The LCD displays shows its peak value.
Tip You can adjust the falloff speed of the peak values in the LCD display via the Appearance tab in the Preferences.
| Note |
|---|---|
If the Create per-instrument outputs option in the Audio Engine tab of the Preferences was selected for the JACK audio driver, Hydrogen will register ports for each instrument. All the options described above will only take effect if in addition the Track output option in the same tab as set to This allows you to route the individual instruments directly into any other JACK enabled application, like Ardour, and gives you a lot more flexibility. |
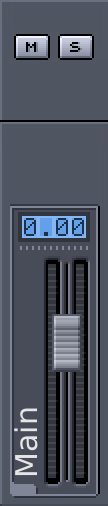
Right of the Instrument Channel Strips there additional strips corresponding to the instrument components.
| Note |
|---|---|
These channels will not be exposed as JACK output ports when enabling the Create per-instrument outputs option in the Preferences. |
- : mutes the instrument.
Fader and LCD: the fader next to the component's name allows you to adjust the volume of all layers (of all instruments) associated with this component. In the background of the fader a volume unit (VU) meter is included representing the instrument's signal level. The LCD displays shows its peak value.
Tip You can adjust the falloff speed of the peak values in the LCD display via the Appearance tab in the Preferences.
The FX Rack can be accessed by clicking the
 button in the Master Fader Strip).
It has 4 bays where you can load a LADSPA effect plugin, but before you can load any plugins these must be installed on system-level.
There are dozens of plugins available for download from various sources:
SWH-Plugins: available at http://plugin.org.uk.
CMT: available at http://www.ladspa.org.
TAP: available at http://tap-plugins.sf.net.
Calf plugins: available at http://calf.sourceforge.net/.
LSP plugins: available at https://github.com/sadko4u/lsp-plugins/.
....
| Plugins Kill |
|---|---|
A badly designed LADSPA plugin is capable of hanging, crashing, freezing, screeching, overflowing buffers, and even phoning home. If you start having issues with Hydrogen, disable your plugins and see if things improve. Some plugins are not designed for real-time use, and some are just plain better than others. |
Once you have installed some plugins you can select one by clicking the
 button.
Now the FX selector window will pop up :
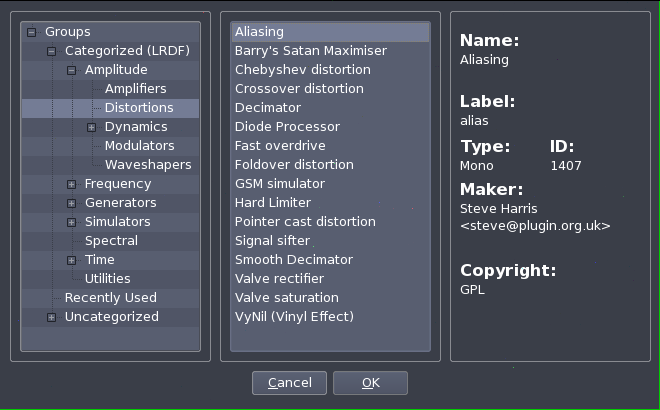
Once you have selected a plugin you will immediately have access
to its parameters:
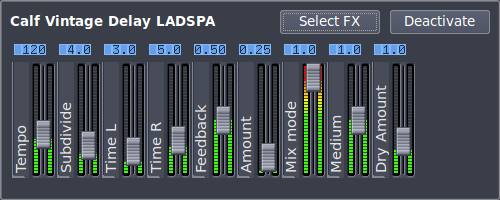
You can select another plugin by clicking the Select FX button. If you quickly want to
enable/disable the effect click the Deactivate button (or the Bypass (
 )
button in the FX Rack).
)
button in the FX Rack).
| Tip |
|---|---|
This can be handy for a quick A/B comparison. |
After you have selected the FX and tweaked it's parameters you can use the Return knob to increase/decrease how much of this FX will be returned to the master output.

The Master Fader Strip contains the Master volume fader with volume unit (VU) meter representing the signal level, and three global humanization settings.
Using the fader you can control the volume of the resulting audio output of Hydrogen which is the sum of all the individual Instrument Channel Strips, the Playback Track, and the Metronome. The
 button mutes the whole output.
On the bottom-right of the Master section the
button will show or hide the FX Rack, and the
 button will enable or disable the VU meters in both the Master Fader Strip and all the individual Instrument Channel Strips and Component Channel Strips.
In order to make the resulting audio sound more natural and less artificial, Hydrogen does offer some humanization capabilities.
| Tip |
|---|---|
Further humanization capabilities are provided via Random Pitch Shift Parameter in the Instrument Editor. In contrast to the global nature of the humanization in the Master Fader Strip this random pitch will only be applied to notes associated with the corresponding instrument. |
Velocity: adds a certain randomness to the note velocity set in the Note Properties Editor. The higher you turn this knob, the bigger will be the randomness.
Timing: adds a certain randomness to the note timing set in the Note Properties Editor (as Lead/Lag). The higher you turn this knob, the more the timing will be randomized.
Note Notes are displaced in time but the pattern duration or BPM do not change.
Swing: this knob will add a certain amount of swing to the song. Swing (a slight time delay) is applied to upbeat 16th-notes, and not to 8th-notes as it happens in traditional Jazz.
This means for instance when setting the resolution of a pattern to
1/16every second note will be affected. If set to1/32instead, every third out of four consecutive notes will be affected. For smaller resolution the swing won't have any effect.Note Please also notice that the amount of lag depends on the current speed as well. The slower the song, the larger is the offset introduced (it scales with 1/tempo).
| Note |
|---|---|
In technical terms both for the Velocity and the Timing a random number will be sampled independently and identically distributed from a Gaussian distribution. The associated knobs provide a linear scaling of the variance of the underlying distribution. |
In the upper right corner of Master Fader Strip there is a small "cog" icon button:
Click it to open the Mixer Settings window:
Here you can select the Pan Law used by Hydrogen Mixer.
The Pan Law is the relationship between the Resultant Pan and the separate gains of left and right audio outputs. The aim is to control the horizontal angle the sound seems to arrive from.
Hydrogen features one the most customizable and accurate Pan Law set.
You will find four categories: linear, polar,
ratio, quadratic.
Every category gives a different "scale" or "sensibility" to the pan knob:
the same knob position will make the sound appear more lateral or central depending on the category,
from the most lateral (linear) to the most central (quadratic).
Then for each category you will find four options, that define a constraint between the gains of the two channels:
Balance Law (0dB): when you turn the pan knob from center to right, the right gain stays constant at maximum level while the left gain decreases from the maximum level to 0 (and symmetrically turning from center to left).
It is ideal for balancing a DUAL-channel track. It has ZERO center compensation: the sound will be louder when the pan knob is at center - unless channels are out of phase - so you may have to readjust the volume manually with the mixer fader.
Constant Power (-3dB): the total power (which is proportional to the square of the gain) is constant for any position of the pan knob.
Compared to the Balance Law, each channel gain is divided by the square root of 2 when the pan knob is at center (-3.0103 dB center compensation). In a common room, this constraint may give the general perception of uniform volume for any pan knob position (panning a MONO track).
Constant Sum (-6dB): the sum of left and right gains is constant for any position of the pan knob.
This constraint preserves the mix volumes in mono export. Compared to the Balance Law, each channel gain is halved (-6.0206 dB) when the pan knob is at center. If you are in an ideal anechoic room (where there are no acoustic reflections) and you seat perfectly at the same distance from the speakers, with this constraint the volume will be really constant for any pan position, because of the linear super-position of sound waves (panning a MONO track).
Constant k-Norm (Custom dB center compensation): you can experiment adjusting the center compensation to your taste!
Tip Some hi-end studio mixers - to be used in well tuned rooms - have center compensation between -3dB and -6dB.
The four constraints should not change the perception of the stereo angle, but the volume only (depending on the pan knob).
The Pan Law is something you should choose before starting the mix and keep untouched. Hydrogen sets the ratio Balance Law by default because it was the only available law until version 1.0 (so old songs and drumkits will sound the same). The setting is saved in the song file but not in preferences, so it is NOT remembered when you create a new song.
| Note |
|---|---|
Unlike in advanced mixers, Hydrogen panning makes no distinction if a track is mono or dual-channel (stereo). You cannot pan each channel of stereo tracks separately, nor use a balance law for them and another pan law for mono tracks. If the drumkit you are using is made of true stereo samples, you don't want a negative center compensation probably, so you should select a Balance Law. |
The Director provides a quick overview of what Hydrogen is currently doing. It can be opened by pressing Alt + D or by via the View option in the Main Menu.
The Director shows you the song name, a visualization of the Metronome, and the Tags. Just below the metronome you can see the latest tag, and below that the next upcoming tag. This way you have a nice overview of what is going on, and what is about to happen in the song.
| Tip |
|---|---|
This comes in very handy when you are recording a song, or if you are using Hydrogen live on stage. |
Table of Contents
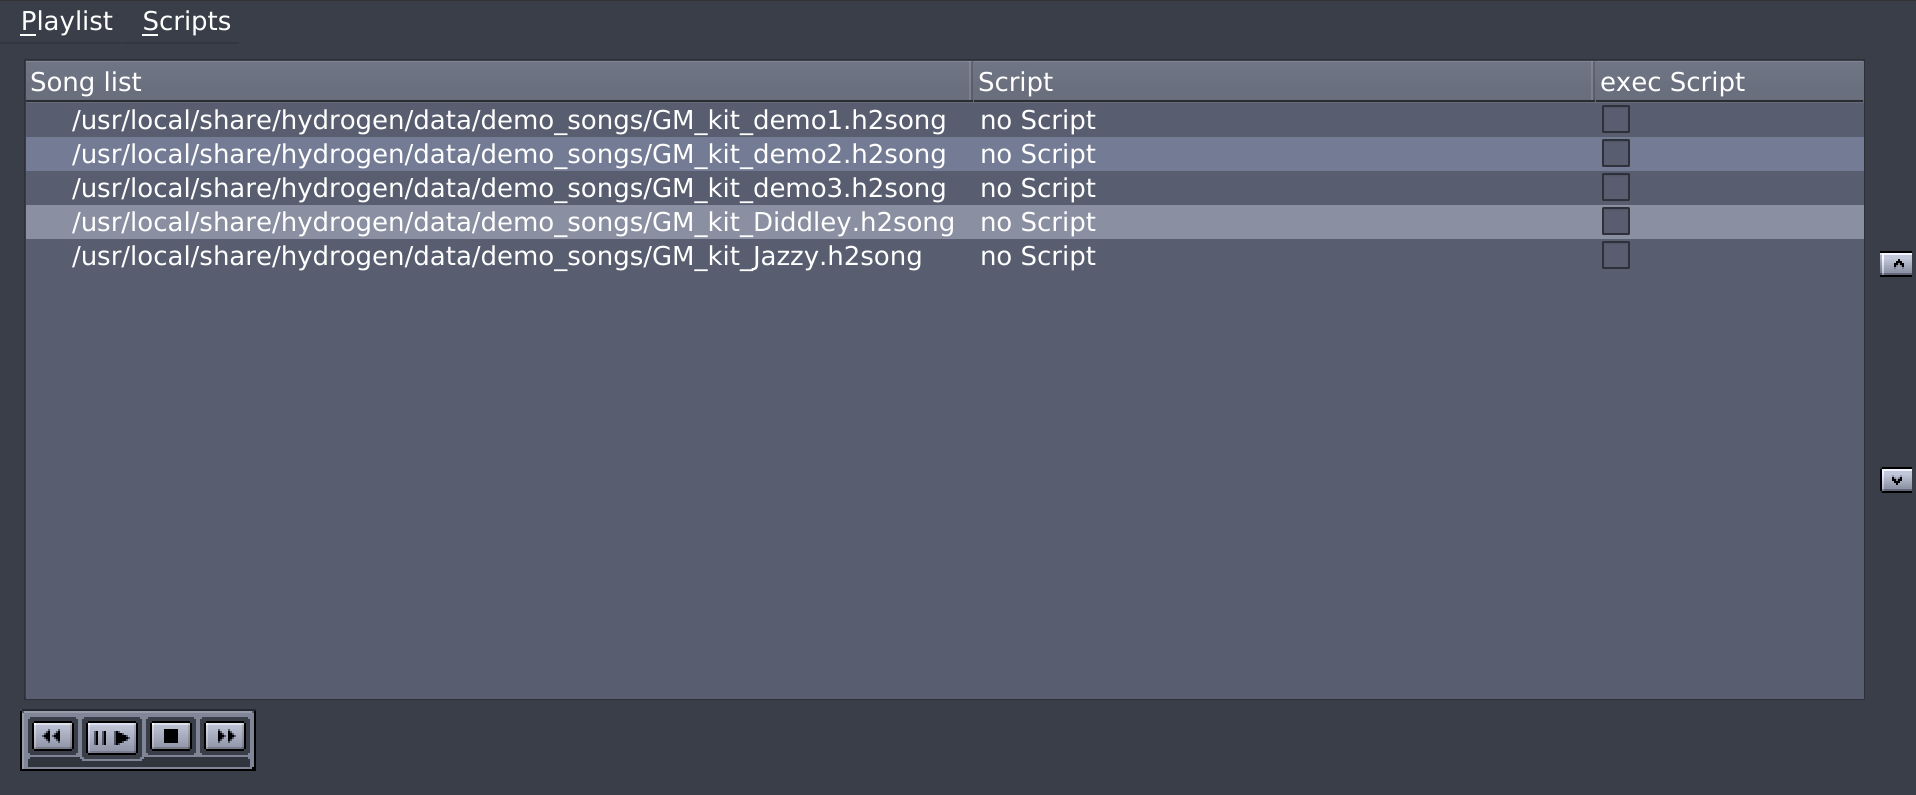
The Playlist Editor allows you to group various songs into a playlist and is intended to ease using Hydrogen live on stage. You can access this window via the View option of the Main Menu.
Using the menu you can add various songs to the playlist and you can arrange their order using the arrow buttons to the right of the widget.
| Note |
|---|---|
When playback reaches the end of one song the next one won't be automatically selected and played! You can select an arbitrary song in the playlist using double left-clicking, by pressing the hotkeys F5 and F6, or the corresponding OSC commands. Also note that selecting a song won't start playback automatically. |

At the bottom of the widget you find a couple of buttons you already know from the Transport Control in the Main Toolbar. They do have the same purposes of starting, pausing, and stopping the playback as well as moving the transport position backwards or forwards by one pattern.
In addition, the Playlist Editor allows you to add scripts executed right before the selected song is loaded.
| Note |
|---|---|
This means that e.g. OSC commands can not be used to change the state of Hydrogen as the subsequent loading of the associated song would reset it immediately. |
The scripts supported in the Playlist Editor are BASH scripts and one has to both add a script to a song as well as to check the corresponding box in the exec Script column in order to have it by your computer whenever you switch to the particular song.
| Warning |
|---|---|
Scripts are not supported in the Windows version of Hydrogen. |
Add song to Playlist: let's you select a song to be added to the current playlist.
Add current song to Playlist: adds the currently loaded song to the current playlist.
Remove selected song from Playlist: deletes the selected song from the current playlist.
New Playlist: creates a new and empty playlist.
Open Playlist: opens an existing playlist (file of type .h2playlist).
Tip In the General tab of the Preferences dialog you can configure Hydrogen to reload the last used playlist.
Save Playlist: saves all changes done to the current playlist.
Save Playlist as: saves the current playlist into a file (of type .h2playlist) and location of your choice.
Add Script to selected song: associates a BASH script (file of type .sh) to the currently selected song of the playlist.
Edit selected Script: opens the selected script with your default editor (in an external window).
Note When using the function for the first time Hydrogen will ask you which program to use as your default editor.
Remove selected Script: removes the selected script from the playlist.
Create a new Script: creates a new and empty .sh scrip at a location of your choice.
Note The default one is the
scriptsfolder in the Hydrogen data directory (usually$HOME/.hydrogen/data/).
In this section you can find more info about how to make Hydrogen respond to MIDI messages. This is either done using the available MIDI Actions or using the MIDI-learnable Widgets, like knobs or faders, both triggered using MIDI Events.
| Note |
|---|---|
Before you can work with MIDI actions you should have your MIDI devices, drivers, and connections configured correctly in the MIDI System tab of the Preferences. Please note that this chapter will only cover the table linking external MIDI Events to Hydrogen's MIDI Actions. For all other parameters of the MIDI API please see the MIDI System tab of the Preferences. |
An MIDI Event is an incoming MIDI message, originating from e.g. a MIDI controller or an external sequencer. A MIDI Action is a function built into Hydrogen that can be used to react to a specific MIDI Event. Binding an Event to an Action can be done using the MIDI System tab of the Preferences.
You can also define MIDI bindings by simply pressing the
 button left of the Event-Action binding line.
A popup will inform you that Hydrogen is waiting for your input. Press/hit/turn
the key/pad/knob on your MIDI keyboard (or controller) that you want to link to
this action. The popup will close and the Event Param. value will now show the
MIDI note value of the key you pressed. Once this is done you can select an Action
from the action drop-down list.
button left of the Event-Action binding line.
A popup will inform you that Hydrogen is waiting for your input. Press/hit/turn
the key/pad/knob on your MIDI keyboard (or controller) that you want to link to
this action. The popup will close and the Event Param. value will now show the
MIDI note value of the key you pressed. Once this is done you can select an Action
from the action drop-down list.
| Tip |
|---|---|
You can also define a binding without the
|
The Action Param. column to the right of the table specifies the input parameter to the Action (see the corresponding Actions reference for details).
Three types of MIDI Events are available (as described in the MIDI standard):
NOTE: an input coming from a regular black/white key of a keyboard or a drumpad.
CC: controller commands coming from faders or rotary controllers.
MMC_x: machine control events coming from buttons, like 'play' or 'stop', on a controller.
| Note |
|---|---|
Some of the MIDI Actions require that the Action Param. is configured. This parameter usually references a specific channel, instrument, FXsend... Keep in mind that its value is zero-based. So, if you want to reference channel 1 you
have to enter |
<<_PREVIOUS_BAR: moves the playhead to the previous pattern/bar.
>>_NEXT_BAR: moves the playhead to the next pattern/bar.
BEATCOUNTER: calculates the average time passing between successive encounters of this commands and uses it to set the current tempo using the Beat Counter.
BPM_CC_RELATIVE: changes the tempo relative to the current tempo, using a controller. Using the Action Param you can specify by how much the current tempo will change. If the incoming Event is
-1(negative), the tempo will be increased and if it's1(positive), it will be increased.Note This Action will have no effect if Hydrogen is both in Song mode and the Timeline is activated.
BPM_DECR: decreases the current tempo by the supplied value.
BPM_FINE_CC_RELATIVE: as BPM_CC_RELATIVE but with changes 100 times smaller than the value specified in Action Param.
BPM_INCR: increases the current tempo by the supplied value.
EFFECTx_LEVEL_ABSOLUTE: changes the volume level of an FX
xprovided as an integer between0and127. The value you enter in the Action Param determines the Instrument Channel Strip the Action will be applied to.EFFECTx_LEVEL_RELATIVE:
Warning Not implemented yet.
FILTER_CUTOFF_LEVEL_ABSOLUTE: for a value of
0it sets the Filter Cutoff of the instrument strip specified using the Action Param to0. For all other values it sets the cutoff to the provided number divided by 127.0.MASTER_VOLUME_ABSOLUTE: sets the Master output volume to the value provided by the MIDI event times 1.5 and divided by 127.
MASTER_VOLUME_RELATIVE: changes the Master output volume, relative to its current setting. For a value of
0it sets the volume of the master fader to 0. For a value of1it increases its volume by 0.05 and for all other values it decreases it by 0.05. (-1: -0.05 ,0: 0 ,1: +0.05)MUTE: mutes the Master output (sequencer keeps running).
MUTE_TOGGLE: toggles the muting of the Master output (sequencer keeps running).
PAN_ABSOLUTE: changes the pan of an instrument determined by the Action Param to the absolute value - from
0to127- that the linked controller sends to Hydrogen.PAN_RELATIVE: changes the pan of an instrument determined by the Action Param relative to the current value. For a value of
1it increase the pan by 0.05. For all other values it decreases it by 0.05. (-1: -0.05 ,1: +0.05).PLAY/PAUSE_TOGGLE: works the same as PLAY if the playback has not started yet and same as. PAUSE otherwise. (The playhead will not return to the start of the song, but will stay at its current position).
PLAY/STOP_TOGGLE: works the same as PLAY if the playback has not started yet and same as. STOP otherwise.
PLAYLIST_NEXT_SONG: opens the song in the current playlist corresponding to the song number specified in Action Param.
PLAYLIST_PREV_SONG: opens the previous song in the current playlist.
PLAYLIST_SONG: opens the next song in the current playlist.
RECORD/STROBE_TOGGLE: toggles recording (same as pressing the record button in the main toolbar).
RECORD_EXIT: deactivates recording.
RECORD_READY: toggles recording (same as pressing the record button in the main toolbar) if the playback has not started yet.
RECORD_STROBE: activates recording.
REDO_ACTION: redoes the previous undone action.
SELECT_AND_PLAY_PATTERN: works as SELECT_NEXT_PATTERN combined with PLAY.
SELECT_INSTRUMENT: selects the instrument in the drumkit corresponding to the number supplied in the incoming MIDI Event.
SELECT_NEXT_PATTERN: switches to the pattern specified in Action Param.
Note If Hydrogen is in Song mode, the command will have no effect.
SELECT_NEXT_PATTERN_CC_ABSOLUTE: like SELECT_NEXT_PATTERN but only take effect in Stacked mode.
SELECT_NEXT_PATTERN_RELATIVE: switches Action Param patterns forward.
Note This Action does only increment the pattern number and will only take effect if Hydrogen is in Stacked mode.
SELECT_ONLY_NEXT_PATTERN: clears the list of patterns scheduled to be played next and adds the one specified in Action Param.
Note If either Song mode or Stacked mode is activated, this action will have no effect.
STOP: stops playback and moves the playhead to the beginning of the song.
STRIP_MUTE_TOGGLE: mutes the instrument specified in Action Param.
STRIP_SOLO_TOGGLE: mutes the instrument specified in Action Param.
STRIP_VOLUME_ABSOLUTE: see MASTER_VOLUME_ABSOLUTE, but applies to the Instrument Channel Strip specified in Action Param.
STRIP_VOLUME_RELATIVE: see MASTER_VOLUME_RELATIVE, but applies to the Instrument Channel Strip specified in Action Param.
TAP_TEMPO: another command calculating the average time passing between successive encounters of this commands and uses it to set the current tempo using Tap Tempo.
TOGGLE_METRONOME: toggles the metronome.
UNDO_ACTION: undoes the previous action.
UNMUTE: unmutes the Master output (sequencer keeps running).
MIDI Events can be mapped to Actions in the dedicated table at the bottom of the MIDI tab of the Preferences Dialog. For more convenient handling some of these Actions are associated with GUI elements and can directly be mapped to MIDI Events by pressing Shift while left-clicking the widget.
Such elements are:
the volume faders in the Instrument Channel Strips
the FX volume knobs in the Instrument Channel Strips
the pan rotaries in the Instrument Channel Strips
the Master Fader Strip in the Mixer
A 'Waiting for MIDI input...' popup informs you that Hydrogen is now waiting for you to press a key or turn/move a controller on your MIDI device.
| Note |
|---|---|
If the element that does not support MIDI automation, a different popup will inform you. |
Table of Contents
Open Sound Control (OSC) is a protocol for communication among programs, computers, and hardware, like synthesizers or multimedia devices, via networking protocols such as UDP or TCP. It can be thought of as a replacement for the MIDI protocol with rich benefits, like supporting symbolic and high-resolution numerical argument data, providing an URL-style naming scheme in combination with a pattern matching language, and allowing to bundle messages for a better handling of timing and simultaneous processing.
Hydrogen is able to receive and send OSC messages. This allows you to control it using various devices, like hardware OSC controllers, smartphones, tablets, or any PC. For Linux-based systems you can use or test these interactions using the command line program oscsend.
$ oscsend localhost 9000 /Hydrogen/NEW_SONG s /tmp/new.h2song
| Note |
|---|---|
To enable OSC support in Hydrogen, open the OSC tab in the Preferences dialog. Make sure that the "Enable OSC support" checkbox is activated, otherwise Hydrogen will not listen for incoming OSC messages. |
| Tip |
|---|---|
Hydrogen's port number defaults to |
| Warning |
|---|---|
oscsend should only be used for sparse interactive testing and control via a command-line. Using it in scripts is not recommended since every time it sends a command it will registers a new client at the OSC server. If the Enable OSC feedback option in the OSC tab of the Preferences dialog is checked, Hydrogen will send its current state to all registered clients causing it to become slower and slower with every oscsend command sent. Soon you will experience visual lags. When unchecking this option, however, using oscsend is fine. |
The syntax for sending the commands is
$ oscsend localhost OSC_PORT_NUMBER COMMAND_URL COMMAND_TYPE COMMAND_ARGUMENT
with the supported types
' ': no argument required
i: int32
f: float32
s: OSC-string (ASCII)
Detailed description of the formats and conventions used in the tables below
ff: two types placed right after each other indicated that the command requires two distinct arguments.
' ',[f]: two types separated by a comma indicate that two versions of the command are available. To support TouchOSC all commands expecting no parameter are available in an alternative version requiring a float too. In the latter version the argument will be ignored and it is placed in squared brackets [f] to indicate its inferiority compared to the non-parametric version.
[0,]: limitations in possible values of the input parameters are indicated in the range column. For continuous values squared brackets [LOWER_LIMIT,UPPER_LIMIT] are used and a limit will be left empty when it is associated with a "natural" boundary, like the total number of instrument or pattern.
{-1;0;1}: sets of discrete values are shown in curly brackets and separated semicolon {VALUE;...} and usually feature the most convenient input options.
1.0: also in order to support TouchOSC all numerical input has to be passed as type float while most of these numbers will be rounded to integers internally. For all true float inputs the range column uses a floating point representation of the limits, like 1.0 instead of 1.
X: all commands ending with a /X/ require this character to be replaced by an integer and do affect only the corresponding instrument, e.g. oscsend localhost 9000 /Hydrogen/PAN_ABSOLUTE/1/ f 0.3. The instrument number starts at 1 and is determined by the order of the instrument in the mixer and pattern editor.
Table 17.1. All OSC Messages
| URL | type | range | description |
|---|---|---|---|
| /Hydrogen/PLAY/ | ' ',[f] | Starts playback. | |
| /Hydrogen/PAUSE/ | ' ',[f] | Stops playback. | |
| /Hydrogen/STOP/ | ' ',[f] | Stops playback and moves the playhead to the beginning of the song. | |
| /Hydrogen/PLAY_PAUSE_TOGGLE/ | ' ',[f] | Works the same as /Hydrogen/PLAY/ if the playback has not started yet and same as. /Hydrogen/PAUSE/ otherwise. (The playhead will not return to the start of the song, but will stay at its current position). | |
| /Hydrogen/PLAY_STOP_TOGGLE/ | ' ',[f] | Works the same as /Hydrogen/PLAY/ if the playback has not started yet and same as. /Hydrogen/STOP/ otherwise. | |
| /Hydrogen/RECORD_READY/ | ' ',[f] | Toggles recording (same as pressing the record button) if the playback has not started yet. | |
| /Hydrogen/RECORD_STROBE_TOGGLE/ | ' ',[f] | Toggles recording (same as pressing the record button). | |
| /Hydrogen/RECORD_STROBE/ | ' ',[f] | Activates recording. | |
| /Hydrogen/RECORD_EXIT/ | ' ',[f] | Deactivates recording. | |
| /Hydrogen/NEXT_BAR/ | ' ',[f] | Moves the playhead to the next pattern/bar. | |
| /Hydrogen/PREVIOUS_BAR/ | ' ',[f] | Moves the playhead to the previous pattern/bar. | |
| /Hydrogen/SELECT_NEXT_PATTERN/ | f | [0,] | If Hydrogen is in Pattern mode, switch to pattern f. If Hydrogen is in Song mode, the command will have no effect. |
| /Hydrogen/SELECT_AND_PLAY_NEXT_PATTERN/ | f | [0,] | Works as /Hydrogen/SELECT_NEXT_PATTERN/ combined with /Hydrogen/PLAY/. |
| /Hydrogen/RELOCATE/ | f | [0,] | If Hydrogen is in Song mode, locates the playhead to pattern number f. If Hydrogen is in Pattern mode, locates the playhead to the beginning of the current pattern. |
| /Hydrogen/BPM_DECR/ | f | Decreases the current tempo by f. Note that this command will have no effect if Hydrogen is both in Song mode and the Timeline is activated. | |
| /Hydrogen/BPM_INCR/ | f | Increases the current tempo by f. Note that this command will have no effect if Hydrogen is both in Song mode and Tempo Marker has been passed. | |
| /Hydrogen/BEATCOUNTER/ | ' ',[f] | Calculates the average time passing between successive encounters of this commands and uses it to set the current tempo using the Beat Counter. | |
| /Hydrogen/TAP_TEMPO/ | ' ',[f] | Another command calculating the average time passing between successive encounters of this commands and uses it to set the current tempo using Tap Tempo. | |
| /Hydrogen/TIMELINE_ACTIVATION/ | f | {0,1} | Activates the Timeline if f is not zero and deactivates it otherwise. |
| /Hydrogen/TIMELINE_ADD_MARKER/ | ff | [0,] [10,400] | Adds a Tempo Marker to the Timeline. The first argument specifies the pattern/bar to at the marker to and the second its tempo. |
| /Hydrogen/TIMELINE_DELETE_MARKER/ | f | [0,] | Deletes a Tempo Marker at pattern/bar f on the Timeline. |
| /Hydrogen/MUTE/ | ' ',[f] | Mutes the Master output (sequencer keeps running). | |
| /Hydrogen/UNMUTE/ | ' ',[f] | Unmutes the Master output (sequencer keeps running). | |
| /Hydrogen/MUTE_TOGGLE/ | ' ',[f] | Toggles the muting of the Master output (sequencer keeps running). | |
| /Hydrogen/MASTER_VOLUME_ABSOLUTE/ | f | [0.0,1.5] | Sets the volume of the Master fader. |
| /Hydrogen/MASTER_VOLUME_RELATIVE/ | f | {-1;0;1} | Changes the Master output volume, relative
to the current setting. For a value of 0 it sets the volume of
the master fader to 0. For a value of 1 it increases its
volume by 0.05 and for all other values it decreases it by
0.05. (-1: -0.05 ,0: 0 ,1: +0.05) |
| /Hydrogen/STRIP_VOLUME_ABSOLUTE/X/ | f | [0.0,1.5] | See /Hydrogen/MASTER_VOLUME_ABSOLUTE/, but applies to the Instrument Channel Strip provided in the OSC command path as X. Please not that this only affects Instrument Channel Strips. Strip volume control for Component Channel Strips is not implemented yet). |
| /Hydrogen/STRIP_VOLUME_RELATIVE/X/ | f | {-1;0;1} | See /Hydrogen/MASTER_VOLUME_RELATIVE/, but applies to the Instrument Channel Strip provided in the OSC command path as X. Please not that this only affects Instrument Channel Strips. Strip volume control for Component Channel Strips is not implemented yet). |
| /Hydrogen/PAN_ABSOLUTE/X/ | f | [0.0,1.0] | Sets the pan of instrument strip X. |
| /Hydrogen/PAN_RELATIVE/X/ | f | {-1;1} | Changes the pan of the Instrument Channel Strip
X, relative to the current value. For a
value of 1 it increase the pan by 0.05. For all other values
it decreases it by 0.05. (-1: -0.05 , 1: +0.05) |
| /Hydrogen/FILTER_CUTOFF_LEVEL_ABSOLUTE/X/ | f | [0,127] | For a value of 0 it sets the Filter Cutoff of the
Instrument Channel Strip X to 0. For all other
values it sets the cutoff to the provided number divided by
127.0. Please note that this parameter is not displayed
anywhere in the Mixer but in the Instrument Rack. |
| /Hydrogen/STRIP_MUTE_TOGGLE/X/ | f | Toggles muting of Instrument Channel Strip X. Input argument will be ignored. | |
| /Hydrogen/STRIP_SOLO_TOGGLE/X/ | f | Toggles soloing of Instrument Channel Strip X. Input argument will be ignored. | |
| /Hydrogen/PLAYLIST_SONG/ | f | [0,] | Opens song f of the Playlist. |
| /Hydrogen/PLAYLIST_NEXT_SONG/ | ' ',[f] | Opens the next song in the Playlist. | |
| /Hydrogen/PLAYLIST_PREV_SONG/ | ' ',[f] | Opens the previous song in the Playlist. | |
| /Hydrogen/UNDO_ACTION/ | ' ',[f] | Undoes the previous action. | |
| /Hydrogen/REDO_ACTION/ | ' ',[f] | Redoes the previous undone action. | |
| /Hydrogen/JACK_TRANSPORT_ACTIVATION/ | f | {0;1} | Deactivated the JACK transport support for a value of 0
and activates it for all others. |
| /Hydrogen/JACK_TIMEBASE_MASTER_ACTIVATION/ | f | {0;1} | Unregisters Hydrogen as JACK Timebase Master
for a value of 0 and registers it for all others. |
| /Hydrogen/SONG_MODE_ACTIVATION/ | f | {0;1} | Deactivated Song mode for a value of 0 and activates it
for all others. |
| /Hydrogen/LOOP_MODE_ACTIVATION/ | f | {0;1} | Deactivated looped playback for a value of 0 and activates it
for all others. |
| /Hydrogen/TOGGLE_METRONOME/ | ' ',[f] | Toggles the metronome. | |
| /Hydrogen/SELECT_INSTRUMENT/ | f | [0,] | Selects a specific instrument in the drumkit. |
| /Hydrogen/NEW_SONG/ | s | Creates an empty song which will be stored at the absolute path s. | |
| /Hydrogen/OPEN_SONG/ | s | Opens an existing song associated with the absolute path s. | |
| /Hydrogen/SAVE_SONG/ | ' ',[f] | Saves the current song. | |
| /Hydrogen/SAVE_SONG_AS/ | s | Saves the current song to the absolute path s. | |
| /Hydrogen/SAVE_PREFERENCES/ | ' ',[f] | Saves the preferences. | |
| /Hydrogen/QUIT/ | ' ',[f] | Exits Hydrogen. |
Table of Contents
Table of Contents
This chapter provides a quick-and-dirty walkthrough to Hydrogen. Refer to the tutorials and the technical Part II of this document for a more detailed overview.
Hydrogen has two main modes: Pattern mode and Song mode. When Pattern mode is activated the current pattern is continuously repeated. This mode is very well suited to tweak your pattern until it's just right, since the pattern you are working on is constantly repeated. This way you can immediately hear the changes you have made. In Song mode the whole song is played. This is useful when putting together the patterns to create the structure of the song.
We'll start from the empty song with an empty pattern created when
Hydrogen starts up: Pattern mode should be selected by default. Now
let's click on the
button in the Main Toolbar, and while the pattern is playing
let's add notes by left-clicking in the grid of the Pattern Editor
(see Figure 18.1). Adjust the grid resolution and tempo if needed.
| Note |
|---|---|
Remember some constraints of the grid: if you are
working with a resolution of |
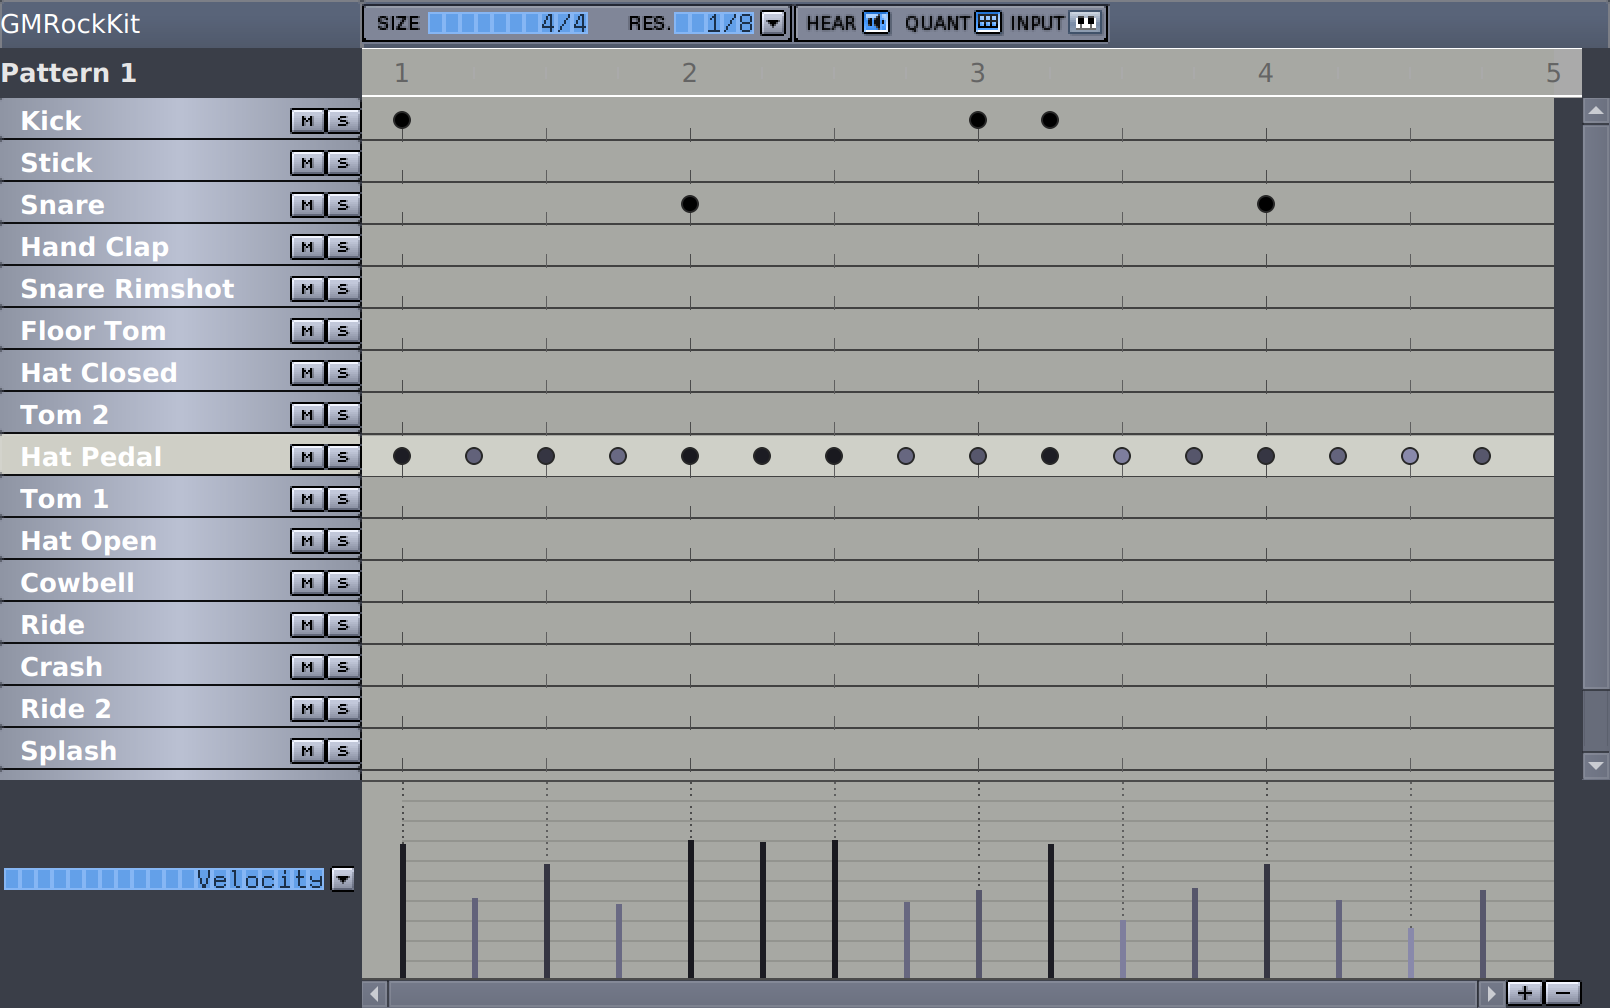
Once patterns are created (Figure 18.2), we can copy/paste/delete them using the Select mode.

Of course we can always use the Mixer window, either when creating or playing patterns.
The Mixer (see Figure 18.3) is made of a number
independent Instrument Channel Strips, each of these is bound to an instrument, plus a
Master Fader Strip and a
button to show and hide the
FX Plugin Rack.
Every line features 3 buttons (
 ), current maximum peak, FX volume control knobs, volume fader, and name of the track. Clicking on
will play the selected instrument, cutting the others. The Mute button
, simply mute that instrument. The maximum peak
indicates the maximum volume reached from the instrument. The peak must
be in a range of
), current maximum peak, FX volume control knobs, volume fader, and name of the track. Clicking on
will play the selected instrument, cutting the others. The Mute button
, simply mute that instrument. The maximum peak
indicates the maximum volume reached from the instrument. The peak must
be in a range of 0.0 and 1.0 (in Figure 18.3 you can
see a few volumes too loud). For a full description of the Mixer and its elements please see Mixer.
| Tip |
|---|---|
Peaks outside that range will get distorted (especially with OSS audio driver). Keep an eye on each VU meter and if distortion appears, turn the volume down for that instrument. |
Table of Contents
In this chapter we will show you how to create a complete drumkit. Be sure to have a look at the conceptional design of a drumkit first. Keeping this in mind we will use a top-down approach, so we will start at the Drumkit level and work our way down to the samples.
Creating a new drumkit with Hydrogen is done with the Instrument Editor. You can load samples, set envelope parameters, set the gain, and other advanced features like mute groups, a low-pass resonance filter, and pitch randomization.
Lets make a brand new drum kit:
in the Main Menu select → . This will give you a single blank instruments. To add more instruments, select → and to delete one, right-click a instrument and select Delete Instrument.
Select an instrument to start editing it. This is done by left-clicking on the name of the instrument in the Sidebar. You will notice that the name of the instrument in the Instrument Editor matches the one that you clicked.
Once you have your drumkit working the way you want, select → . You will be prompted for the name of the kit to save. If you wish to overwrite an existing kit, you will need to type in the same name as the kit that you want to replace.
Drumkits are automatically stored in the
datadirectory (i.e.$HOME/.hydrogen/data/drumkits).In order to share your drumkit with others, you have to export it using → from the Main Menu. Select the drum kit that you wish to export, and give it a file name to save it to.
For each instrument in a drum kit, you can load several samples and set different synthesizer parameters. This section will step you through how to create a new instrument and load the samples. For details about the individual parameters please refer to Section 11.1.
To begin creating an instrument, select → . This will give you a blank instrument to start from.
Now, you need two samples. Any .WAV or .FLAC file will do.
Hydrogen provides several in the data/drumkits folder in the Hydrogen data
directory (usually $HOME/.hydrogen/data/).
In the Instrument Editor, click on Layers.
You can layer several samples into the instrument. Which one is played
depends on the velocity of the incoming note. Click
and point the Audio File Browser to
your sample.
| Note |
|---|---|
The Audio File Browser will allow you to preview the sample before you load it. It will also allow you to load more than one sample at a time. But for now, only load one. |
After you load the sample, you'll see that there is now a
1 at the top, and the topmost rectangle has turned
light blue. To load a second sample, click the slot just below it, and
then click
to bring in another sample.
After bringing in both samples, you'll probably notice that only the first sample is being played whenever you trigger the instrument. This is because you need to set the velocity ranges for the layers. Move your mouse to the sides of the light blue rectangles and you see that you get a left-right drag cursor. Now drag the sample to the left or right (like a curtain). You will now see Layer 2 appear.
The velocity setting for the layer is 0-velocity on the left, and full velocity on the right. Set up Layer 1 to sound for soft notes, and Layer 2 to sound for hard notes, i.e. Layer 1 on the left and Layer 2 on the right (see Sample Selection for further info).
Now, in the Drumkit Editor, set up a simple pattern that plays this instrument. Adjust the velocity settings on each note in the Note Properties Editor so that you can get the different samples to sound. Now, set the playback to loop and notice how your different samples are getting triggered. To learn about editing a pattern, see Chapter 9.
For each layer, you can set the and the . The pitch also has a adjustment.
Use the Gain adjustment to control how loud the sample will be played. This is necessary because it's extremely difficult to get a set of samples that all sound at about the same volume. By adjusting here, the samples that were recorded too quietly can be turned up to match your loud samples (that had to be turned down).
| Warning |
|---|---|
It is very easy to set the too high,
causing your sample to clip. Remember to test the gain with
full-velocity using the
|
The pitch of the sample can be modified with the pitch controls.
The knob adjust the pitch in musical
half-steps. (So, -12 is down 1 octave). The pitch on the right adjusts
the pitch ±50 cents. (One half-step is 100 cents.)
| Note |
|---|---|
The pitch is adjusted by playing the sample back faster or
slower. This is called the Doppler Effect. So, if you have a
1-second sample that you turn down |
You can hear the sample in a layer by clicking the layer id (just below the 'General' and 'Layers' buttons).
With all of the different parameters available to tweak, it can be difficult to set up something that sounds nice when you're done. Here are a few tips on setting up an instrument:
Turn down the gain. Every gain knob (i.e. an amplifier), this is a gain stage. With every gain stage you have, it's easy to overdrive your signal - which means the signal gets distorted by clipping. In addition, if you have two samples that, by themselves, peg your meters - what do you think happens when you combine them? That's right, you overdrive the signal again.
If things sound bad and distorted, start by turning down the gain setting on the layer... especially if it's larger than 1.0. Then turn down the instrument gain. Then any gain on a LADSPA effect. Then the fader on the Mixer. Then the master output fader.
Test samples at full velocity. Your sample will be played louder if the velocity is higher. So, if you set everything to sound nice and full with velocity at 0.7, what will happen when you get a full velocity of 1.0? (Hint: clipping.)
Try to use samples that are -6 dB max. Visually, this means samples that peak at only 1/2 of full scale. Otherwise, turn your layer gain to about .5.
Remove all DC offsets from the sample. In a sample editor, there is usually a line down the center of your sample's waveform. This is the zero-line. The beginning of your sample should be on this line. The end of your sample should also be on this line. However, if your signal is a little above or a little below this line, you will hear a click at the beginning and the end of your sample whenever it is played. If your sample editor doesn't provide any tools to fix a DC offset problem, you can eliminate the noise by putting a slight fade-in/out at the ends of your sample.
The ADSR will not be longer than your sample. If you have a short sample, it doesn't matter how long you set the attack and delay - the sample will stop playing at the end.
Things change with the sample rate. If you have a really nice setup with all your parameters painstakingly tweaked... things will change if you change the sample rate of your audio card. Many of Hydrogen's internal settings and parameters are based on how many samples go by, not on how many seconds go by. The sorts of things that change are: anything time-base (like attack and release) and anything frequency based (like the cutoff frequency).
Typical samples that are used in Hydrogen are: the sound of a single drum hit, the sound of a single cymbal hit, the sound of a single cowbell hit. Whenever you put a note in the pattern (or play a note using MIDI), Hydrogen will play whatever sound you have loaded. So, to put together a drum kit you need to gather short recordings of the bass drum, each tom, each cymbal, the high hat open, the high hat closed, the snare drum (snare on), the snare drum (snare off), rim shots, etc.
However, there are no rules about what a sample can be. It's not uncommon to use Hydrogen to trigger non-drum sounds like: audio clips of people talking, a clip from a song, sound effects, audio clips from movies, and famous people speaking. Be creative!
Table of Contents
Before working with Hydrogen, please familiarize with these file types:
*.h2pattern: XML file describing a single pattern. Patterns are group of beats and are managed in the pattern editor.
*.h2song: XML file describing the whole song (or sequence). Songs are group of patterns with their properties and are manager using the song editor
*.h2playlist: XML file describing a playlist. A Playlist is a (ordered) group of songs.
*.h2drumkit: a compressed and archived folder containing all sound samples composing a drumkit and a description XML file. Drumkits are basically group of sound samples.
Table 21.1. Shortcut Table
| Shortcut | Description |
|---|---|
| Ctrl + N | New Project |
| Ctrl + O | Open File |
| Ctrl + D | Open Demo |
| Ctrl + S | Save Song |
| Ctrl + Shift + S | Save Song as |
| Ctrl + P | Export Pattern as |
| Ctrl + M | Export MIDI file |
| Ctrl + E | Export Song (see Export Song) |
| Ctrl + L | Export LilyPond file |
| Ctrl + Q | Quit Hydrogen |
| Ctrl + Z | Undo an action |
| Ctrl + Shift + Z | Redo an action |
| Alt + D | Show Director |
| Alt + M | Show Mixer |
| Alt + I | Show Instrument Rack |
| Alt + A | Show Automation Path |
| Alt + F | Toggle fullscreen mode |
| Ctrl + Alt + I | Set Input mode to Instrument |
| Ctrl + Alt + D | Set Input mode to Drumkit |
| Alt + P | Show Preferences |
| Alt + ? | Show Manual |
| Backspace | Restart song or pattern from the beginning |
| Space | Play / Pause |
| Ctrl + Space | Starts playback at the current cursor position. If playback is already rolling, it will relocate to the cursor position without pausing or stopping playback. Note that on MacOS this shortcut is bound to Alt + Space. |
| , | Use the Beat Counter |
| \ | Use Tap Tempo |
| + | Increase tempo by 0.1 BPM |
| - | Decrease tempo by 0.1 BPM |
| F5 | Jump to previous song in playlist |
| F6 | Jump to next song in playlist |
| F9 | Jump to previous bar in the song |
| F10 | Jump to next bar in the song |
| F12 | Panic button (stops the song and mutes all playing sounds) |
This is a glossary of general terms encountered when using Hydrogen, synthesizers, drums, or samplers. The definitions here provide more detail and explanation than the simplified ones in the text. For example, the text of the manual would have you believe that an ADSR is the only kind of envelope generator and could only ever control the volume. While the simplified definitions help new users start using Hydrogen quickly, they can lack the nuances presented here.
- ADSR
A type of envelope generator that allows you to control the Attack, Decay, Sustain, and Release parameters. Generally, the parameters are proportional to the velocity.
After you trigger a note, Hydrogen will start the attack phase in which the volume of the note is increase from 0 to its full velocity. After reaching full velocity, the volume will decay until it reaches the sustain level. When the note is released, Hydrogen reduces the volume from the sustain level back down to 0.
In Hydrogen, the ADSR envelope generator only controls the volume (attenuation).
Read more about this in the Wikipedia Article ADSR Envelope
See Also Envelope Generator, Attack, Decay, Sustain, Release.
- Attack
This is the first phase of an ADSR envelope. It represents the amount of time to increase the volume of a note from 0 (triggering) to full velocity.
See Also ADSR.
- Attenuation
In filters and mixers, this the amount that a signal is reduced (volume).
See Also Roll-off.
- Band-Pass Filter
A filter that preserves a certain band of frequencies, and attenuates (silences) all others. This is often done by combining a high-pass and a low-pass filter.
See Also Filter, High-Pass Filter, Low-Pass Filter.
- Clipping
A phenomenon that happens to a signal when its amplitude is too large for whatever is receiving it. The peaks of the signal (which are normally smooth curves) get cut off straight at the max volume (clipped). This distorts the sound and is usually undesirable.
An example of clipping is when you play music louder than your speaker can handle. Parts of the music sound harsh and fuzzy.
- Component
A component is a part of Hydrogen's instrument model. Instrument consist of one or more components, and each component consists of one or more layers.
To make an example: A snare could have two components. One component includes sounds from the top side of the snare drum, and the other component includes the sounds from the bottom side of the snare drum (where the snare wires are fitted). Each component can consist of several layers (snare drum hits with different velocities). Now you can adjust the volume of the two components to build your ideal drum sound. If you want more of the attack, you can put in more of the "top head" component. If you want more of the snare wires, you put in more of the bottom component.
Note Components will be created for all instruments. So, even if you just want to have two of them in the snare you will automatically have two components in all other instruments. If you thus remove an empty component in one instrument, you will remove it for all other instruments - even if they are non-empty - too.
In addition, all layers belonging to the same component do share a common volume fader in the Component Channel Strips in the Mixer.
- Cutoff Frequency
On high-pass and low-pass filters, this is the frequency that divides between those that pass, and those that are attenuated (silenced). In a high-pass resonance filter, or a low-pass resonance filter, the cutoff is also the frequency zone that gets boosted.
For example, if you have a low-pass filter and you set the cutoff frequency high (i.e. 20kHz)... the filter will not affect the sound. All the audible frequencies will pass through undisturbed. As you lower the cutoff frequency to something like 40 Hz (the low string on a bass guitar), it sounds like someone is putting a blanket over the speaker. The higher frequencies are being attenuated above 30 Hz.
See Also Filter, High-Pass Filter, Low-Pass Filter, Resonance Filter.
- Decay
After the attack phase, this is the amount of time for the volume of a note to decrease from full velocity to the sustain level.
See Also ADSR.
- DC-offset
DC offset, or DC coefficient is the mean value of the waveform.
DC offset is usually undesirable. For example, in audio processing, a sound that has DC offset will not be at its loudest possible volume when normalized (because the offset consumes headroom), and this problem can possibly extend to the mix as a whole, since a sound with DC offset and a sound without DC offset will have DC offset when mixed. It may also cause other artifacts depending on what is being done with the signal.
- Envelope Generator
A way to control (change) a parameter over time as a response to triggering, holding, and releasing a note.
Did your eyes just glaze over? Let's try again:
Imagine that you're playing a note on the keyboard and you have your other hand on a knob (volume, filter cutoff, etc.). As you play the note, you twist the knob (often up, then down... or down, then up). You do the same thing on each note. That's what an envelope generator does. See also ADSR
- Fader
A slider control used to adjust the attenuation (volume) in a mixer. Faders always have an "audio" taper, which means that the attenuation amount changes on an exponential scale.
- Filter
A device that changes a sound by attenuating specific frequencies. A tone knob is an example of a simple, low-pass filter.
See Also Band-Pass Filter, High-Pass Filter, Low-Pass Filter, Resonance Filter.
- Gain
In an amplifier, this adjust how much (or how little) a signal is amplified (volume). A higher gain value is a louder signal.
- High-Pass Filter
A filter that attenuates (silences) low frequencies, but allows high frequencies to pass through.
See Also Filter, Cutoff Frequency.
- Instrument
In Hydrogen, an instrument is a single noise-maker (like a bass drum kick, or a tom).
- Layer
In an instrument you can load several different samples (each one called a layer), and have a different sample play depending on the velocity of the note. Only one sample at a time will play.
Suppose you have a sample of a floor tom being struck softly. If you simply play the sample louder - it will not sound the same as a real tom that has been struck very hard. If you wish to mimic this in your instrument, you can load one sample for soft playing, and a different sample for loud playing.
See Also Instrument.
- Low-Pass Filter
A filter that attenuates (silences) high frequencies, but allows low frequencies to pass through.
See Also Filter, Cutoff Frequency.
- Mute
To make no noise. A setting on an instrument that prevents any audio output.
- Mute Group
A group of instruments (samples) out of which only a single one can be unmuted. If another instrument from the same group is triggered, the former one will be muted (stop playing) immediately.
This is typically used in hi-hats, where there's a different instrument (sample) for when the hi-hat is open or closed. With a real hi-hat, the sound of the open hi-hat will stop as soon as you close it. However, if you use two samples - the open sound will continue even after you have triggered the closed sound. By placing both instruments in the same mute group (group #1, for example)... triggering closed sound will immediately stop the open sound (and vice versa).
- Normalization
Normalization is the process of applying a uniform gain to an audio signal in order to make its largest amplitude peak match a predefined value (usually 0dBFS).
- Octave
A span of frequencies where the top-most frequency is exactly twice the frequency of the bottom frequency.
For example, the range 20 Hz to 40 Hz is an octave. So is 120 Hz to 240 Hz, and 575 Hz to 1150 Hz. While the frequency differences are very different (20 Hz, 120 Hz, and 575 Hz, respectively), to the human ear they sound like the same distance.
- Pan
Panning allows you to change the position of both a mono and stereo sample within the stereo sound field of the resulting audio output. In other words, it controls whether the sound of e.g. the snare is coming from the left or right speaker or somewhere in between. With careful pan adjustments of the different instruments you can make you drumkit sound more natural and simulate the feeling of listening to a real kit in close distance.
The effect of note Pan depends on the instrument Pan knob, which is set in the Mixer. Look to next figure to see how the Resultant Pan is determined (from version 1.1):
This multi-pan model resembles a "matryoshka" in some way: the note Pan value moves the Resultant Pan in a smaller pan range centered at instrument Pan, whose extension depends on instrument Pan value. Some examples: if instrument Pan is central, note Pan moves the signal in the whole stereo range (really from Left to Right); if instrument Pan is sided, note Pan moves the signal in a progressively smaller stereo range centered at instrument Pan; if instrument Pan is HARD-sided, note Pan doesn't have any effect.The way the Resultant Pan will be translated into the volume of each stereo channel is determined by the Pan Law in the Mixer settings.
- Release
The amount of time to reduce the volume of a note from the sustain level to 0.
See Also ADSR.
- Resonance
When referring to a resonance filter, this is the parameter that determines how much of a boost (gain) to give the frequencies at the cutoff.
See Also Resonance Filter.
- Resonance Filter
A filter that gives a large boost to a very narrow range of frequencies. Typically it will be part of a high-pass or a low-pass filter, where the boosted frequencies are centered on the cut-off frequency.
See Also Filter, Cutoff Frequency, Low-Pass Filter, High-Pass Filter, Resonance.
- Roll-off
This is the amount that frequencies are attenuated (suppressed) as the frequency changes (typically measured in dB/octave).
For example, in a low-pass filter the frequencies below the cutoff frequency are not attenuated (they pass-through with the same volume). Same with the cutoff frequency. As you go above the cutoff frequency, the frequencies that are near the cutoff frequency are not attenuated very much at all. However, the frequencies that are much higher than the cutoff are attenuated (suppressed) a lot. This is usually approximated by a straight line (on a log scale) and measured in in dB of attenuation per octave of frequency.
See Also Attenuation, Filter.
- Sample
A short recording of a sound, typically between .1 and 3.0 seconds long. Each time a note is triggered within Hydrogen the corresponding sample will be played back (after applying all customization and effects).
- Sustain
The level (how loud; volume) to hold the note between the decay and the release. It is given as percentage of the velocity and does not depend on time.
See Also ADSR.
- Velocity
How hard you hit a note.
MIDI devices are required to send this information along with the note. Synthesizers use this information to adjust several parameters on the sample (typically the volume). In Hydrogen, it is only used to adjust how loud the sample is played back.